Advertisement
Quick Links
ROCAM
R
Alarm Clock with USB Charger
CR1001E
CREATE YOUR PERFECT SLEEP ENVIRONMENT
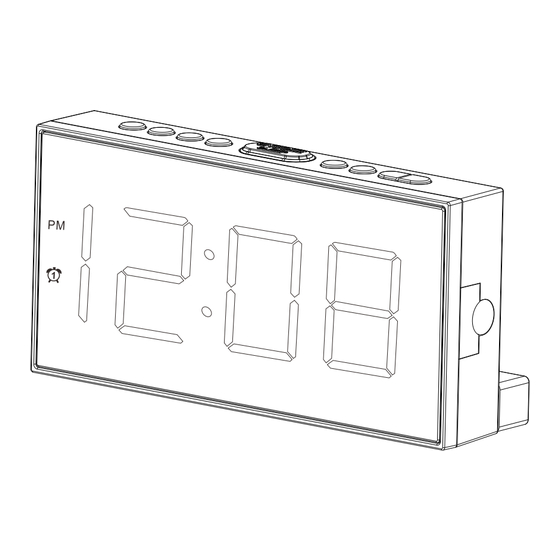
Chapter 1 LOCATION OF CONTROLS
1 2 3
4
5
10
11
12
17
1.Set Time Button
2.Hour Button
4.Dimmer Button
5.SNOOZE Button
7.Alarm OFF Button
8.Alarm 1 Button
10. PM Indicator
11.Alarm 1 Indicator
12.Alarm 2 Indicator
14.12/24H & DST Button
16.Volume - Button
18.USB Port
20.Speaker
Note: Battery is not included
6 7 8
9
15
13
16
14
20
21
18
19
3.Minute Button
6.Alarm Pause Button
9. Alarm 2 Button
13.DST Indicator
15.Volume + Button
17.Battery Door
19.DC Jack
21.Holder ( x 2pcs)
- 01 -
Speak with our Experts
+1 (240) 514-4451
Mon-Fri: 9:00am ~01:00pm PST
8:00am ~12:00pm PST
support@yelaw.net
Http://www.yelaw.net
Chapter 2 POWER RESOURCES
1. Install 2pcs 1.5V "AAA" size batteries to the proper terminals in
the battery compartment to memorize the time setting in case
of power outage.
NOTE: Batteries(not included) don't support time display but can back up
time & alarm setting and trigger an alarm in case of AC power failure.
2. Connect the adapter line to DC jack , then plug into a 100~240V
AC wall power outlet.
Chapter 3 TIME SETTING
SET
1. Press
button once, display
TIME
2. Press
button to set the hour. press
HOUR
the minute.
SET
3. Press
button or
TIME
for another 5 seconds to confirm automatically.
To change 12H/24H time format
Press
button to change 12H/24H time format.
12/24H &DST
Made in China
starts flashing.
button to set
MIN
button to save time or wait
SNOOZE
- 02 -
Version 1.0
Advertisement

Related Manuals for ROCAM CR1001E


Summary of Contents for ROCAM CR1001E
- Page 1 +1 (240) 514-4451 Mon-Fri: 9:00am ~01:00pm PST 8:00am ~12:00pm PST support@yelaw.net Http://www.yelaw.net Alarm Clock with USB Charger CR1001E CREATE YOUR PERFECT SLEEP ENVIRONMENT Version 1.0 Made in China Chapter 1 LOCATION OF CONTROLS Chapter 2 POWER RESOURCES 1. Install 2pcs 1.5V “AAA” size batteries to the proper terminals in...
- Page 2 Chapter 3 ALARM SETTING Turn off Alarm When alarm goes off: (11) will light up, 1. Press button, the alarm indicator ALARM 1. Press button to temporarily turn off alarm for 9 SNOOZE the display starts flickering. minutes. Alarm will ring every next 9 minutes. 2.
Need help?
Do you have a question about the CR1001E and is the answer not in the manual?
Questions and answers