Table of Contents
Advertisement
Quick Links
. . . . . . . . . . . . . . . . . . . . . . . . . . . . . . . . . . . . . .
. . . . . . . . . . . . . . . . . . . . . . . . . . . . . . . . . . . . .
. . . . . . . . . . . . . . . . . . . . . . . . . . . . . . . . . .
. . . . . . . . . . . . . . . . . . . . . . . . . . . . . . . . . . . . . . . . . . .
. . . . . . . . . . . . . . . . . . . . . . . . . . . . . . . . . . . . . . . . . . . . . .
. . . . . . . . . . . . . . . . . . . . . . . . . . . . . . . . .
. . . . . . . . . . . . . . . . . . . . . . . . . . . . . . . . . . . . . . . . . . .
. . . . . . . . . . . . . . . . . . . . . . . . . . . . . . . . . . . . . .
. . . . . . . . . . . . . . . . . . . . . . . . . . . . . . . . . . . . . . . 14
. . . . . . . . . . . . . . . . . . . . . . . . . . . . . . . . . . . . 14
. . . . . . . . . . . . . . . . . . . . . . . . . . . . . . . . . . . . . . . 15
. . . . . . . . . . . . . . . . . . . . . . . . . . . . . . . . . . 15
. . . . . . . . . . . . . . . . . . . . . . . . . . . . . . . . . . . . . . . . . . . . . . . 19
. . . . . . . . . . . . . . . . . . . . . . . . . . . . . . . . . . . . . . . 24
. . . . . . . . . . . . . . . . . . . . . . . . . . . . . . . . . . . . . . . . . . 25
. . . . . . . . . . . . . . . . . . . . . . . . . . . . . . . . . . . . . . . . 25
. . . . . . . . . . . . . . . . . . . . . . . . . . . . . . . . . 26
. . . . . . . . . . . . . . . . . . . . . . . . . . . . . . . . . . . . . . . . . 27
. . . . . . . . . . . . . . . . . . . . . . . . . . . . . . . . . . . . . . . . . 29
. . . . . . . . . . . . . . . . . . . . . . . . . . . . . . . . . . . . . 30
. . . . . . . . . . . . . . . . . . . . . . . . . . . . . . . . . . . . . . . 32
. . . . . . . . . . . . . . . . . . . . . . . . . . . . . . . . . . . . . 32
. . . . . . . . . . . . . . . . . . . . . . . . . . . . . . . . . . . . . . . . . . . . . . . . 34
. . . . . . . . . . . . . . . . . . . . . . . . . . . . . . . . . . . . . . . . . . . . . . 36
. . . . . . . . . . . . . . . . . . . . . . . . . . . . . . . . . . . . 38
© 2022 Roland Corporation
Version 1.21 and later
. . . . . . . . . . . . . . . . . .
. . . . . . . . . . . . . . . . . . . . . . . . . . . . . . . .
. . . . . . . . . . . . . . . . . . . . . . . . . . . . . 10
. . . . . . . . . . . . . . . . . . . . . . . . . . . 12
. . . . . . . . . . . . . . . . . . . . . . . . . 12
. . . . . . . . . . . . . . . . . . . . . . . . . . . . 12
. . . . . . . . . . . . . . . . . . . . . . . . 13
. . . . . . . . . . . . . . . . . . . . . . . . . . . . . . . . 13
. . . . . . . . . . . . . . . . . . . . . . . . . . . . . . . 14
. . . . . . . . . . . . . . . . . . . . . . . . . . 14
. . . . . . . . . . . . . . . . . . . . . . . . . . . . . . . 17
. . . . . . . . . . . . . . . . . . . . . . . 32
. . . . . . . . . . . . . . . . . . . . . . . . . 33
. . . . . . . . . . . . . . . . . . . . . . . . 34
. . . . . . . . . . . . . . . . . . . . . 36
. . . . . . . . . . . . . . . . . . . . . . . . . . 37
2
2
3
4
5
5
8
8
9
9
. . . . . . . . . . . . . . . . . . . . . . . . . . . . . . . . . . . . . . . . . . . . . . . . 48
Using RS-232
. . . . . . . . . . . . . . . . . . . . . . . . . . . . . . . . . . . . . . . . . . . . . . . . 52
. . . . . . . . . . . . . . . . . . . . . . . . . . . . . . . . . . . . . . . . . . . . . . . . . 52
. . . . . . . . . . . . . . . . . . . . . . . . . . . . . . . . . . . . . . . . . . . . . . 53
. . . . . . . . . . . . . . . . . . . . . . . . . . . . . . . . . . . . . . . . . . . . . . . . . 54
. . . . . . . . . . . . . . . . . . . . . . . . . . . . . . . . . . . . . . . . . . . . . . . . . . . . 54
. . . . . . . . . . . . . . . . . . . . . . . . . . . . . . . . . . . . . . . . . . . . . . . . . 55
. . . . . . . . . . . . . . . . . . . . . . . . . . . . . . . . . . . . . . . . . . . . . . . . 62
14: RS-232
. . . . . . . . . . . . . . . . . . . . . . . . . . . . . . . . . . . . . . . . . . . . . . . . 63
. . . . . . . . . . . . . . . . . . . . . . . . . . . . . . . . . . . . . . . . . . . . . . . . . . . 63
. . . . . . . . . . . . . . . . . . . . . . . . . . . . . . . . . . . . . . . . . . . . . . . . 64
. . . . . . . . . . . . . . . . . . . . . . . . . . . . . . . . . . . . . . . . . . . . . . . . . 66
. . . . . . . . . . . . . . . . . . . . . . . . . . . . . . . . . . . . . . . . . . . . . . . . . . 66
. . . . . . . . . . . . . . . . . . . . . . . . . . . . . . . . . . . . . . . . . . . . . . . . . . . . . 67
. . . . . . . . . . . . . . . . . . . . . . . . . . . . . . . . . . . . . . . . . . . . . . . . . . . . 67
. . . . . . . . . . . . . . . . . . . . . . . . . . . . . . . . . . . . . . . . . . . . . . . . 71
. 35
. . . . . . . . . . . . . . . . . . . . . . . . . . . . . . . . . . . . . . . . . . . . . . 74
Reference Manual
. . . . . . . . . . . . . . . . . . . . . . . . . . . . . . . . . . . . . . . . . 39
. . . . . . . . . . . . . . . . . . . . . . . . . . . . . . . . . . . . 40
. . . . . . . . . . . . . . . . . . . . . . . . . . . . . . . . . . 41
. . . . . . . . . . . . . . . . . . . . . . . . . . . 42
. . . . . . . . . . . . . . . . . . . . . . . . . . . . 43
. . . . . . . . . . . . . . . . . . . . . 44
. . . . . . . . . . . . . . . . . . . . . . . . . . . . . . . . . . . . . . . 44
. . . . . . . . . . . . . . . . . . . . . . . . . . . . . . . . 45
. . . . . . . . . . . . . . . . . . . . . . . . . . . . . . . . . . . . . . . . . . . . . 50
. . . . . . . . . . . . . . . . . . . . . . . . . . . . . . . . . . . . . . . . . . . . 55
. . . . . . . . . . . . . . . . . . . . . . . . . . . . . . . . . . . . . . . . . . . 57
. . . . . . . . . . . . . . . . . . . . . . . . . . . . . . . . . . . . . . . . . . . . 58
. . . . . . . . . . . . . . . . . . . . . . . . . . . . . . . . . . . . . . . . . . 59
. . . . . . . . . . . . . . . . . . . . . . . . . . . . . . . . . . . . . . . 61
. . . . . . . . . . . . . . . . . . . . . . . . . . . . . . . . . 61
. . . . . . . . . . . . . . . . . . . . . . . . . . . . . . . . . . . . . . . . . . . 61
. . . . . . . . . . . . . . . . . . . . . . . . . . . . . . . . . . . . 68
. . . . . . . . . . . . . . . . . . . . . . . . . . . . . . . . . . . . . . . . . . 71
. . . . . . . . . . . . . . . . . . . . . . . . . . . . . . . . . . . . . . . . 72
. . . . . . . . . . . . . . . . . . . . . . . . . . . . 72
. . . . . . . . . . . . . . . . . . . . . . . . . . . . . . . . . . . . . . . 73
. . . . . . . . . . . . . . . . . . . . . . . . . . . . . . . . . . . . . . 75
. . . . . . . . . . . . . . . . . . . . . . . . . . . . . . . . . . . . . 76
. . . . . . . 39
. . . . . . . . . . . . 46
. . . . . . . . . . 46
. . . . . . . . . . . . . 47
. . . . . . . . . . . . . . 69
01
Advertisement
Table of Contents

Related Manuals for Roland P-20HD


Summary of Contents for Roland P-20HD
-
Page 1: Table Of Contents
. . . . . . . . . . . . . . . . . . . . . . . . . . . . . 10 Using a USB Keyboard to Operate the P-20HD . -
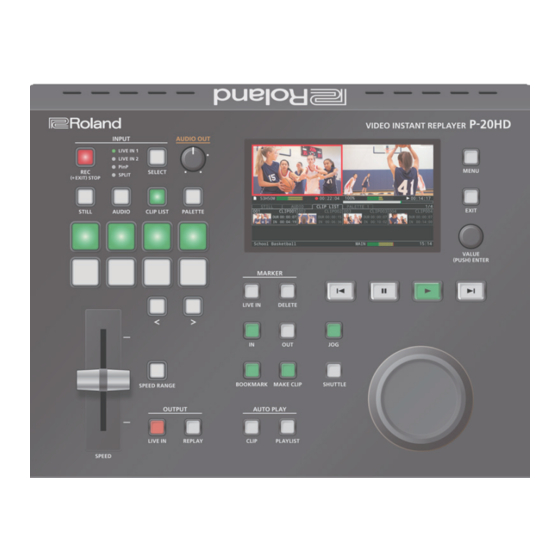
Page 2: Panel Descriptions
Plays back the playlist. Sets the [JOG/SHUTTLE] dial to shuttle mode [SHUTTLE] button (p. 15). Heat from inside the P-20HD is released from these vents. In jog mode/shuttle mode, adjust the frame Cooling vents advance, frame rewind, and playback speed. -
Page 3: Rear Panel (Connecting Your Equipment)
Use these to connect an audio recorder, amplifier, speakers, or related equipment. separately) to this jack. Use this when you want to switch between video using your foot. * Use only the specified expression pedal (Roland EV-5, BOSS Audio FV-500L/FV-500H; sold separately). Connecting any other input jacks expression pedals may cause malfunctions and/or damage to this unit. -
Page 4: Connecting A Footswitch
Panel Descriptions Connecting a Footswitch FS-5U x 2 FS-5U x 1 FS-6 FS-7 Stereo 1/4” phone type 1/4” phone type Stereo 1/4” phone type Stereo 1/4” phone type Ñ Ñ Ñ Ñ Ò Ò Ò Ò 1/4” phone type x 2 1/4”... -
Page 5: Getting Ready
Getting Ready Main Screen This is the main screen of the P-20HD. Name Explanation Displays the preview video for the recording content that is being input. You can also change the input video with the INPUT LIVE IN video preview area SELECT. - Page 6 Getting Ready Name Explanation Shows the playback time (*). Playback time display * This is shown in “HH:MM:SS; frame” format when the system frame rate is 59.94. This is shown in “HH:MM:SS: frame” format when the system frame rate is 50. Displays the playback position within the recording time.
- Page 7 Getting Ready Name Explanation When playing back a clip Shows the playback time from the beginning of the clip. Playback time display The remaining playback time is shown on the preview screen when either a clip or a playlist is playing back. Timeline display The playback position is shown, with the clip length being the total length.
-
Page 8: Turning The Power On/Off
Turn off the power of the output devices first, and Formatting an SD Card then the source devices. Make sure that the SD card you want to use on the P-20HD is properly Turn off the [POWER] switch of the P-20HD. formatted using the P-20HD. -
Page 9: Operating The Menu
¹ If the battery runs out, the message “Battery Error” is displayed. If you see this message, contact the nearest Roland Service Center. Follow the steps: press the [MENU] button Ó “System” Ó select “Date & Time Settings,” and press the [VALUE] knob. -
Page 10: How The P-20Hd Is Organized
Getting Ready How the P-20HD is Organized Project Clip List Palette 1–8 Page 1–64 Page 1–8 CLIP1 CLIP1 CLIP4 CLIP2 CLIP15 CLIP3 CLIP4 CLIP22 CLIP5 CLIP40 CLIP6 CLIP26 CLIP7 CLIP74 CLIP8 CLIP16 Max: 512 Max: 64 Recording Data CLIP1 CLIP2... - Page 11 Explanation Project On the P-20HD, a project is used for managing material (unprocessed content) and operation-related settings as a unit. This is the video data you’ve recorded. Even if video recording is stopped, you can simply start recording again to create a continuous block of data.
-
Page 12: Video Input/Output Settings
List of Compatible Video Formats Setting the System Frame Rate The P-20HD supports input and output of signals in the following On the P-20HD, the input/output format is determined according formats, regardless of the format in which the video was recorded. -
Page 13: Specifying The Input Format (Edid)
EDID data for a specific input format to be sent to the NOTE source device. If the display does not support the output format of the P-20HD, the What is EDID? video may not play properly. EDID is data that is transmitted from the P-20HD to the source Press the [MENU] button Ó... -
Page 14: Creating A Project
“clips” that contain specific time ranges of a recorded video, as well as “playlists” that feature multiple clips that are played back in series. After you turn the P-20HD on, you have the choice to create a new project or open an existing project. Creating a New Project Opening an Existing Project Here’s how to create a new project. -
Page 15: Video Operations
Video Operations Recording and Playback You can play back a previously recorded scene while the P-20HD is recording (chase play). Changing the Playback Speed Press the INPUT [SELECT] button to select the input. Confirm that the video of the input you selected is shown on this Use the [SPEED] lever and the [JOG/SHUTTLE] dial to advance unit’s display and in the upper left of the monitor connected to... - Page 16 Menu item Explanation Wipe Pattern Selects the wipe pattern. The P-20HD lets you seamlessly switch the output between the input Wipe Direction Selects the wipe direction. video (live in video) and the playback video (replay video). Press the OUTPUT [LIVE IN] button or the OUTPUT Press the [MENU] button to close the menu.
-
Page 17: Using Markers (Bookmarks)
Using Markers (Bookmarks) On the P-20HD, you can set up to 64 markers in your recorded video data. You can move between playback positions at which you set the markers, by using the [ô] [û] buttons or by selecting a marker from the marker menu. - Page 18 Video Operations Deleting a Marker (Bookmark) Press the [ô] or [û] button to move the current position to the location of the marker that you want to delete. Press the [DELETE] button. The marker at the current position is deleted. * Markers can only be deleted when the [DELETE] button is lit (when there is a marker at the playback position).
-
Page 19: Using Clips
Video Operations Using Clips With the P-20HD, you can specify a certain time range of a recorded video and use it to create a clip. The clips you create can be used as material for replay. Once you create clips of highlight scenes from recorded video, you can play back these video clips at whatever timing you like. - Page 20 Video Operations Create the clip based on the current recording/ Changing the length of a clip to create playback position You can change the length of the clip to create (the default value is 7 seconds). It’s easy to create a clip by specifying only the OUT point. MEMO By combining this with playback operation of the clip, you can The setting is saved on a per-project basis.
- Page 21 Video Operations Playing back a playlist Playing Back a Clip You can easily play back the clips you create. Press the [CLIP LIST] button to display the CLIP LIST screen. Press the [CLIP LIST] button. Press the AUTO PLAY [PLAYLIST] button. The CLIP LIST screen is shown on the bottom half of this unit’s display.
- Page 22 Video Operations Changing the length of a clip Editing a Clip You can edit the “In Position” and “Out Position” parameters of a clip You can change a clip’s parameters after it is created. to change its start position, end position and length. * You can’t edit clips during playback.
- Page 23 Video Operations Deleting a Clip Here’s how to delete clips you don’t need from the list. On the CLIP LIST screen, select the clip to display the CLIP MENU screen. Select “Delete” and press the [VALUE] knob. A dialog appears, select “OK,” and press the [VALUE] knob.
-
Page 24: Clip List Operations
Video Operations Clip List Operations Creating a Thumbnail Adding Transition Effects You can create thumbnails for many clips all at once that do not yet You can add transition effects between clips when playing back a have a thumbnail. playlist. * The playback position jumps to the IN point to create a thumbnail. -
Page 25: Pad Operations
Pad Operations Using the Palettes On the P-20HD, you can register the clips you have created in eight different palettes and categorize the clips by player, scene and so on according to your tastes. You can also play back the clip list and clips arranged in a palette in series (This is the playlist playback feature). -
Page 26: Other Palette Operations
Pad Operations Editing Clips in a Palette Other Palette Operations If a clip in the clip list is referring to a clip registered to a palette, changing the contents of the clip also changes the clip to which it Creating a Thumbnail refers. -
Page 27: Using Still Images
Pad Operations Playing Back Still Image Clips Using Still Images You can import still images created on your computer as materials Press the [STILL] button. and display those images by pressing the pads. You can overlay still images you have imported onto a video. Press a pad from [1]–[8] corresponding to the position of the still image clip you want to play Supported files... - Page 28 Pad Operations Press the [MENU] button to close the menu. Setting a Still Image Clip For still image clips that are assigned to the pads, you can individually configure the playback-related settings. Press the [STILL] button. Turn the [VALUE] knob to move the cursor and select the still image clip.
-
Page 29: Using Audio Files
Pad Operations Using Audio Files Audio files that you created on your computer can be imported into the P-20HD as materials. The imported audio can then be played back by pressing the pads. Supported files Setting an Audio Clip WAV (linear PCM, 48 kHz, 16-bit, stereo/ 44.1 kHz,... -
Page 30: Adjusting The Video
Here’s how to adjust the output video so that it is appropriate for the Here’s how to adjust the video that is input from the INPUT 1 and 2 device that receives output from the P-20HD. connectors. Press the [MENU] button Ó “Video Input” Ó select MEMO “LIVE IN 1”... - Page 31 Sets the border color for the inset screen Border Color video. Sets the border width for the inset screen Border Width The P-20HD features three internal output buses (Main, Preview and video. Replay). SPLIT You can set which output bus is assigned to the PREVIEW OUTPUT Pattern Sets the split composite pattern.
-
Page 32: Audio Operations
Audio Operations Adjusting the Volume Applying Effects to the Input Audio Here’s how to adjust the volume of the input and output audio. You can apply effects to the input audio to adjust the character of the sound. Press the [MENU] button Ó “Audio Input” Ó select a Press the [MENU] button Ó“Audio Input”Óselect value from “LIVE IN 1”... -
Page 33: Applying Effects To Output Audio
Audio Operations Equalizer (EQ) Applying Effects to Output Audio Adjusts the tonal character of the audio for each frequency band. Here’s how to modify the tonal character by applying effects to the audio output. Menu Explanation Press the [MENU] button Ó “Audio Output” Ó select Turns the equalizer on/off. -
Page 34: Muting Only Specific Audio (Mute)
Each Output Connector Here’s how to temporarily mute specific input or output audio (Mute function). The P-20HD features two internal audio output buses (Main and Muting input audio Preview). You can set which audio output bus is assigned to each output connector. -
Page 35: Mixing The Audio In Audio With The Audio From The Video
Audio Operations Mixing the AUDIO IN Audio with the Audio from the Video With the P-20HD, you can mix the audio from AUDIO IN with one of the following audio signals. ¹ Audio from input video ¹ Audio from final output... -
Page 36: Annotation
As the P-20HD lets you switch between live and replay video, you can Refer to the support page on the Roland website for the latest composite your drawing with either type of video. -
Page 37: Getting Ready To Use Annotation
The display automatically returns to the menu after calibration. The cursor is shown in the annotation screen that * To cancel calibration, press the [EXIT] button on the P-20HD. is output to the PREVIEW connector. The cursor is shown or hides depending on the type of pen tablet that’s connected. -
Page 38: Drawing On The Screen
Drawing on the Screen While annotation is enabled, the output video from the P-20HD along with the buttons for controlling the animation are shown on the external display or pen display connected to the PREVIEW connector. Use these annotation buttons to draw using the pen. -
Page 39: Other Functions
Other Functions Saving this Unit’s Settings to a SD Card/USB Storage You can group together the unit’s settings into a single file (with a “.p20” extension) and save this to an SD card or USB storage. The saved file can be loaded into this unit from the SD card or USB storage when necessary. * Depending on the USB storage used, it may take a while for the unit to recognize the media. -
Page 40: Formatting An Sd Card
NOTE Press the [MENU] button Ó “SD Card/USB Memory” ¹ The P-20HD does not recognize SD cards that were not formatted Óselect “Load Settings, ” and press the [VALUE] knob. on this unit. The Load Settings screen appears. -
Page 41: Importing Title Materials
Other Functions Importing Title Materials You can import still images such as event logos, corporate logos and so on, and layer them on top of live in video and replay video as title materials. Displaying the Title Supported files Bitmap file (.bmp), 24-bit color, uncompressed Format Press the [MENU] buttonÓ“Project”Ó“Project PNG file (.png), 24-bit color, 8-bit with alpha channel... -
Page 42: Exporting Recorded Video Data
You can convert recorded video data or clips to MP4 (.mp4) files, and export this data to an SD card or to USB storage. * The files exported from the P-20HD can be downloaded to your computer via a network (FTP). -
Page 43: Exporting/Importing A Project
Archived projects can be imported into this unit, restoring the original data. * You can exchange projects that were exported from the P-20HD, between the P-20HD and your computer over a network (FTP). For the detailed operations, see “Exchanging Files with Your Computer via the Network (FTP)” (p. 49). -
Page 44: Turning Off The Power From The Menu
Turning Off the Power from the Menu Using a Footswitch In addition to using the [POWER] switch on the P-20HD to shut down You can use a footswitch connected to the CTL/EXP 1 and 2 jacks to the power, you can also power down this unit from the menu. -
Page 45: Using An Expression Pedal
Other Functions Using an Expression Pedal You can use an expression pedal connected to the CTL/EXP 1 and 2 jacks to control the P-20HD with your foot. Adjusting the Pedal (Pedal Calibration) Assigning a Function to the Pedal The first time you use an expression pedal, you must calibrate (adjust) You can assign various functions to the expression pedal. -
Page 46: Preventing Unintended Operation (Panel Lock)
Preventing Unintended Operation Returning to the Factory Settings (Factory Reset) (Panel Lock) Here’s how you can return the settings of the P-20HD to their factory- set state. You can disable operation of the panel’s buttons and knobs to If the unit does not operate as described even though you’ve prevent unintended operations (Panel Lock function). -
Page 47: Using A Usb Keyboard To Operate The P-20Hd
You can connect a USB keyboard (commercially available) to the USB 3.0 port to operate the P-20HD. * This unit supports the use of 101/102-key keyboards. * If you want to use both USB storage and a pen tablet with the P-20HD at the same time, use a USB hub to connect. P-20HD operating panel... -
Page 48: Using Lan
¹ Download/upload archived projects between your computer and the P-20HD via FTP. ¹ Download exported videos, EDL and FCPXML files from the P-20HD to your computer via FTP. * This product cannot be used to directly connect to a network operated by a telecommunications provider (such as a mobile or landline-based telecommunications company, an Internet provider or the likes), including a public wireless LAN. - Page 49 Network (FTP) You can remotely control the P-20HD by transmitting commands to You can use an FTP client to connect your computer to the P-20HD the P-20HD from the Telnet client of a network device. and perform the following file operations. When using an FTP connection, the contents of the “/P-20HD_Export”...
-
Page 50: Using
Other Functions Using RS-232 By connecting the RS-232 connector to a controlling device such as a computer or to a Roland video switcher, you can use the following features. ¹ Transmit commands from your controlling device to remotely control the P-20HD. - Page 51 * The P-20HD video must be inputted to the video switcher. Target Model V-60HD Ch5 or Ch6 (select the V-60HD channel The P-20HD can operate either as a host or as a remote. Input Channel used for inputting the P-20HD video). ¹ As a host...
-
Page 52: Menu List
Menu List When you press the [MENU] button, the menu is shown on this unit’s display and on the display connected to the OUTPUT PREVIEW connector. MEMO ¹ If “[Enter]” is shown for the setting value, you can press the [VALUE] knob to proceed to a lower-level menu. ¹... -
Page 53: 2: Transition
Menu List Menu item Value Explanation (Bold: default) When in shuttle mode, this sets the speed factor (maximum value) when you turn SHUTTLE Speed x1, x2, x4, x8, x16, x32, x64, x128 the [JOG/SHUTTLE] dial. When in shuttle mode, this sets the speed factor (maximum value) when you turn x128 [SHUTTLE] + Dial x1, x2, x4, x8, x16, x32, x64,... -
Page 54: 3: Playlist
Menu List 3: Playlist Menu item Value Explanation (Bold: default) CLIP LIST [ENTER] Configures the settings for the clip list. PALETTE 1 [ENTER] Configures palette 1. PALETTE 2 [ENTER] Configures palette 2. PALETTE 3 [ENTER] Configures palette 3. PALETTE 4 [ENTER] Configures palette 4. -
Page 55: 5: Marker
What is EDID? SXGA (1280 x 1024), EDID EDID is data that is transmitted from the P-20HD to the source device when the SXGA+ (1400 x 1050), P-20HD is connected to a source device. EDID contains data such as the formats... - Page 56 Menu List PinP Menu item Value Explanation (Bold: default) Background Ch LIVE IN 1, LIVE IN 2 Sets the channel for the background video of the inset screen. Window Ch LIVE IN 1, LIVE IN 2 Sets the channel for the video of the inset screen. -100.0–...
-
Page 57: 7: Video Output
Menu List 7: Video Output Menu item Value Explanation (Bold: default) MAIN OUTPUT [ENTER] Configures the OUTPUT MAIN connector side. PREVIEW OUTPUT [ENTER] Configures the OUTPUT PREVIEW connector side. MAIN OUTPUT, PREVIEW OUTPUT Menu item Value Explanation (Bold: default) Shows the status of the OUTPUT jacks. Status –... -
Page 58: 8: Audio Input
Menu List 8: Audio Input Menu item Value Explanation (Bold: default) LIVE IN 1 [ENTER] Configures the audio input for LIVE IN 1. LIVE IN 2 [ENTER] Configures the audio input for LIVE IN 2. AUDIO IN [ENTER] Configures the audio input for AUDIO IN. LIVE IN Bus [ENTER] Configures the audio input for the LIVE IN bus. -
Page 59: 9: Audio Output
Menu List LIVE IN Bus Menu item Value Explanation (Bold: default) Level -INF, -80.0–0.0–10.0dB Adjusts the input volume. Turns the mute function on/off. If this is set to “On, ” the input audio is Off, On Mute temporarily muted. Preview Send -INF, -80.0–0.0–10.0dB Adjusts the output volume sent through the OUTPUT PREVIEW connector. - Page 60 Menu List Main Bus Menu item Value Explanation (Bold: default) Level -INF, -80.0–0.0–10.0dB Adjusts the output volume. Turns the mute function on/off. If this is set to “On, ” the output audio is temporarily Off, On Mute muted. Adjusts the delay time of the audio. Delay 0.0–95.0ms (0.0–5.6/4.7Frame) * The range for the frame rate setting differs depending on the Frame Rate setting (59.97Hz/50Hz).
-
Page 61: 10: Audio Rec Level
Menu List 10: Audio Rec Level Menu item Value Explanation (Bold: default) Level -INF, -80.0–0.0–10.0dB Adjusts the output volume. Off, On Mute Turns the mute function on/off. If this is set to “On, ” the output audio is temporarily muted. 11: SD Card/USB Memory Menu item Value... -
Page 62: 13: Ctl/Exp
Menu List 13: Ctl/Exp Menu item Value Explanation (Bold: default) Ctl/Exp 1 [Enter] These settings for the footswitch or expression pedal connected to the CTL/EXP 1 jack. Ctl/Exp 2 [Enter] These settings for the footswitch or expression pedal connected to the CTL/EXP 2 jack. Ctl/Exp 1, Ctl/Exp 2 Menu item Value... -
Page 63: 15: Lan
Disables remote control. Remote Control Remotely controls the P-20HD from a controlling device such as your computer. Synchronizes playback of the clip or playlist on the P-20HD with the video transition on Switcher your Roland video switcher. Target Model (*5) V-60HD Sets the video switcher used to synchronize with the P-20HD. -
Page 64: 16: System
Menu List 16: System Menu item Value Explanation (Bold: default) Frame Rate 59.94Hz, 50Hz Specifies the frame rate. Sets the date and time. Menu item Value Explanation Date Year/Month/Day Sets the date and time. Time Hour/Minute/Sec. Sets the time. Date & Time Settings [ENTER] Time Zone (*10) - Page 65 Specifies the test tone. 0dB@1kHz Turns the Auto Off function on/off. If this is set to “On, ” the power to the P-20HD turns off automatically when all of the following applies for at least 240 minutes. Auto Off Off, On ¹...
-
Page 66: Clip List
Menu List CLIP LIST Menu item Value Explanation (Bold: default) Name – Give the clip a name. hour:munutes:seconds;frames (at 59.94 Hz) In Position Shows the IN point. hour:munutes:seconds:frames (at 50Hz) hour:munutes:seconds;frames (at 59.94Hz) Out Position Shows the OUT point. hour:munutes:seconds:frames (at 50Hz) Duration –... -
Page 67: Still
Menu List STILL Menu item Value Explanation (Bold: default) Import [ENTER] Imports a still image. Name – Sets the name for a still image clip. File (File name) Shows the filename. Alpha Channel Yes, No Shows whether the image has an alpha channel. Sets what happens when the still image clip plays back. -
Page 68: List Of Shortcut Keys
List of Shortcut Keys The following items let you use shortcut operations to display other items, or perform direct operations without going to the menu. Operation Action Recording stop Hold down the [EXIT] button and press the [REC] button. Hold down the [EXIT] button and press the INPUT [SELECT] button. Switch input Once you release the [EXIT] button, the input is switched. -
Page 69: Remote Control Commands (Lan/Rs-232)
Remote Control Commands (LAN/RS-232) Command format Commands are formatted using the configuration shown below. Commands are all in ASCII code. Command code Parameter Parameter ASCII code “02H” is a control code indicating the start of a command. “H” indicates that it is a hexadecimal value. Command code This specifies the command type (three single-byte alphanumeric characters). - Page 70 System Sent Response Item Parameter command command Request active sensing stxACS; a: Version Request version information stxVER; stxVER:P-20HD,a; * The version info is ASCII text strings. Shut down this unit stxEXT; Flow control XON/XOFF Inquiry Sent Response Item Parameter command...
-
Page 71: Appendix
Appendix Troubleshooting If you suspect a malfunction, please check the following points. If this does not resolve the problem, contact a nearby Roland Service Center. Problem Items to check Action Page Video-related problems Have you inserted an SD card? Make sure that the SD card is inserted correctly. -
Page 72: Error Message List
Message Explanation P-20HD is too hot! The internal temperature is too hot. Select [OK] and turn off the power of the P-20HD. Please turn off the power immediately. Fan Error! The cooling fan is not working. Select [OK] and turn off the power of the P-20HD. -
Page 73: Main Specifications
Appendix Main Specifications à Video Video Processing 4:2:2 (Y/Pb/Pr), 8-bit HDMI type A x 2 Input Connectors INPUT 1–2 * Multi-format Supported HDMI type A MAIN Output Connectors * Multi-format Supported PREVIEW HDMI type A 720/59.94p, 720/50p, 1080/59.94i, 1080/50i, 1080/59.94p, 1080/50p SVGA (800 ×... -
Page 74: Dimensions
Startup Guide, Leaflet “USING THE UNIT SAFELY, ” AC adaptor, Power cord * 0 dBu = 0.775 Vrms * This document explains the specifications of the product at the time that the document was issued. For the latest information, refer to the Roland website. Dimensions Unit: mm 79.2... -
Page 75: Video Block Diagram
Appendix Video Block Diagram OUTPUT BUS INPUT BUS MAIN PREVIEW LIVE IN MAIN PREVIEW FOLLOW FOLLOW INPUT SELECT OUTPUT SELECT MUTE LEVEL HDMI 1 MAIN OUT GATE COMP DELAY 75Hz MUTE LEVEL OUTPUT ASSIGN MUTE LEVEL HDMI 2 GATE COMP DELAY PREVIEW OUT PREVIEW... -
Page 76: Audio Block Diagram
Appendix Audio Block Diagram OUTPUT BUS INPUT BUS MAIN PREVIEW LIVE IN MAIN PREVIEW FOLLOW FOLLOW INPUT SELECT OUTPUT SELECT MUTE LEVEL HDMI 1 MAIN OUT GATE COMP DELAY 75Hz MUTE LEVEL OUTPUT ASSIGN MUTE LEVEL HDMI 2 GATE COMP DELAY PREVIEW OUT PREVIEW...
Need help?
Do you have a question about the P-20HD and is the answer not in the manual?
Questions and answers