Table of Contents
Advertisement
Quick Links
Advertisement
Table of Contents

Subscribe to Our Youtube Channel
Summary of Contents for Biochef Air Fryer Multi Oven
- Page 1 BioChef Air Fryer Multi Oven USER MANUAL...
- Page 2 ENGLISH 3 The information in this manual is intended to help you to get the best results from your BioChef Air Fryer Multi Oven. Please read and follow these instructions and safeguards prior to use. Please keep your manual handy for future reference.
-
Page 3: Table Of Contents
Contents Safety Precautions Parts and Accessories Before using your BioChef Oven for the fi rst time Operating your BioChef Oven Air Fry Roast Bake Toast Grill Slow Cook Pizza Dehydrate Warm Crumpet Reheat Proof Replacing the Oven Light Care and Cleaning... -
Page 4: Safety Precautions
• Do not use the Air Fryer Multi Oven on or close to a hot gas or electric burner, or where it could touch a heated oven or surface. The temperature of accessible surfaces maybe high when the Air Fryer Multi Oven is operating. - Page 5 Do not place cardboard, plastic, paper, or other fl ammable materials in the oven. Do not cover crumb tray or any part of the Air Fryer Multi Oven with metal foil. This will cause overheating of the oven. A fi re may occur if the appliance is covered or touching fl ammable materials such as curtains, draperies or walls, when in operation.
-
Page 6: Parts And Accessories
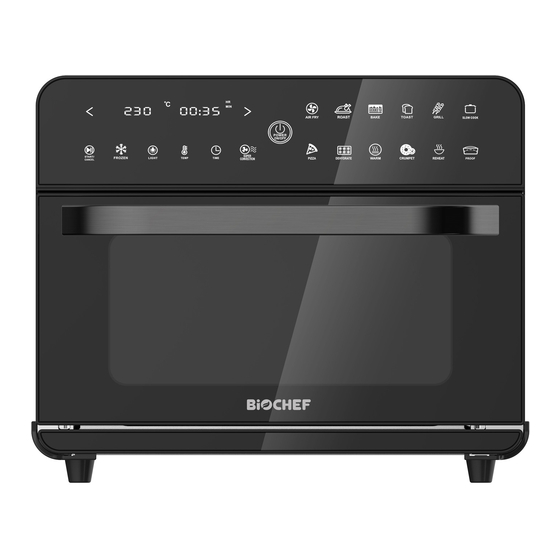
Parts and Accessories Ventilation Touchscreen- Slots Display Door Handle Interior Oven Light (Not Shown) Cord Storage at Rear (Not Shown) Crumb Tray Wire Rack Air Fryer Basket Enamel Baking Pan (28 x 36cm) Touchscreen-Display 6. TEMPERATURE & TIME decrease/Toast & Crumpet Darkness decrease 5. -
Page 7: Before Using Your Biochef Oven For The Fi Rst Time
“FROZEN” icon again to go back to the preset time setting for fresh foods 7. START/CANCEL Touch “START/CANCEL” icon to start the oven function. Touch again to cancel. Before Using your BioChef Oven for the fi rst time Before fi rst use, please run the oven empty for 25 minutes to remove protective substances from the heating elements. -
Page 8: Operating Your Biochef Oven
At the end of the cooking cycle, all the function icons will be illuminated, the “AIR FRY” icon will fl ash, the oven will display “END” and the alert will sound fi ve times. 10. The oven is now ready to use. Operating Your BioChef Oven Oven Functions Overview SUGGESTED RACK... - Page 9 Operating Your BioChef Oven Position the wire rack so the spokes face upwards and insert it into the desired rack position. The rack positions are conveniently printed on the oven door window sticker, which should be removed before fi rst use.
- Page 10 When the oven has reached the preset temperature and is ready for use, “PRE” will go out, the oven alert will sound and the display will show “ADD FOOD”. Place the food directly on the wire rack, or on the included air fry basket and/or baking pan.
-
Page 11: Air Fry
AIR FRY FUNCTION The AIR FRY function combines intense heat and maximized airfl ow to cook foods crispy and brown. Arrange food evenly on the included air fry basket. For best results, place food in a single layer and leave space between pieces. Insert the air fry basket into the top rack height position. -
Page 12: Roast
ROAST FUNCTION The ROAST function is ideal for cooking a variety of meats and poultry. Food will be tender and juicy on the inside and roasted to perfection on the outside. Insert the wire rack, with the spokes facing upward, into the bottom rack height position. -
Page 13: Bake
BAKE FUNCTION The BAKE function uses high speed Super Convection to cook food evenly throughout. This function is ideal for baking cakes, muffi ns, brownies and pastries. The BAKE function is also ideal for cooking pre-packaged frozen meals such as lasagna and pot pies. -
Page 14: Toast
At the end of the BAKE cycle, all the function icons will be illuminated, the BAKE function icon will fl ash, the oven will display “END” and the alert will sound fi ve times. TOAST FUNCTION The TOAST function browns and crisps the outside of your bread while keeping the inside soft and moist. -
Page 15: Grill
GRILL FUNCTION The GRILL function is ideal for cooking open- faced sandwiches, thin cuts of meat, poultry and fi sh, sausages and vegetables. Grilling can also be used to brown the tops of casseroles, gratins and desserts. Insert the wire rack, with the spokes facing upward, into the middle rack height position. - Page 16 Touch the SLOW COOK icon, it will fl ash once selected. The left fi gure on the screen indicates the preset SLOW COOK temperature of 100°C, while the right fi gure indicates the preset time of ‘03:00 HRS’. 03:00 The SLOW COOK temperature, time and convection settings can be adjusted before and during the SLOW COOK cycle.
-
Page 17: Pizza
• Cold food will take longer to cook than food that has been pre-seared or heated so adjust cooking times as appropriate. Do not slow cook frozen foods. • Cut large pieces of meat in half to allow heat to penetrate more evenly. PIZZA FUNCTION The PIZZA function uses high speed super convection to melt and brown cheese and toppings, while crisping up the pizza crust. -
Page 18: Dehydrate
b) Close the oven door. The timer will start to count down. At the end of the PIZZA cycle, all the function icons will be illuminated, the PIZZA function icon will fl ash, the oven will display “END” and the alert will sound fi... -
Page 19: Warm
Touch the “START/CANCEL” icon to activate the DEHYDRATE function. The DEHYDRATE icon will remain illuminated, and the timer will automatically begin to count down. At the end of the DEHYDRATE cycle, all the function icons will be illuminated, the “DEHYDRATE” icon will fl ash, the oven will display “END” and the alert will sound 5 times. -
Page 20: Crumpet
At the end of the WARM cycle, all the function icons will be illuminated, the “WARM” icon will fl ash, the oven will display “END” and the alert will sound fi ve times. CRUMPET FUNCTION The CRUMPET function directs heat from the top elements to brown and crisp one side more than the other. -
Page 21: Reheat
Touch the “START/CANCEL” icon to activate the CRUMPET function. The CRUMPET icon will remain illuminated and the timer will automatically begin to count down. At the end of the CRUMPET cycle, all the function icons will be illuminated, the “CRUMPET” icon will fl ash, the oven will display “END” and the alert will sound fi... -
Page 22: Proof
PROOF The PROOF function is designed to precisely hold low temperatures, providing an ideal environment for proofi ng bread, rolls, pizza and other doughs. Insert the wire rack into the bottom rack position. Place dough in an oven-proof vessel, cover and place on center of the wire rack. -
Page 23: Replacing The Oven Light
Replacing the Oven Light Always unplug the oven and allow to cool completeley before WARNING: replacing the bulb. Only use a 25-Watt, 220-240V, halogen bul Remove the wire rack from the oven before replacing the light. The light is positioned on the rear right-hand side of the oven cavity. 1. -
Page 24: Care And Cleaning
Care & Cleaning Before cleaning, ensure the oven is turned off by removing the power plug from the power outlet. Allow the oven and all accessories to cool completely before disassembling and cleaning. Cleaning the outer body and door Wipe the outer body with a soft, damp sponge. A non-abrasive liquid cleanser or mild spray solution may be used to avoid build-up of stains. - Page 25 To remove baked-on grease, soak the tray in warm soapy water then wash with a soft sponge or soft plastic scouring pad. Rinse and dry thoroughly. Always reinsert the crumb tray into the oven after cleaning and prior to inserting the power plug into a power outlet and turning the oven on. Cleaning the wire rack, baking pan and air fry basket Wash all accessories in warm soapy water with a soft sponge or soft plastic scouring pad.
-
Page 26: Troubleshooting
Troubleshooting Possible Problem Easy Solution The oven will not • Check that the power plug is securely inserted into the switch “ON” outlet. • Insert the power plug into an independent outlet. • Insert the power plug into a diff erent outlet. •... - Page 27 The ingredients • Reduce the amount of food in the oven when cooking. cooked within Set the temperature higher or the time longer. Ensure the oven are you have selected the correct cooking function. underdone Foods are cooked • Ensure food is spread out evenly and not stacked too unevenly close to eachother during cooking.
-
Page 28: Warranty
BIOCHEF AIR FRYER MULTI OVEN 2 YEAR WARRANTY WARRANTY PERIOD: 2 YEARS VITALITY 4 LIFE IS THE GLOBAL DISTRIBUTOR AND WARRANTY PROVIDER OF BIOCHEF. WARRANTY REGISTRATION AND CLAIMS ARE HANDLED BY YOUR LOCAL VITALITY 4 LIFE SUPPORT CENTRE, DETAILS ON BACK COVER. - Page 32 Support & Service Centres Please contact us for warranty & service Vitality 4 Life – Australia & New Zealand E: support@vitality4life.com We: www.vitality4life.com.au Vitality 4 Life – United Kingdom E: support@vitality4life.co.uk W: www.vitality4life.co.uk Vitality 4 Life - United States E: support@vitality4life.com W: www.vitality4life.com Vitality 4 Life –...
Need help?
Do you have a question about the Air Fryer Multi Oven and is the answer not in the manual?
Questions and answers
I have dirty glass between the two door layers there are also somehow food bits in there as well - How can this be opened up so that I can clean the inside areas of the two layers of glass - undoing the screws that hold the inner glass layer in does not release it -
To clean the inner glass layers of the Biochef Air Fryer Multi Oven, use a glass cleaner or mild detergent with a soft, damp sponge or soft plastic scouring pad. Do not use abrasive cleaners or metal scouring pads, as they can scratch the surface. Let all surfaces dry thoroughly before plugging in and using the oven.
This answer is automatically generated