Table of Contents
Advertisement
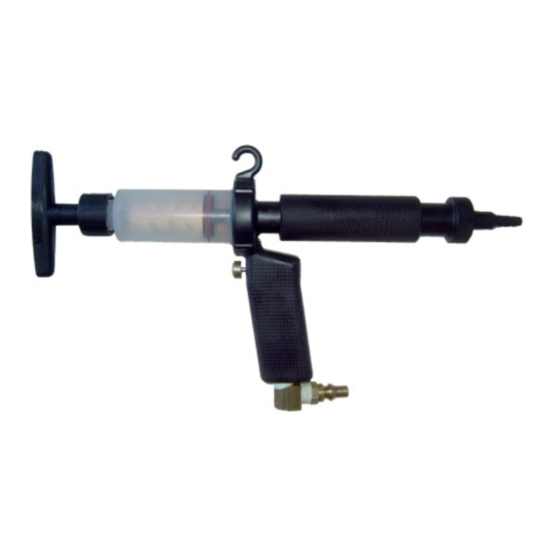
Gas / Air Pressure
CATTLE
Pour-On
45-50 psi
Oral Drench
50-55 psi
The Power Doser™
"Pioneering Medicant Delivery Technology"
09-70-100-MAN A
DO NOT LEAVE MEDICANT IN
APPLICATOR OR
SUCTION HOSE.
4 Merlin Way
Bowerhill Industrial Estate
Melksham, Wiltshire SN12 6TJ
Phone:
+44 (0)1225 700 476
Fax:
+44 (0)1225 700 477
Email:
customerservices@genesisindustries.co.uk
Website:
www.genesisindustriesinc.com
i
Gas / Air Pressure
SHEEP
Thin Pour-On
45-50 psi
Oral Drench
45-50 psi
Thick Pour-On
50-55 psi
Advertisement
Table of Contents

Related Manuals for Genesis Power Doser CATTLE

Summary of Contents for Genesis Power Doser CATTLE
- Page 1 Gas / Air Pressure Gas / Air Pressure SHEEP CATTLE Thin Pour-On 45-50 psi Pour-On 45-50 psi Oral Drench 45-50 psi Oral Drench 50-55 psi Thick Pour-On 50-55 psi The Power Doser™ “Pioneering Medicant Delivery Technology” DO NOT LEAVE MEDICANT IN APPLICATOR OR SUCTION HOSE.
-
Page 2: Table Of Contents
Table of Contents Power Doser™ Optional Accessories ..............Power Doser™ Gas System..................Power Doser™ Air System ..................Disassembling the Power Doser™................. Re-assembling the Power Doser™ ............... Replacing the Trigger ................... Cleaning the Power Doser™................. Lubricating the Power Doser™................Troubleshooting..................... 2 ml Power Doser™ ..................... 10 ml Power Doser™... -
Page 3: Power Doser™ Optional Accessories
Power Doser™ Optional Accessories Page 1 of 14... -
Page 4: Power Doser™ Gas System
Power Doser™ Gas System A 5 kilogram gas bottle will provide a minimum of 6000 shots of a 15 ml • dose. LPG is not compatible with standard air hoses and fittings. LPG will corrode • them. Normal pressure range 40-80 psi. •... -
Page 5: Power Doser™ Air System
Power Doser™ Air System Page 3 of 14... -
Page 6: Disassembling The Power Doser
Disassembling the Power Doser™ Page 4 of 14... -
Page 7: Re-Assembling The Power Doser
Seat outlet check onto outlet spring and place in front end of barrel. Step 8 Screw on barrel cap. NOTE: Do not over tighten inlet nozzle onto piston rod. REMEMBER: Lubricate barrel, plunger O-ring and piston rod with Genesis Power Lube or petroleum jelly. Page 5 of 14... -
Page 8: Replacing The Trigger
Replacing the Trigger Page 6 of 14... -
Page 9: Cleaning The Power Doser
Step 3 Unscrew barrel & wipe out with a clean rag. Step 4 Lubricate Plunger “O” ring with Genesis Power Lube (or petroleum jelly). Your applicator is ready for the next job. Maintenance Cleaning the Power Doser™ regularly will prevent it from getting ‘clogged up’... -
Page 10: Troubleshooting
Genesis Power Lube or petroleum jelly. “Oiling” guns is completely refill. commonly accepted as good practice therefore, this can be a problem for the Genesis Power Doser™. Often when a gun will not work disassembling it, washing it, lubricating it and then rebuilding it will fix the problem. - Page 11 Problem Solution a) Has the gun been lubricated with oil? Re-lubricate plunger O-ring with Genesis Power Lube or petroleum jelly. See v) in section A (pg. 8). b) Is it the correct suction hose for that chemical? See section C (pg.
- Page 12 The gun is used for many purposes and a universal ‘draw off system’ hasn’t been devised. Genesis draw off systems are available for several products, please phone toll free +44 (0) 800 v. No ‘Draw-off system’.
-
Page 13: Ml Power Doser
Page 11 of 14... -
Page 14: Ml Power Doser
Notes: Use Genesis Power Lube or petroleum jelly to coat Plunger O-Ring before inserting into barrel. Page 12 of 14... -
Page 15: Ml Power Doser
Page 13 of 14... -
Page 16: Ml Power Doser
Page 14 of 14...
Need help?
Do you have a question about the Power Doser CATTLE and is the answer not in the manual?
Questions and answers