NimbeLink Skywire User Manual
Hide thumbs
Also See for Skywire:
- User manual (19 pages) ,
- Instruction manual (14 pages) ,
- User manual (17 pages)
Table of Contents
Advertisement
Quick Links
Chipsmall Limited consists of a professional team with an average of over 10 year of expertise in the distribution
of electronic components. Based in Hongkong, we have already established firm and mutual-benefit business
relationships with customers from,Europe,America and south Asia,supplying obsolete and hard-to-find components
to meet their specific needs.
With the principle of "Quality Parts,Customers Priority,Honest Operation,and Considerate Service",our business
mainly focus on the distribution of electronic components. Line cards we deal with include
Microchip,ALPS,ROHM,Xilinx,Pulse,ON,Everlight and Freescale. Main products comprise
IC,Modules,Potentiometer,IC Socket,Relay,Connector.Our parts cover such applications as commercial,industrial,
and automotives areas.
We are looking forward to setting up business relationship with you and hope to provide you with the best service
and solution. Let us make a better world for our industry!
Contact us
Tel: +86-755-8981 8866 Fax: +86-755-8427 6832
Email & Skype: info@chipsmall.com Web: www.chipsmall.com
Address: A1208, Overseas Decoration Building, #122 Zhenhua RD., Futian, Shenzhen, China
Advertisement
Table of Contents

Related Manuals for NimbeLink Skywire


Summary of Contents for NimbeLink Skywire
- Page 1 Chipsmall Limited consists of a professional team with an average of over 10 year of expertise in the distribution of electronic components. Based in Hongkong, we have already established firm and mutual-benefit business relationships with customers from,Europe,America and south Asia,supplying obsolete and hard-to-find components to meet their specific needs.
- Page 2 Skywire™ Development Kit User Manual NimbeLink, LLC Revised: March 2014 PN 30005 rev 5 NimbeLink, LLC All Rights Reserved.
-
Page 3: Table Of Contents
CONNECT KIT TO OTHER DEVELOPMENT KIT ....................18 OPEN, ....................18 NSURE HEADER REMOVE UMPER 12V P J15 ....................18 LUG IN OWER UPPLY TO CONNECTOR J8 .................... 20 ONNECT OTHER EVELOPMENT IT TO ONNECTOR PN 30005 rev 5 NimbeLink, LLC All Rights Reserved. -
Page 4: Introduction
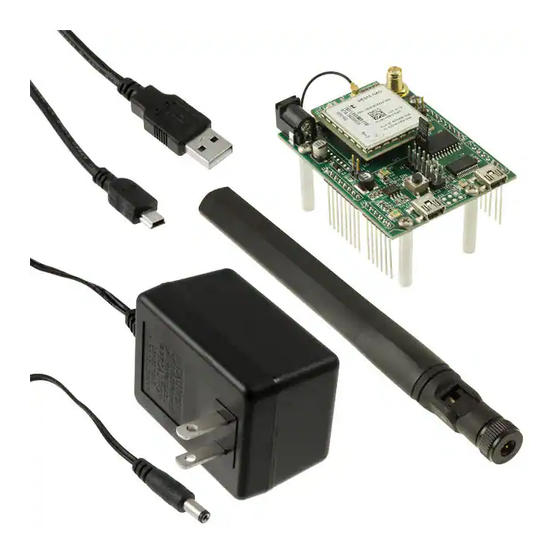
DE910 Hardware User Guide 1.3 Product Overview The Skywire™ Development Kit includes one Skywire™ cellular modem, baseboard, antenna, power supply, and debug cables. The kit enables you to develop your application directly on the Skywire™ modem with three different ways to connect: ... -
Page 5: Block Diagram
1.4 Block Diagram PN 30005 rev 5 NimbeLink, LLC All Rights Reserved. -
Page 6: Connect To Kit Using A Pc
USB1 (connector J5) is used for Telit firmware updates to the modem and is not used in this section. 2.1 Unpack Kit Contents Note: Photo depicts modem removed from baseboard, however, modem ships pre-mounted to baseboard for ease of assembly. PN 30005 rev 5 NimbeLink, LLC All Rights Reserved. -
Page 7: Attach Antenna To Baseboard
2.2 Attach Antenna to Baseboard Antenna screws onto SMA connector with a clockwise rotation 2.3 Ensure header J6 is shorted with 2 pin Jumper PN 30005 rev 5 NimbeLink, LLC All Rights Reserved. -
Page 8: Plug In 12V Power Supply To Connector J15
2.4 Plug in 12V Power Supply to connector J15 2.5 Plug USB cable into connector J14 and PC PN 30005 rev 5 NimbeLink, LLC All Rights Reserved. -
Page 9: Press And Hold Button S1 For >1 Second
Your PC may have multiple COM ports. Select appropriate USB COM port to communicate with the development kit. Serial Settings should be as follows: Baud Rate: 115,200 bps Data: 8bit Parity: none Stop: 1bit Flow Control: none PN 30005 rev 5 NimbeLink, LLC All Rights Reserved. -
Page 10: Test Serial Communication
2.10 Activate Modem (one-time step) The cellular module included in the kit does not have an active cellular plan. NimbeLink provides reduced rate Verizon M2M data plans for Skywire products. To activate a data plan, send an email to SkywireActivations@NimbeLink.com... -
Page 11: Send Sms Message
Otherwise, the terminal responds with the first message in the form: +CMGL=index, message_status, address, [address_text], [time_stamp] [,address_type, body_length] <CR> <LF> sms_message_body[<CR> <LF> +CMGL: ...] This is an example: +CMGL: 0,"REC UNREAD","555444333","",20130925202238 SMS message 2.14 Delete Received SMS Message PN 30005 rev 5 NimbeLink, LLC All Rights Reserved. -
Page 12: Send Email
Enter key, and the terminal should respond with: 2.15 Send EMAIL You can use the Skywire cell modem to send an email directly to an email recipient using the AT#EMAILD command once a few parameters regarding the email service provider are configured. - Page 13 Initiate email sending; this causes Skywire to activate and get an IP address: AT#EMAILACT=1 followed by the Enter key, and after a short delay, the terminal should respond with: Provide the email details and body: AT#EMAILD="to@somewhere.com","Message Subject",0 followed by the Enter key, and the terminal should respond with: >...
-
Page 14: Connect Kit To Arduino
At the time this was written, the latest Arduino IDEs could be downloaded here: http://arduino.cc/en/Main/Software The sample sketches were written and tested using Arduino 1.0.5 on a PC running Windows 7. 3.2 Insert Skywire Baseboard into Arduino Leonardo PN 30005 rev 5 NimbeLink, LLC All Rights Reserved. -
Page 15: Ensure Header J6 Is Open, Remove 2 Pin Jumper
The Arduino Leonardo gets its power from the USB port and does not require an external power supply. 3.6 Launch the Arduino Application 3.7 Select Arduino Leonardo board In the ‘Tools’ drop down, select ‘Board’, then select ‘Arduino Leonardo’. PN 30005 rev 5 NimbeLink, LLC All Rights Reserved. -
Page 16: Select Serial Port
The sketch can be downloaded from the Skywire product page. 3.10 Change Destination Phone Number Find “DESTINATION_PHONE_NUMBER” on line 18 and edit the example phone number to the target recipient’s phone number. PN 30005 rev 5 NimbeLink, LLC All Rights Reserved. -
Page 17: Upload And Run The Sketch
Once connected, you can open the Serial Monitor by selecting: ‘Tools’ and then ‘Serial Monitor’ The monitor should show something like this: And the recipient should receive the default SMS message. PN 30005 rev 5 NimbeLink, LLC All Rights Reserved. -
Page 18: Change Default Sms Message
3.13 Change Default SMS message Find “SMS_MESSAGE” on line 20 and edit the text between the parenthesis to change the default message. PN 30005 rev 5 NimbeLink, LLC All Rights Reserved. -
Page 19: Connect Kit To Other Development Kit
4.1 Ensure header J6 is OPEN, remove 2 pin Jumper 4.2 Plug in 12V Power Supply to connector J15 This step is important because the only way to power the Skywire™ embedded cellular modem is through the onboard power supply. If you want to power with your own power supply, you can do so by removing resistor R4 (near J2), and applying a voltage to pin 2 of header J2. - Page 20 PN 30005 rev 5 NimbeLink, LLC All Rights Reserved.
-
Page 21: Connect Other Development Kit To Connector J8
Searching for Network & Not Registered, Slow ON/nSLEEP Output 1.8V No connection Blink = Regsitered with full service, Permanently on = call is active. See Telit x910 modem manual for additional information. PN 30005 rev 5 NimbeLink, LLC All Rights Reserved.
Need help?
Do you have a question about the Skywire and is the answer not in the manual?
Questions and answers