Table of Contents
Advertisement
Quick Links
Advertisement
Table of Contents

Summary of Contents for Cantek C12RSH
- Page 1 Operations Manual www.cantekamerica.com C12RSH Straight Line Ripsaw Please ensure you have your serial number available when contacting us for parts or service. Cantek America Inc. | 1.888.982.2683 | Parts: sales@cantekamerica.com | Service: service@cantekamerica.com...
- Page 2 SRS-12H MANUAL Specification SPECIFICATIONS Model NO: C12RSH Serial NO: 0733030 Production Date: DEC.2007 Volt Control: Drive specifications: Drive Motor Q’ty Volt Saw arbor □7.5 □10 □15 Feed Belt specifications: 5 pcs Triangular belt □A-52 (50Hz) 7.5、10 HP □A-58 (60Hz) Saw motor 3 pcs Triangular belt □3V-530...
- Page 3 PREFACE SRS-12H MANUAL PREFACE This manual explains how to install, operate, and maintain the C12RSH STRAIGHT LINE RIP SAW . Please make certain to read the information contained herein to ensure safe operation and to achieve the longest lifespan and finest results possible.
-
Page 4: Table Of Contents
SRS-12H MANUAL CONTENTS CONTENTS CHAPTER 1: INTRODUCTION ........... 1 1-1 SPECIFICATIONS TABLE ........1 1-2 FEATURES .............. 2 1-3 LOCATION OF PARTS ........... 4 CHAPTER 2: INSTALLATION ......8 2-1 PRE-INSTALLATION INSPECTION ..... 8 2-2 MOVING THE MACHINE ...... 8 2-3 FIX THE MACHINE IN POSITION .... -
Page 6: Chapter 1: Introduction
SRS-12H MANUAL Chapter 1: Introduction CHAPTER 1: INTRODUCTION 1-1 SPECIFICATIONS TABLE 200 mm Mini. length of workpiece 85 mm Max. cutting thickness Distance between saw and column 460 mm 7.5,10 or 15 HP Saw arbor motor Saw arbor speed 4500 R.P.M. ∅... -
Page 7: Features
SRS-12H MANUAL Chapter 1: Introduction 1-2 FEATURES PRECISION-PROCESSED FEED CHAIN AND GUIDE TRACK The feed chain block and guide track are made of special cast iron. The high- grade steel connecting pin are heat-treated and ground for maximum durability. EIGHT PRESSURE ROLLERS HOLD THE WORKPIECE STABLY Eight pressure rollers arranged in six rows on both sides, the front and rear of sawblade and supported by hinges so that they are smooth and stable in motion. - Page 8 SRS-12H MANUAL Chapter 1: Introduction SELF LUBRICATION The central lubrication system ensures a permanent oil film between feed chain and guide track. If the oil in tank is below the safety level, the warning lamp will light up and the feed chain will stop running automatically. This fully ensures the service life of the feed chain and track.
-
Page 9: Location Of Parts
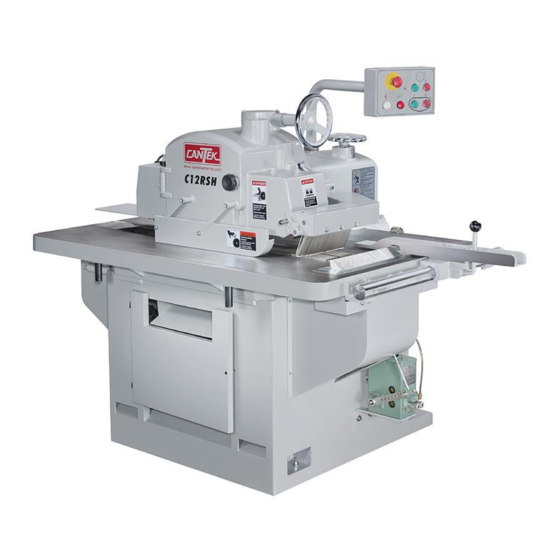
SRS-12H MANUAL Chapter 1: Introduction 1-3 LOCATION OF PARTS... - Page 10 SRS-12H MANUAL Chapter 1: Introduction 1. Feed chain cover 2. Driving sprocket cover 3. Lateral safety guard 4. Outfeed safety plate 5. Saw arbor cover 6. Pressure roller housing 7. Dust suction outlet 8. Pressure roller height-adjustment Hand wheel 9. Control panel 10.
- Page 11 SRS-12H MANUAL Chapter 1: Introduction Control panel: 1. Emergent STOP button 2. Sawblade START button 3. Sawblade STOP button 4. Power indicator 5. Feed chain insufficeient lubrication indicator 6. Feed chain START button 7. Feed chain STOP button...
- Page 12 SRS-12H MANUAL Chapter 1: Introduction Machine size:...
-
Page 13: Chapter 2: Installation
SRS-12H MANUAL Chapter 2: Installation CHAPTER 2: INSTALLATION 2-1 PRE-INSTALLATION INSPECTION To ensure optimum performance from your machine, the following checks should be made before installation: ◎ Is there any damage to the package of the machine? ◎ Does the appearance of machine show any sign of having been hit after opening the package? If either of the above situations has been happened, please contact the local dealer immediately. -
Page 14: Fix The Machine In Position
SRS-12H MANUAL Chapter 2: Installation 2-3 FIX THE MACHINE IN POSITION 1. PROPER LOCATION FOR THE MACHINE: ◎ The floor must be strong enough to support the machine's weight as well as the vibrations produced while it is running. ◎ The directions of feed workpiece in and out from the machine must not be facing the area where people may be passing frequently. - Page 15 SRS-12H MANUAL Chapter 2: Installation 2) Press the sawblade START button to start the saw arbor. Make sure the saw arbor is turning in counter-clockwise direction. If not, the operator must shut off the power supply immediately. Exchange any two of cables and rewire the machine, then start the saw arbor again.
-
Page 16: Connection Of Dust Collection Apparatus
SRS-12H MANUAL Chapter 2: Installation 2-6 CONNECTION OF DUST COLLECTION APPARATUS The dust collection outlet is Ø100mm which can connect with one flexible tube of The air speed has to be higher than 25m/sec and the air caliber 4 inches. consumption can not be less than 700m... -
Page 17: Chapter 3: Operation
SRS-12H MANUAL Chapter 3: Operation CHAPTER 3: OPERATION 3-1 INSTALLING AND REMOVING BLADES 1) Take out the “special open-end wrench” and “special offset wrench” from tool box (see the picture below). Open the saw arbor cover. Use the “special open-end wrench” to fix the saw arbor, then, take the hex. bolt off by turning the “special offset wrench”... - Page 18 SRS-12H MANUAL Chapter 3: Operation 3) Release “saw arbor locking lever”, then, raise the saw arbor by turning “saw arbor height-adjustment handwheel” until it is up to the place for installing the saw blade on it. * Notice: the direction of the sawblade teeth (refer to the above picture)! 4) Installed the saw blade and put the lock washer back.
-
Page 19: Checking Safety Devices
SRS-12H MANUAL Chapter 3: Operation In the case of sawblade removal, the user has to raise the saw arbor slightly at first (same as the step 3). Raise the saw arbor for 3-5mm so that the sawblade teeth may not be damaged while removal. Then loosen the hex. bolt of sawblade. 3-2 CHECKING SAFETY DEVICES 1) Close the saw arbor cover, check and make certain all limit switches and the lateral safety guard are at the functional position. -
Page 20: Raise/Lower Pressure Roller Assembly
SRS-12H MANUAL Chapter 3: Operation 3-3 RAISE/LOWER PRESSURE ROLLERS ASSEMBLY The height of pressure rollers ( *It is a complete assembly of pressure rollers and housing, but we will only mention with pressure rollers in the following description. ) depends on how thick the to-be-cut wood is. First release “pressure roller locking lever”, turn “pressure roller height-adjustment handwheel”... -
Page 21: Start Feed Chain
SRS-12H MANUAL Chapter 3: Operation 3-5 START FEED CHAIN Press “feed chain start button” to start feed chain. The feeding speed should be adjusted according to the thickness and race of the wood to-be-cut. There are 2 choices on the feeding system: “Variable speed (option)” and “5-Step speed”. - Page 22 SRS-12H MANUAL Chapter 3: Operation (2) 5-Step Speed: How to adjust: To adjust the feed speed by changing the feed belt to different groove. * IMPORTANT: For safety, be sure to SHUT OFF the power supply and make sure the “Power indicator” is OFF before adjustment. Use an open-end wrench to open the feed motor cover, then use a 19mm Open- end wrench to adjust the 2 Hex.
-
Page 23: Adjusting The Position Of Rip Fence
SRS-12H MANUAL Chapter 3: Operation 3-6 ADJUSTING THE POSITION OF RIP FENCE The Fence is positioned with a clamp handle, to fix it by pushing the handle forward, to release it by pulling the handle backward in order to move the fence. The distance between fence and sawblade can be read by the sideline. -
Page 24: Chapter 4: Safety Precautions
SRS-12H MANUAL Chapter 4: SAFETY PRECAUTIONS CHAPTER 4 SAFETY PRECAUTIONS There are some precautions and warnings to be stuck on the machine. The operator must read them carefully before handling this machine, and remind himself all the time to avoid the abnormal operation causing danger. - Page 25 SRS-12H MANUAL Chapter 4: SAFETY PRECAUTIONS To operate this machine incorrectly might cause danger to people (the operator), therefore we strongly request the operator complies with the following safety guidelines: The operator must read the operation manual very carefully, before handling the machine.
- Page 26 SRS-12H MANUAL Chapter 4: SAFETY PRECAUTIONS If there is only one pressure roller function while ripping short workpiece, it will influence the accuracy of the ripping. Therefore, if short or small finished product is needed, we suggest the operator rips the width at first, and then cut-off the workpiece at the necessary length by other machines.
- Page 27 SRS-12H MANUAL Chapter 4: SAFETY PRECAUTIONS Checks should be made regularly to ensure that there are no foreign objects jammed in the gaps between the feed chain. Be sure to remove sawdust from these gaps by an air gun everyday. If the lumber that has not been edged square, the wider side should always be facedown on the feed chain.
- Page 28 SRS-12H MANUAL Chapter 4: SAFETY PRECAUTIONS The stock which is warped lengthwise should be placed with the convex side upward on the feed chain. Otherwise the pressure rollers can not work smoothly and then influence the accuracy of workpiece. Make certain that sawblade is installed with the teeth pointing in the same direction as the rotation of saw arbor turns.
-
Page 29: Chapter 5: Maintenance & Replacement
SRS-12H MANUAL Chapter 5: MAINTENANCE & REPLACEMENT CHAPTER 5: MAINTENANCE & REPLACEMENT Must disconnect the power supply from the machine before doing any maintenance or replacement. The operator must obey the following rules to avoid any serious injury. 5-1 CLEANING Regularly clean all machine parts and the surrounding environment can help a safer operation and prolong the machine life. -
Page 30: Lubrication
SRS-12H MANUAL Chapter 5: MAINTENANCE & REPLACEMENT ◎ The wood should be cleared of any foreign objects such as metal, sand and soil etc… before ripping. Those objects will also damage the feed chain and guide track. ◎ Pay attention to the dust extracting apparatus all the time to ensure the maximum efficiency of dust-collection is being maintained. - Page 31 SRS-12H MANUAL Chapter 5: MAINTENANCE & REPLACEMENT Mechanical Lubricator: * Every 2400-2500 working hours: After every 2400-2500 working hours, the operator should use a grease gun to add grease to the bearings of the saw arbor. Before lubrication, the nozzle of grease gun should be cleaned completely at first, to avoid any impurity object following the grease into the bearings and damage them.
-
Page 32: Adjust And Replace Saw Arbor Belt
SRS-12H MANUAL Chapter 5: MAINTENANCE & REPLACEMENT * Changing the oil for the feed chain reduction gears: After 300 working hours, the inside of the feed chain speed-reducer should be cleaned and the oil for the gears should be changed. Thereafter, the gear oil should be changed for every 2500 working hours. -
Page 33: Inspect And Replace The Variable Speed Belt
SRS-12H MANUAL Chapter 5: MAINTENANCE & REPLACEMENT New belts should be re-tightened after the first 4 working hours. Then, after 8 working hours they should be re-tightened again. Thereafter, the belts should be inspected and adjusted after every 200 working hours. If the belts show the signs of wear, they should be replaced with new belts of the same brand and the same production batch. -
Page 34: Adjust The Oil Supply To Feed Chain
SRS-12H MANUAL Chapter 5: MAINTENANCE & REPLACEMENT (2) 5-Step Speed: Please refer to Page 22 of 5-Step Speed adjustment for the replacement of new belt (check the “SPECIFICATIONS” chapter of the manual for the specifications of belt). 5-5 ADJUST THE OIL SUPPLY TO FEED CHAIN This machine is designed with an auto-lubrication system to supply necessary lubricant for feed chain and guide track. - Page 35 SRS-12H MANUAL Chapter 5: MAINTENANCE & REPLACEMENT (2) Mechanial Lubricator: The mechanical lubricator has 2 oil outlets. Each outlet has an A DJUST SCREW reduce / increase oil supply. The maximum oil supply by each ADJUST SCREW 0.9 c.c. (each outlet), so, the total is 1.8 c.c. 1.
-
Page 36: Weekly Cleanup
SRS-12H MANUAL Chapter 5: MAINTENANCE & REPLACEMENT 5-6 WEEKLY CLEANUP Except the daily cleanup and maintenance, it is necessary to clean the Roller Housing weekly. See the cleaning method as below: 1. Clean and lubricate the Screw, Nut and Slide Way of roller housing. When clean up and lubricate these parts, be sure to adjust the Roller Housing to the highest and lowest position.
Need help?
Do you have a question about the C12RSH and is the answer not in the manual?
Questions and answers