Table of Contents
Advertisement
Quick Links
Advertisement
Table of Contents

Summary of Contents for DTG X
- Page 1 Installation and Training Module...
- Page 2 1. Always leave your printer on to allow the machine to perform the necessary automatic maintenance. Any time white ink is loaded into the Model X the printer MUST run the auto maintenance to avoid clogs. If you would like to shut down your machine for more than 12 hours, it is recommended that you flush the white ink out of the system beforehand.
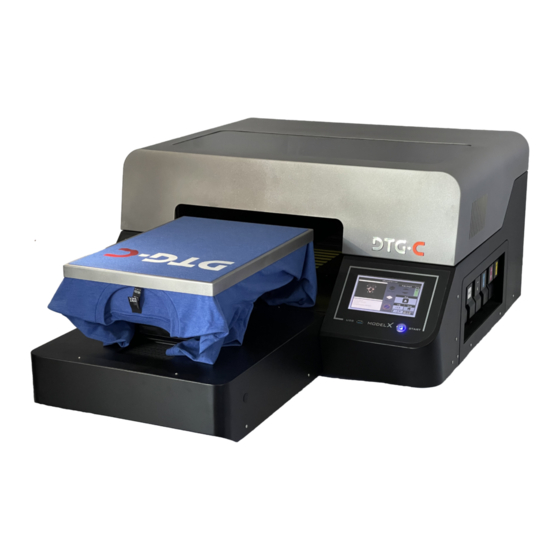
- Page 3 Get to know your printer Front Front Cover Open the front cover for maintenance. Otherwise keep it closed. Ink Cartridges Access Touch Panel Sub Power Platen It turns machineon/off Place the T-shirt here. A medium-sized platen is already installed. Optional larger and smaller platens are available.
- Page 4 Back of the printer 1.2 Back Normally leave it on. When the machine is not in use for a long period or when you move the machine, turn the main power switch off Network Connector Waste Ink Bottle Connector Connect the Connect the tube from ethernet cable waste ink bottle...
- Page 5 Carriage Underneath there is the print head and the head nozzle. It moves left and right when printing. The carriage requires regular cleaning Inside the printer Head Cap It prevents the print head from drying out Wiper It is a gum plate that wipes the ink off on the print head...
-
Page 6: Installation
Installation Connect waste ink bottle tube to valve on the right- Open the front cover and remove bracket fix platen. back side of printer. - Page 7 Installation (cont.)
-
Page 8: Installation (Cont)
Installation (cont) - Page 9 DTG Basics Substrate, Environment, Support and others…...
- Page 10 What types of fabrics can I print Continued…. • Not all cotton fabrics are the same - quality of fabric will also impact the vividness of the image. Lower quality fabric will yield a lower saturated color or faded colors, while higher quality fabric will give you strong and vivid colors.
-
Page 11: Very Important
Very Important • Below 32˚F (0˚C) or over 40˚C 104˚F (40˚C ) The printer will not operate and request a power off. • If the temperature is 32˚F (0˚C) - 50˚F (10˚C) or 30˚C (86˚F) to 40˚C (104˚F) The Printer will give a warning •... - Page 12 Operation Display Item # Description Displays the current job if one is loaded Set on the position of the platen, print position, eject position or stop. Adjust the platen height by press or hold this button Select the platen height adjusting method. When it is AUTO position, the platen height is adjusted by media sensor automatically.
- Page 13 Recent Jobs Item # Description select recently used print images in the [Recent Job] User can print selected image. Locks the file Saves the file to a USB if one is inserted Delete the selected image. Home...
-
Page 14: Maintenance Screen
Maintenance Screen Item # Description Print a nozzle check pattern. Access to part replacement screen Performs automatic head cleaning Performs manual head cleaning. In this case, print head moves to the center of bridge. User can clean the print head by hand. Adjust the platen up or down Moves the platen into the machine Select the platen height adjusting method. -
Page 15: Settings Screen
Settings Screen Item # Description Alignment of printhead, table and print position IP address for printer connectivity Temperature for F or C Laser sensor indicating on or off Reset all Factory settings Turning on or off sounds Printer information, serial #, firmware version Home button... - Page 16 Alignment Screen Item # Description Print and adjust pattern of the head Print and adjust pattern of the platen Print and adjust pattern of the print position New Table Alignment Eject or insert the platen Adjusting the height of the platen Select the platen height adjusting method.
- Page 17 Replacement Screen The Model X tracks the usage of the major components in the printer. These components will eventually need to be replaced. By touching each button you will get a real time view of the current life of that component.
- Page 18 Software Software is designed to be plug and play. Drag the image in, position where you want and hit print...
- Page 19 2 inches from the top. You can also adjust the sizing and positioning in the light blue box to the left. For example if someone wants the image to be 10 x 10 inches wide, you can type that in here and hit apply.
- Page 20 2 options. Model X and Model X File. Model X = prints directly to the printer Model X file = allows you to save the file onto your computer. To then be put on a thumb drive and plugged into the front...
- Page 21 Background section: Here you can adjust the background in Turbo RIP. You can make it opaque and remove background colors. The sliding bar indicates how much you want to change the desired section.
- Page 22 White Ink: This section is where you tell the software to lay down white ink. Click on the box next to “Add white under-base” will automatically generate a white ink under-base for the file and change the default background color to black. Currently the Grayscale button is checked as well, this is a way to save on ink cost.
- Page 23 White Ink Settings and Adjustments: The White ink settings are set at the default necessary white ink to get full coverage. For the White ink Adjustments, you can adjust the opacity of the ink, and increase the choke to avoid any white outlines.
-
Page 24: Getting Ready To Print
Getting Ready to Print AnaJet Ricoh _ Ri 1000- Operator Training... -
Page 25: Best Practices
Best Practices • Always press the shirt for 5-10 seconds before printing. This will lay down all the fibers on the shirt. • Be sure not to touch the area where the print will go after you press, if you do the fibers of the shirt will stick back up. •... - Page 26 Loading a Shirt • Shirt should be loaded with the collar closest to you, so bottom enters printer first Shirt on Table • Be sure shirt is as flat as possible, smooth any wrinkles Press • Secure table hoop, press print/set Confirm...
- Page 27 Heat Press Equipment • All garment inks are required to reach a certain temperature and time to be properly cured, if this temperature or time is not properly adjusted on your heat press you risk the possibility of the shirt washing out during the wash cycle. Keep Heat Press at least 10’ft from printer.
Need help?
Do you have a question about the X and is the answer not in the manual?
Questions and answers