Advertisement
Troubleshooting Tips:
1. There is no video or audio on the monitor.
a. Make certain the unit's Green LED is on and the Red LED is flashing.
b. Check video cable connections and input settings on monitor.
c. QuickSign may be used to determine the unit's current video resolution. Verify the monitor is capable of
this resolution.
d. Use the remote to browse to the video folder and select the desired video manually.
2. QuickSign player scan does not find my unit on the network.
a. Check the Ethernet RJ-45 LEDs to see if they are active. Verify network cables are securely inserted.
b. Verify with the on screen menu that the unit has an IP address that is in the sub-net you are using.
DHCP may be disabled.
c. If you are plugging directly into the unit from a computer, a crossover cable is required.
d. QuickSign only works within the same subnet on which the MP500 resides.
3. How do I change video resolution?
a. You will need to have the MP500 connected to a computer via Ethernet. Use the Set Resolution tab
under Tools in Quick Sign to change video output type and resolution. There is also a button for
retrieving the current video setting on the unit.
4. Why is the picture all green on my HDMI input monitor?
a. The unit detects the proper color space on power up. If the monitor is disconnected for a long period of
time, it may revert to a different setting. Simply ensure the monitor is connected and reboot the MP500.
CE labs can support many areas of your video playback and distribution needs.
We manufacture HD media players, Digital Signage Solutions, HDTV compatible RF amplifiers, HD distribution
amplifiers, and cables of all types.
See our full product line at www.celabs.net.
WARRANTY
Cable Electronics, Inc. warrants this product to be free from defects in material and workmanship, under normal use
and service, for a period of one year from the purchase by the original purchaser. If this product is defective or
malfunctions, Cable Electronics will replace or repair this unit (at our option) within a reasonable time. No
expressed or implied warranty is made for any defects or damage caused by immersion or exposure to liquids,
abuse, neglect, improper operation of unit, excess wear and tear and or defects resulting from unauthorized
disassembly and or modification.
Cable Electronics, Inc.
3209 Wood Drive
Garland, TX 75041
(469) 429-9200 Fax (469) 429-9205
Document: MP500 Quick Start Guide_J.doc
CE labs MP500
HD Media Player
MP500
HD Media Player
Quick Start Guide
This guide will explain the basic connection and
operation of the MP500. For full details on
operation, refer to the MP500 manual at
www.celabs.net.
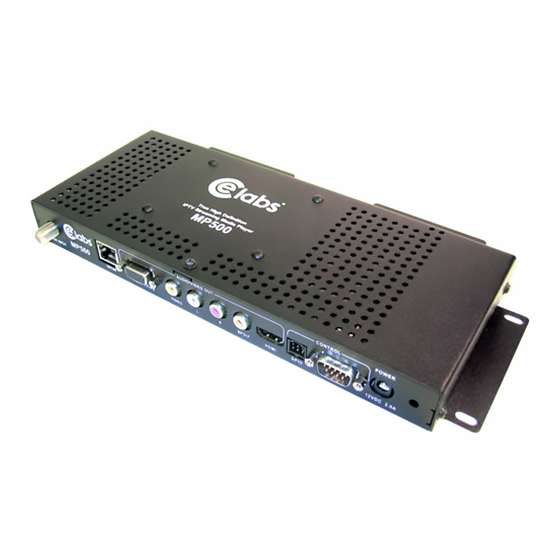
Connections:
The MP500 is capable of driving a wide variety of displays at up to 1080P
resolution at bit rates up to 40 Mbps. Connect the following cables to
operate the unit.
• Display cable – Depending on the application, plug in the cable from the media player to the display. The HDMI cable is
run directly. The component video output uses a DB-15 to RCA cable to break out the video signal. The appropriate
cable should be ordered at the time of player purchase.
• Audio cable – The audio output is via two RCA jacks on the rear panel. Connect a patch cable from the rear jack to the
display or audio system as desired. The audio cable is not needed when HDMI is connected as audio is integral to the
HDMI cable.
• Network cable – Certain operations require a network connection in order to implement. Connect an Ethernet cable between
the MP500 10/100 port and a local Ethernet switch. Alternatively, you may connect the player to a local PC using a
crossover cable.
• F-Connector RF coax – If you have purchased a MP500T, the unit has a built-in ATSC tuner for receiving HD broadcasts.
Use the remote up and down arrow keys to change channels or the number may be entered directly on the keypad.
The channel will always go back to default startup item on reboot.
• Insert the power plug into the MP500. Plug the power supply cord into a 120VAC outlet.
• Please wait for approximately one minute until the unit completes the boot-up process. If a default startup playlist has been
defined and content is on the local storage medium, the unit will begin to display video. If no video appears, press the
menu button on the remote control to check on the unit's status.
Note: The RS-232 and GPIO ports are used for advanced controls. Please refer to the MP500 manual for further
information.
Menu:
If you have a standard unit without a media card
installed, you will see a text based menu on
screen. The menu allows a user to view the
media player network settings and adjust some
parameters. A media player with an internal
storage card and the dual layer option will display
a graphical OSD when the remote "menu" button
is pressed. The graphical menu allows additional
features for browsing content on internal or
external storage memory.
CE labs MP500
Unpacking:
The box should contain the following items:
•
MP500A Media Player
•
Universal Power Supply and power
cable
•
Remote Control / 2 AAA Batteries
•
Quick Start Guide
•
HDMI cable
•
Optional item(s) that were ordered
at time of purchase.
HD Media Player
Advertisement
Table of Contents

Related Manuals for Elabs MP500


Summary of Contents for Elabs MP500
- Page 1 • Network cable – Certain operations require a network connection in order to implement. Connect an Ethernet cable between the MP500 10/100 port and a local Ethernet switch. Alternatively, you may connect the player to a local PC using a crossover cable.
- Page 2 The unit has ventilation holes along the sides and top. Theses should remain uncovered during operation. There are no ventilation openings on the bottom of the chassis, so it may be bolted directly to a shelf or monitor. CE labs MP500 HD Media Player...
Need help?
Do you have a question about the MP500 and is the answer not in the manual?
Questions and answers