
Summary of Contents for Continental Refrigerator HS Series
- Page 1 PC125 and PC125M Operators Manual C125 125M O perators Manual HS Series Hose Saws HS150 / HS300 / HS500 Operators Manual ContiTech www.contitech.us...
-
Page 2: Safety Precautions
SAFETY PRECAUTIONS MODELS COVERED This manual is applicable to different variations of the Continental HS Series Hose Saws. SAFETY PRECAUTIONS • READ INSTRUCTIONS AND IDENTIFY ALL COMPONENT PARTS BEFORE USING HOSE SAW. • MOUNT THE HS150, HS300, OR HS500 HOSE SAW ON A STURDY WORKBENCH. -
Page 3: Table Of Contents
TABLE OF CONTENT SAFETY PRECAUTIONS-----------------------------------------------------------------------------------------------------2 CONTINENTAL HS SERIES HOSE SAWS SERIES & TECHNICAL DATA----------------------------------------------------------------------4 INITIAL SET UP------------------------------------------------------------------------------------------------------------------------------5 HS150 / HS300 / HS500 INCLUDED TOOLING-------------------------------------------------------------------------------------------------------6 HS150 / HS300 / HS500 OPTIONAL PARTS-----------------------------------------------------------------------------------------------------------7 HS150 / HS300 / HS500 BLADE AWARENESS-------------------------------------------------------------------------------------------------------9 HS300 / HS500 HOSE HELPER SET UP----------------------------------------------------------------------------------------------------------------10... -
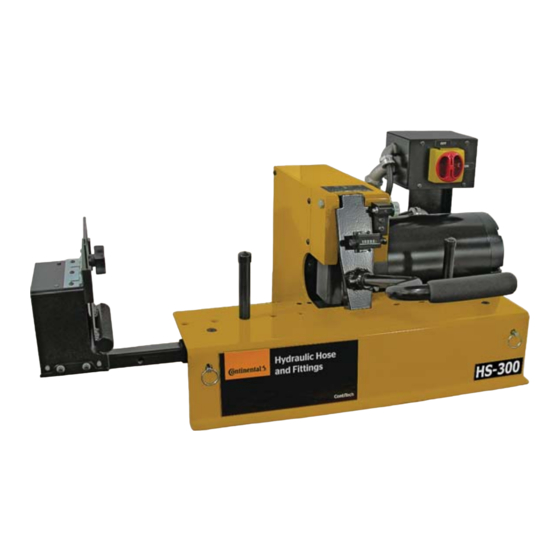
Page 4: Continental Hs Series Hose Saws Series & Technical Data
CONTINENTAL HS SERIES HOSE SAWS & TECHNICAL DATA These rugged, HS150 / HS300 / HS500 dependable saws offer features not found on other saws. Choose the one with the capacity and features which meet your individual requirements. Technical Data HS150... -
Page 5: Initial Set
FOLLOW THESE STEPS BEFORE YOU USE YOUR HS SERIES HOSE SAW FOR THE FIRST TIME. • Mount your HS Series Hose Saw on a sturdy workbench in a well-lit area. Workbench should be able to support the hose saw weight. -
Page 6: Hs150 / Hs300 / Hs500 Included Tooling
HS150 / HS300 / HS500 INCLUDED TOOLING • Hose Helper Included only for HS300 / HS500 Series. Not available for HS150. A “Hose Helper” attachment for the HS300 & HS500 prevents the hose from being drawn back during a cut and gives the operator the ability to more precisely control the cut length. -
Page 7: Hs150 / Hs300 / Hs500 Optional Parts
HS150 / HS300 / HS500 OPTIONAL PARTS • Mister Hose Assembly Optional only for HS300 / HS500 Series. Not available for HS150. The mister sprays a fi ne mist of air tool oil on the saw blade for longer blade life and cleaner cuts. •... - Page 8 HS150 / HS300 / HS500 OPTIONAL PARTS • Scalloped Blade (General Purpose) Available for all HS150 / HS300 / HS500 Series. • Double Bevel Blade with SS Slots Available for all HS150 / HS300 / HS500 Series. Hose Saw Blade ContiTech Blade Size Arbor...
-
Page 9: Hs150 / Hs300 / Hs500 Blade Awareness
HS150 / HS300 / HS500 BLADE AWARENESS Note: New blades must be properly conditioned to assure long life and clean cuts. For the fi rst ten cuts, feed the blade slowly through a medium size hose. this will properly break in and condition the blade for long life. -
Page 10: Hs300 / Hs500 Hose Helper Set
HS300 / HS500 HOSE HELPER SET UP Step 1 Retraction To set hose helper, loosen locking knob and lift the retraction. Locking Knob Step 2 Feed the hose through from the rear end, and set retraction a slight angle and tighten locking knob. This will prevent hose from back feeding from cutting area. -
Page 11: Hs150 / Hs300 / Hs500 Hose Bending Pins Set
HS150 / HS300 / HS500 HOSE BENDING PINS SET UP Hose Bending Pins Set UP All the HS150 / HS300 / HS500 series hose saws have a “Hose Bending Pins Position” decal placed on top of the hose saw. Step 1 Position the hose bending pins according to the hose size. -
Page 12: How To Change Saw Blade
HOW TO CHANGE THE SAW BLADE Step 1 MAKE CERTAIN THAT THE HOSE SAW IS TURNED OFF AND UNPLUG IT. WEAR SAFETY GLASSES AND PROTECTIVE GLOVES AT ALL TIMES WHEN CHANGING SAW BLADE AND OPERATING THE HOSE SAW. Step 2 Use a 5/32 inch Allen wrench to remove the 5 screws, and the side access panel. - Page 13 HOW TO CHANGE THE SAW BLADE Step 6 Remove the old blade. Note: Be careful when removing the old blade. Note: Always wear safety glasses and protective gloves when changing blade and operating the hose saw. Step 7 Use an air gun or a clean rag to clean the inside to remove any debris.
-
Page 14: How To Insert The Vacuum Attachment
HOW TO INSERT THE VACUUM ATTACHMENT Step 1 MAKE CERTAIN THAT THE HOSE SAW IS TURNED OFF AND UNPLUG IT. WEAR SAFETY GLASSES AND PROTECTIVE GLOVES AT ALL TIMES WHEN OPERATING THE HOSE SAW. • 1 ¼" Vacuum Port located on rear of hose saw. Available in all HS150 / HS300 / HS500 Series. -
Page 15: How To Install The Hs300 / Hs500 Mister Hose Assembly
HOW TO INSTALL THE HS300 / HS500 MISTER HOSE ASSEMBLY Step 1 MAKE CERTAIN THAT THE HOSE SAW IS TURNED OFF AND UNPLUG IT. WEAR SAFETY GLASSES AND PROTECTIVE GLOVES AT ALL TIMES WHEN INSTALLING THE MISTER HOSE ASSEMBLY AND OPERATING THE HOSE SAW. The following procedures can be used to install the Mister Hose Assembly on the HS300 / HS500 Series hose saws. - Page 16 HOW TO INSTALL THE HS300 / HS500 MISTER HOSE ASSEMBLY Step 5 Remove the Fill Plug located on the top of the Mister Lubricator (C). Step 6 Pour 1 bottle of 4 oz of mister oil into the fi ll port (D). Then thread the Fill Plug back in.
-
Page 17: How To Adjust Air Pressure & Oil Drops
HOW TO ADJUST AIR PRESSURE & OIL DROPS Step 1 MAKE CERTAIN THAT THE HOSE SAW IS TURNED OFF AND UNPLUG IT. WEAR SAFETY GLASSES AND PROTECTIVE GLOVES AT ALL TIMES WHEN INSTALLING THE MISTER HOSE ASSEMBLY AND OPERATING THE HOSE SAW. Step 2 Use a 5/32 inch Allen wrench to remove the 5 screws, and the side access panel (E). -
Page 18: Hs150 / Hs300 / Hs500 Replacement Accessories
HS150 / HS300 / HS500 REPLACEMENT PARTS Mister Hose Assembly Hose Helper Hose Bending Pins Hose Saw Counter Hose Channel System Mobile Cart Vacuum Attachment Serrated Blade Scalloped Blade Double Bevel w/ SS Slots Blade Hose Saw Blade ContiTech Blade Size Arbor Alternative Model... -
Page 19: Component Parts Breakdown
COMPONENT PARTS BREAKDOWN HS-150 ASSEMBLY (103734) ITEM PART NUMBER DESCRIPTION 103454 HS150 BASE ASSEMBLY 103814 1 HP 110V 3600RPM MOTOR 91251A623 3/8-16 X 7/8 SHCS 91101A031 3/8 LOCK WASHER 92620A537 1/4-20 X 1/2 HHS 92230A330 1/4-20 X 1-1/2" HEX STANDOFF 103774 1/4-20 RUBBER VIBRATION FOOT 103299... - Page 20 COMPONENT PARTS BREAKDOWN...
- Page 21 COMPONENT PARTS BREAKDOWN...
- Page 22 COMPONENT PARTS BREAKDOWN...
- Page 23 PC125 and PC125M Operators Manual Contact ContiTech. Engineering Next Level ContiTech AG As a division of the Continental Group, ContiTech NAFTA Headquarters is a recognized innovation and technology leader 703 S. Cleveland Massillon Road in natural rubber and plastics. As an industry partner Fairlawn, OH 44333-3023 U.S.A.
Need help?
Do you have a question about the HS Series and is the answer not in the manual?
Questions and answers