Advertisement
Quick Links
Installation Guide
On-site installation procedure PV monitoring
with Xemex KWHIQ meter
Introduction
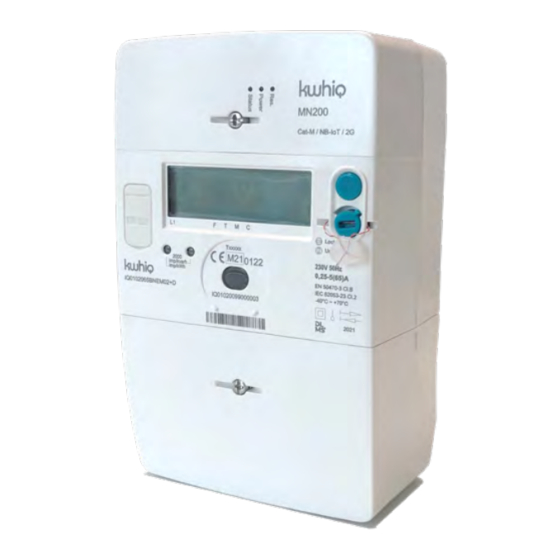
The Kwhiq IQ0102065BNEM electricity meter is a single-phase smart meter developed for measuring
and monitoring energy to enable good energy management. Many energy parameters (such as
energy, voltage, power, ...) are measured, logged and made available. The meter can be read and
configured via the mobile network (4G / 2G).
The most important features:
Measurement accuracy
Connection
Rated voltage
Voltage range
Rated current
Current range
Starting current
Frequency
Internal power
consumption
Interfaces
Real time klok
Mechanical
Installation Guide
On-site installation procedure PV monitoring with Xemex KWHIQ meter
Active power: EN 50470-3 Class B
Reactive power: IEC 62053-23 Class 2
MID certified
1 phase, 2 wires, direct connection
230V
+/- 20%: 184V – 276V
5A
0.25A - 65A
20mA
50Hz (+/- 5%)
Voltage circuit: < 2W / 10 VA per phase. Current circuit: 0.5 VA per phase
– DLMS / COSEM via CAT M / GPRS / NBIoT mobile network
– Optical local interface DLMS / COSEM direct HDLC - IEC 62056-21
– P1 port (SMR v5.0.2)
– LCD display with auto-scroll and push button for manual scrolling.
– 2 energy pulse LEDs: active 2000 imp/kWh & reactive 2000 imp/
kvarh
IEC 62054-21
0.5s deviation over 24h at 23°C +/- 0.15 s/°C/24h
Backup by super capacitor to bridge 5 days of power failure
Dimensions: 210 x 131.6 x 85.5 mm Weight: 0.95 kg
1
Advertisement

Summary of Contents for XEMEX KWHIQ
- Page 1 Xemex KWHIQ meter Introduction The Kwhiq IQ0102065BNEM electricity meter is a single-phase smart meter developed for measuring and monitoring energy to enable good energy management. Many energy parameters (such as energy, voltage, power, ...) are measured, logged and made available. The meter can be read and configured via the mobile network (4G / 2G).
- Page 2 12. Indicator lights. The red LED flashes when energy is being consumed or fed in. There is a LED for active energy (left) and a LED for reactive energy (right). On-site installation procedure PV monitoring with Xemex KWHIQ meter Installation Guide...
- Page 3 L1 -> Voltages on phase 1 F -> Meter cover opened (fraud)! iii. T -> Terminals cover opened M -> Strong magnetic field detected (fraud)! C -> error situation (for example: invalid internal clock) On-site installation procedure PV monitoring with Xemex KWHIQ meter Installation Guide...
- Page 4 Scroll through the list of values by briefly (> 0.2s & < 2s) pressing the upper blue button. After 60 seconds without pressing this button, the display will return to auto scroll mode. On-site installation procedure PV monitoring with Xemex KWHIQ meter Installation Guide...
- Page 5 94.31.9 Mobile network signal strength RSSI 25.4.0 Mobile network - APN 94.31.4 SIM kaart ICCID 25.1.0 IP_address 0.2.0 Active firmware version (FW version measurement part + FW version application) On-site installation procedure PV monitoring with Xemex KWHIQ meter Installation Guide...
-
Page 6: Installation
First de-energise the side of the circuit to which the meter is to be connected. Make sure that the circuit cannot be re-energised by accident. Connect the meter as indicated below. On-site installation procedure PV monitoring with Xemex KWHIQ meter Installation Guide... - Page 7 The kwhiq meter is equipped with terminal connectors that allow the use of wires with a section of 2.5 to 25 mm2. If a solid cable is not used, the correct cable ferrules must be fitted. The terminal connectors are fitted with M7 x 13 cross-head and slotted-head screws that must be tightened with a Posidriv PZ No.
- Page 8 If the ‘Status’ LED does not flash quickly 5 minutes after start-up, there is probably no mobile network coverage at that location and the meter should be moved to a location where there is. On-site installation procedure PV monitoring with Xemex KWHIQ meter Installation Guide...
-
Page 9: Installing An External Antenna
Installing an external antenna 1. Remove the seal from the communication module. 2. Remove the cover from the communication module. On-site installation procedure PV monitoring with Xemex KWHIQ meter Installation Guide... - Page 10 4. Break out the piece of plastic to allow the cable to come out of the cover. 5. Replace the cover on the communication module and reseal the bolt with a (proprietary) seal. 6. Install the antenna in a location with sufficient network coverage. On-site installation procedure PV monitoring with Xemex KWHIQ meter Installation Guide...
- Page 11 To do this, press the upper blue button and scroll through all the codes of the display cycle. All values must be noted in the RMA document. On-site installation procedure PV monitoring with Xemex KWHIQ meter Installation Guide...
Need help?
Do you have a question about the KWHIQ and is the answer not in the manual?
Questions and answers