
Summary of Contents for zapco DSP-IV AT Series
- Page 1 DSP-IV AT SERIES Owner’s Manual Before operating the unit, please read this manual throughly and retain it for future reference. Any updates are available on zapco.com/download...
-
Page 2: Table Of Contents
Table of Contents The Zapco DSP-IV AT Series ........................... 5 Before you start your installation ........................6 Upgrading a Factory Stereo ........................6 All Wire is not created equal ..........................6 Planning your power connections ........................7 More words about Power and Ground ....................8 Wire size .................................... -
Page 3: The Zapco Dsp-Iv At Series
Experience (Knowledge from doing) In addition, for all those who need everything in a compact package, the DSP-IV AT series brings all this great processing to the ADSP-Z8 IV-6AT, a six-channel full range Class D There is absolutely no substitute for experience; that is a simple fact of life. -
Page 4: Before You Start Your Installation
• Because CCA wire can not conduct DC electrical current like copper wire can, your amp ZAPCO highly recommends that a fuse or circuit breaker be placed within 18" of the will not get the current it needs to produce its rated power. That means you get less battery. -
Page 5: More Words About Power And Ground
Mounting your unit More words about Power and Ground Mounting your Zapco unit is easy. Just keep in mind a few guidelines: The second most common cause of under performing amplifiers is insufficient power • The unit can be mounted in any direction, on wood, metal, or carpet but not current or a poor power connection. -
Page 6: Dsp-Z8 Iv At Panels
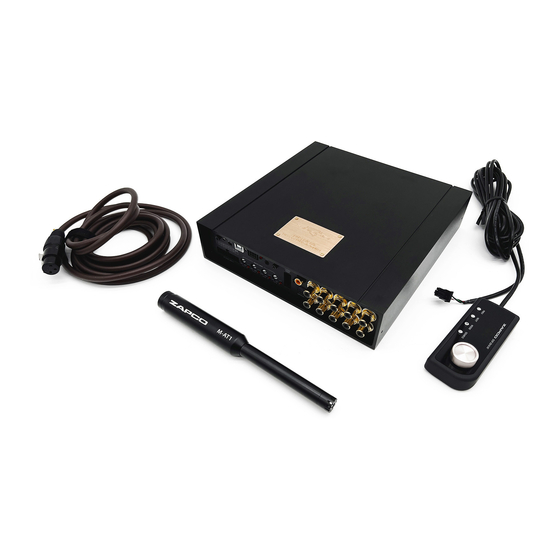
DSP-Z8 IV AT Panels ADSP-Z8 IV-6AT Panels DSP-Z8IV AT 1. Comm Port for HD-BT module 8. Microphone Input for Auto-Tuning 1. Power-On LED 8. Coaxial digital input 2. Coaxial digital input 9. Dash remote port 2. Auto-on switch for OEM integration 9. -
Page 7: Remote Control
Remote Control The Microphone (for Auto Calibration, optional) The M-AT1 is a special microphone for setting up the sound automatically, based on the response characteristics of the speakers and auto detail detection of the car. After detecting all the necessary information, the audio information screen will be transmitted to the computer. -
Page 8: The Graphical User Interface
3. This section is the quick setup area and will be the go-to setup for most systems. Across Just download the file from the Zapco website an put it on your desktop (the number the bottom you find 2CH, 4CH, 6CH, 8CH, and SUM. All digital inputs are 2CH inputs and following “rc”... -
Page 9: The Advanced Menu
c. The Phase column lets you adjust the polarity of each channel, so you have all The Advanced Menu speakers moving the same direction at the same time. See Pag. 22 for more information on Phase. If you have the M-AT1 calibration mic, the autotuning system The Advanced menu of the DSP-IV AT processor GUI, can take you to the Mixing Set where will check the phase of all the speakers for you. - Page 10 Auto Calibration. When used with the optional M-AT1 microphone, the GUI can 5. The Tips area will display messages or reminders i.e. To make sure your crossovers are automatically calibrate the major tuning functions of equalization, signal delay, and phase. set before the calibration run (to protect the tweeters).
-
Page 11: The File Menu
The File Menu Read from Device works the same way. You will get the Read from Device menu and at the bottom you can Select Read Place, choosing any of the saved memory positions, and then click Read to load the settings of that memory preset into the DSP. Delete from Saving your work is critical. -
Page 12: Manual Tuning
B. Midrange and Woofer/Mid-Bass: Now mute all but the midrange. These are easier Now you have set the R-to-L phase of each pair of speakers and you have blended each because phase is more obvious at lower frequencies and because you can use more volume. pair into the system in the correct phase for the best sound stage. - Page 13 The Tuning Tools of the GUI 5. EQ: This is the EQ band box. You can which of the 31 EQ bands you will adjust by clicking on any of the green band buttons and using drag-n-drop, but you can also click You will use the EQ graph and the Function bar above for making the EQ adjustments.
- Page 14 What We Want to Achieve Best Response Curve You will use the EQ graph and the Function bar above for making the EQ adjustments. Below we lay out the EQ tuning functions. Of course, there is no way to know what the response in any particular car will be.
-
Page 15: Technical Specifications
A Bad Response Curve Technical Specifications At the bottom line the sound you want from your car will be subject to your tastes. DSP-Z8 IV AT ADSP-Z8 IV-6AT Everyone will like the “Best Response Curve” and everyone will like the “Good Response Curve”. - Page 16 Software/PC requirements: Microsoft Windows (32/64bit): XP, Vista, Windows 7, Windows 8, Windows 10. Continuous exposure to excessive sound pressure levels may cause permanent hearing loss. ZAPCO strongly advises that you use common sense when setting volume levels. Everything written in this manual is for the proper use of the products. Some features or specifications could be modified during production to improve the product performance.
- Page 17 Modesto, California USA Since 1974 zapco.com...
Need help?
Do you have a question about the DSP-IV AT Series and is the answer not in the manual?
Questions and answers