Table of Contents
Advertisement
Advertisement
Table of Contents

Subscribe to Our Youtube Channel
Summary of Contents for Dormakaba 1460
- Page 1 Programmer 1460 User Manual - 06/2021...
-
Page 2: Table Of Contents
Import from components 5.4.1 Info 5.4.2 Read traceback 5.4.3 Diagnostic details 5.4.4 Import from digital cylinder, c-lever and reader 5.4.5 Import from mechatronics cylinder 5.4.6 Info for TouchGo components (signal strength) 5.4.7 Configuration Manual settings dormakaba Programmer 1460 - 06/2021... - Page 3 Charging the battery Menu structure Service EAC Service Tool 8.1.1 Programmer 1364 – updating firmware 8.1.2 Programmer 1460 – updating firmware 8.1.3 Actuators – updating firmware 8.1.4 Updating desktop reader 91 08 8.1.5 Creating a programmer memory image Emergency supply...
-
Page 4: Regarding This Document
1.4 Document availability Additional documentation is available on the dormakaba website. The manuals can be found in a protected area (extranet). They can be accessed using the user account of trained specialists or a temporary user account. -
Page 5: Abbreviations/Definition Of Terms
Cabinet lock dormakaba cabinet Lock 21 10 Wireless Reader dormakaba remote reader 91 15 (E320) with wireless extension module 90 43 Desktop reader dormakaba desktop reader 91 08 Programmer 1364 dormakaba Programmer 1364 Programmer 1460... -
Page 6: Warnings
ESD: Danger from electrostatic dis- charge Useful tips and information regarding safe operation of the product are labelled as follows: Tips for usage, useful information. These help to make the best use of the product and its functions. dormakaba Programmer 1460 - 06/2021... -
Page 7: Basic Safety Instructions
Opening the device will lead to exclusion of all liability and warranty. This excludes replacing the batteries. The elimination of faults and maintenance work may only be performed by skilled personnel (see chapter 1 Target group). - 06/2021 dormakaba Programmer 1460... -
Page 8: Esd Prevention Measures
Avoid contact between PCBs and clothing. The wrist strap protects PCBs against an elec- trostatic discharge voltage from the body only. However, damage can also be caused by an electrostatic discharge voltage from clothing. • Transport and ship dismantled modules in conductive anti-static bags only. dormakaba Programmer 1460 - 06/2021... -
Page 9: Product Description
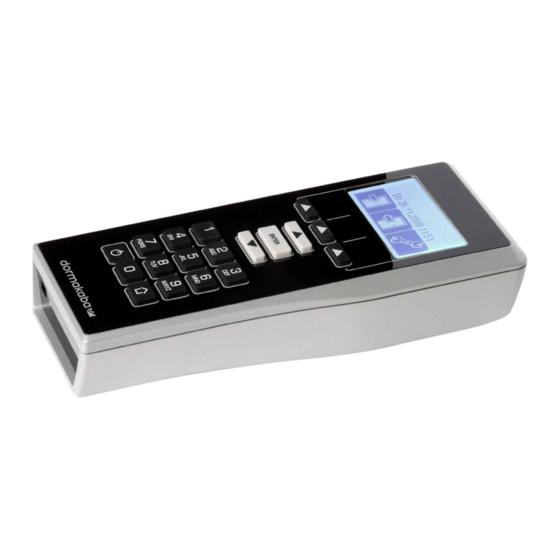
3.1.1 Layout Programmer 1460 Radio interface Programming cable connector Display Menu buttons UP, navigation button ENTER DOWN, navigation button Alphanumeric buttons ON/OFF button Home, Cancel, Back USB interface/main charger con- nector - 06/2021 dormakaba Programmer 1460... -
Page 10: Display Symbols
Connect to programmer Firmware General symbol for actuators Digital cylinder c-lever Cylinder Locker lock Reader c-lever compact 3.2 Scope of delivery • 1 USB cable (for programming and configuration) • 1 mains adapter • 1 quick guide dormakaba Programmer 1460 - 06/2021... -
Page 11: Technical Details
Humidity 0 ... 95% RH, non-condensing 3.4 Conformity This product conforms to the EU directives 2014/53/EU Radio Equipment Directive 2011/65/EU RoHS Directive You can download the original declaration of conformity in PDF format at www.dormakaba.com/conformity. - 06/2021 dormakaba Programmer 1460... -
Page 12: Operation
The three buttons under the menu buttons are the two navigation buttons (UP, up arrow, and DOWN, down arrow) and the confirmation button (ENTER). ENTER The UP and DOWN buttons are used to select the next sub-menu for example, and ENTER to open it. dormakaba Programmer 1460 - 06/2021... -
Page 13: Alphanumeric Buttons
—> The main menu is opened. 4.3 Display dialogues During operation, the display shows a number of different dialogues with prompts and messages. Watch the display carefully during operation of the programmer. Confirm the prompts and messages. - 06/2021 dormakaba Programmer 1460... -
Page 14: Wireless Programming
• Programmer • Firmware update • Emergency power supply 4.5.1 Programmer settings Press the 'Settings' menu key. Use the navigation keys to select the 'Programmer' menu. Press the ENTER key. ð The properties are displayed. dormakaba Programmer 1460 - 06/2021... - Page 15 Open the 'Programmer' menu. Choose the 'Volume' sub-menu. Press the ENTER key. 5. Select the volume level using the navigation keys. 6. Press the ENTER key. Note: The value < 1 means "mute". ð The value is saved. - 06/2021 dormakaba Programmer 1460...
- Page 16 4.5.1.5 Setting the lighting Open the 'Settings' menu. Open the 'Programmer' menu. Choose the 'Lighting' sub-menu. Press the ENTER key. 5. Select the lighting variant. 6. Press the ENTER key. ð The selection is saved. dormakaba Programmer 1460 - 06/2021...
- Page 17 Open the 'Settings' menu. Open the 'Programmer' menu. Select the 'Switch-off time' sub-menu. Press the ENTER key. 5. Select the switch-off time. 6. Press the ENTER key. ð The selection is saved. - 06/2021 dormakaba Programmer 1460...
- Page 18 ð If both inputs match, the PIN is saved. PIN protection is active. Change PIN: If a PIN has been set up via the system software, it is to be input as the “old PIN”. dormakaba Programmer 1460 - 06/2021...
-
Page 19: Actuator Settings
Prefer existing The traceback data saved in the component are preferred. Do not read The traceback data are not read and are lost during update. 4.5.2 Actuator settings Valid master media are required for some settings. - 06/2021 dormakaba Programmer 1460... - Page 20 Log in to the actuator using the master medium. Connect the programmer to the actuator. 5. Select the 'Battery change' sub-menu. 6. Press the ENTER key. Select "Yes" if a new battery has been placed. dormakaba Programmer 1460 - 06/2021...
- Page 21 Log the master medium in to the actuator. Connect the programmer to the actuator. 5. Choose the 'Illumination unit' sub-menu. 6. Press the ENTER key. Select 'On' or 'Off'. 8. Press the ENTER key. ð The selection is saved. - 06/2021 dormakaba Programmer 1460...
- Page 22 5. Select the 'Opening time' sub-menu. 6. Press the ENTER key. Select the opening time from the following options: 2, 4, 6, 10, 20, 30, 45 seconds or 1 minute. 8. Press the ENTER key. ð The selection is saved. dormakaba Programmer 1460 - 06/2021...
- Page 23 Open the 'Actuator' menu. Log the master medium in to the actuator. Connect the programmer to the actuator. 5. Choose the 'INI reset' sub-menu. 6. Press the ENTER key. Select "Yes". ð INI reset is executed. - 06/2021 dormakaba Programmer 1460...
- Page 24 ð The network is exited. Procedure for displaying the network status Choose Status. Confirm with ENTER. ð The component status is displayed. The programmer display contains the following: Software version, e.g. 00.0024 Network, e.g. standalone or wireless dormakaba Programmer 1460 - 06/2021...
-
Page 25: Data Settings
5. Press the ENTER button. ð All available types of actuator are displayed. 6. Select the actuator type. Press the ENTER button. ð The firmware versions available for the actuator type selected are displayed. 8. Search for up-to-date firmware. - 06/2021 dormakaba Programmer 1460... - Page 26 All key plans are deleted from the programmer in this menu. Open the 'Data settings' menu. Select the 'Delete all key plans' sub-menu. Press the ENTER button. Select 'Yes'. ð All key plans are deleted from the programmer. dormakaba Programmer 1460 - 06/2021...
-
Page 27: Programming
Residential Matrix One/exivo/KEM Indirect Matrix Pro/Exos/EACM Professional OSS (3rd Party + dormakaba host) 3rd Party Determining the system level status and “BLE ready”. On the programmer, select the 'Actuator info' menu and read the information from the component. Requirements: •... - Page 28 Update SL1 to SL3 Licensing Mobile Access via BLE The update procedure is described in the technical manual of the component. To save time and money, order new components in the matching combination and configuration. dormakaba Programmer 1460 - 06/2021...
-
Page 29: Export To Components
ð Update the configuration. Activate the electronics on cabinet lock 21 10 by pressing briefly on the door. Choose 'Next'. ð All data are exported to the component. ð The component configuration is updated and confirmed. - 06/2021 dormakaba Programmer 1460... -
Page 30: Export To Mechatronics Cylinders
Insert the master into the mechatronic cylinder and remove it again. Insert the programming adapter into the mechatronic cylinder. ð Update the configuration. Choose 'Next'. ð All data are exported to the mechatronic cylinder. ð The component configuration is updated and confirmed. dormakaba Programmer 1460 - 06/2021... -
Page 31: Import From Components
Tech* technology Bat* Battery status Clock* Date and time Firmware S. No.* Serial number L OS* LEGIC operating system System level Mobile Access is available and activated/deactivated TouchGo UID: Unique number Wireless BIND* Wireless connection - 06/2021 dormakaba Programmer 1460... -
Page 32: Read Traceback
(if there are more events, the oldest entry is overwritten by the newest entry). This allows all accesses to an actuator to be tracked at any time. The programmer 1460 enables a traceback to be read provided the function has not been disabled in the system software. -
Page 33: Import From Digital Cylinder, C-Lever And Reader
Insert the master into the mechatronic cylinder and remove it again. Insert the programming adapter into the mechatronic cylinder. Choose a menu, e.g. 'Configuration'. 5. Press the ENTER key. ð The component configuration is read and confirmed. - 06/2021 dormakaba Programmer 1460... -
Page 34: Info For Touchgo Components (Signal Strength)
TouchGo to function without restriction. The RSSI value displays the total signal strength received. High RSSI values indicate sources of interference in the immediate vicinity and reduce the functionality of TouchGo. dormakaba Programmer 1460 - 06/2021... -
Page 35: Configuration
5.6 Firmware update of components 5.6.1 Firmware update of V4 actuators The Programmer 1460 is required for the firmware update V4. Before the firmware of actuators can be updated, the firmware version of the Programmer should be checked and if necessary, the firmware of the Programmer must be updated. -
Page 36: Crossgrade For Legic Advant Components
Remote reader or compact reader: Note: No INI reset contacts available. Note: Always interrupt the energy supply before switching. Move DIP switches 5 and 6 to ‘ON’. After switching, restore the energy supply. ð The actuator flashes. dormakaba Programmer 1460 - 06/2021... - Page 37 User Manual Programming ð The actuator is in the bootloader. Connect the programmer 1460 and the actuator with the programming cable. ð All technology variants of the actuator firmware which are on the programmer are displayed. Select the technology variant and confirm with ENTER.
- Page 38 Set DIP switch 6 to ON. Not for V3 components Reset points in the forend module Reset information for other components is described in the manuals of the components. Always perform an INI reset in accordance with the device manual. dormakaba Programmer 1460 - 06/2021...
- Page 39 INI reset or for V3, during the INI reset.) Set DIP switch 5+6 to ON. Not for online actuators Reset information for other actuators can be found in the corresponding manuals. Always perform the INI reset as described in the device manual. - 06/2021 dormakaba Programmer 1460...
-
Page 40: System Connection
Windows Server 2008 • Windows Server 2008 R2 Procedure Download the installation package from the dormakaba website. Unpack the installation package. Open the installation package. ð Programmer file path: ..\evolo-toolchain\Programmer 1460\Driver ð EAC Service Tool file path: ..\evolo-toolchain\EAC Service Tool Programmer: Select and launch the Install file. -
Page 41: Downloading Data From The System Software
Connect the programmer to the PC. ð The date and time of the connected programmer are automatically adjusted after the system software has been started. Time on actuators For how to adjust the time on the actuators, see Chapter [} 4.5.2.1] - 06/2021 dormakaba Programmer 1460... -
Page 42: Maintenance
Charging the battery using the PC Switch on the PC. Connect the programmer to the PC using the USB cable. The programmer switches on automatically. The programmer charges the battery by itself when it is connected to the PC. dormakaba Programmer 1460 - 06/2021... -
Page 43: Menu Structure
Actuator firmware Memory information Delete all Delete locking plans Back Programmer Language Contrast Volume Date/Time Lighting Key sound Turn-off time Name Information PIN protection Comfort update Back Firmware Firmware versions Update Back Emergency power supply Back - 06/2021 dormakaba Programmer 1460... -
Page 44: Service
Desktop reader 91 08 Wizard for updating the desktop reader firmware for the selec- LEGIC/MIFARE/MRD ted technology. Programmer 1460 memory Wizard for creating a ZIP file with the memory content of the image programmer. A tool for problem-solving in support cases. -
Page 45: Programmer 1364 - Updating Firmware
5. Select the current firmware file and confirm by selecting 'Next'. ð The programmer is updated. 6. Click on the 'Finish' button. 8.1.2 Programmer 1460 – updating firmware Start the 'EAC Service Tool’ auxiliary program. Connect the programmer to the computer. -
Page 46: Updating Desktop Reader 91
8. Click on the 'Finish' button. ð The firmware files are now on the programmer and can be used for a firmware update. The firmware update is described in the user manual for the programmer 1460. 8.1.4 Updating desktop reader 91 08 Start the 'EAC Service Tool' auxiliary program. -
Page 47: Creating A Programmer Memory Image
User Manual Service 8.1.5 Creating a programmer memory image The memory image can only be created with the Programmer 1460. Start the 'EAC Service Tool’ auxiliary program. Connect the programmer to the computer. Press the 'Programmer memory image' button. Follow the Wizard’s instructions. - Page 48 Service User Manual Replace the batteries. 8. Check the function of the component. dormakaba Programmer 1460 - 06/2021...
-
Page 49: Error Messages/Troubleshooting
Communication error If the PD is unplugged or the PD wireless con- Try again nection is lost, a communication error and then 'Connection disconnected' is displayed. Connection discon- nected Disconnection failed Disconnection has failed in the ZigBee con- Try again troller - 06/2021 dormakaba Programmer 1460... -
Page 50: Disposal
Disposal in Germany: dormakaba EAD GmbH will take responsibility for correct disposal of supplied goods once they are no longer in use as per statutory regulations (ElektroG in Germany). The owner of the used electrical appliance bears any costs incurred for transport to the manufacturer's plant. - Page 51 User Manual Notes - 06/2021 dormakaba Programmer 1460...
- Page 52 Schweiz AG Mühlebühlstrasse 23 8620 Wetzikon Switzerland T: +41 (0)44 931 61 11 www.dormakaba.com www.dormakaba.com...
Need help?
Do you have a question about the 1460 and is the answer not in the manual?
Questions and answers