Advertisement
Available languages
Available languages
Quick Links
Advertisement

Subscribe to Our Youtube Channel
Related Manuals for Efapel 40227


Summary of Contents for Efapel 40227
- Page 1 REF. 40227 BOTÃO DE PRESSÃO QUÁDRUPLO SEM FIOS D40 - PT P . 2 BOTÓN DE PRESIÓN CUÁDRUPLO SIN CABLES D40 - ES P . 9 WIRELESS 4-GANG PUSH BUTTON D40 - EN P . 16 PRESSOIR QUADRUPLE SANS FILS D40 - FR P .
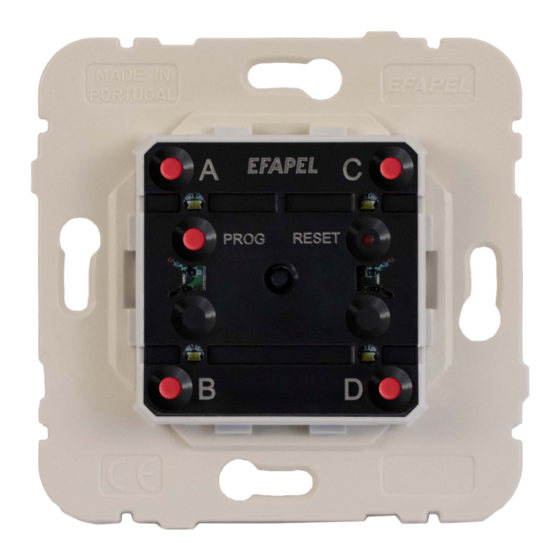
- Page 2 BOTÃO DE PRESSÃO QUÁDRUPLO SEM FIOS D40 LEGENDA Botão de Programação Botões de Comando (A|B|C|D) 4022 40227 7 LED de Modo de Funcionamento (MF) Botão de RESET...
-
Page 3: Modos De Funcionamento
LEDs ficarem to- dos a meio brilho. 2.1 - O LED MF 2º PASSO começa a piscar, indi- Click em PROG. cando que está pronto 4022 40227 7 a ser adicionado à rede, durante período de 10” . - Page 4 1º passo. ONLINE EMPARELHAMENTO DOS APARELHOS JÁ COLOCADOS EM REDE - ƒ NO BOTÃO DE PRESSÃO QUÁDRUPLO 1º PASSO Click em PROG (programação). 1.1 - O LED A liga, indicando que pode iniciar o EM- PARELHAMENTO. 4022 40227 7...
- Page 5 B, C ou D para fica a piscar. iniciar EMPARELHA- MENTO. Nota: No caso de aparel- hos alimentados a bateria (Ref.ª 40227), o LED não 4022 40227 7 pisca para maximizar a du- rabilidade da bateria. ƒ NOS APARELHOS ATUADORES 3º...
- Page 6 EM- PARELHAMENTO. 4022 40227 7 Nota: Para localizar o Atuador emparelhado a um botão Emissor, é suficiente reiniciar o EMPARELHAMENTO (1º PASSO e 2º PASSO). Desta forma, o LED C dos aparelhos com Atuador emparelhado fica ligado.
- Page 7 CARACTERÍSTICAS Função - Emissor Alimentação Pilha CR 2032 (pilha incluída) Temperatura de Funcionamento -5º - +35°C Tecnologia Rádio Frequência 2.4 GHz DESMONTAGEM DA TECLA...
-
Page 8: Substituição Da Pilha
A EFAPEL declara que os equipamentos com rádio pertencentes a este folheto informativo estão conforme a diretiva 2014/53/UE. A declaração de conformidade UE completa está disponível no site www.efapel.com/domus40 A EFAPEL reserva o direito de modificar este documento ou os produtos nele contidos sem aviso prévio. Em caso de dúvida, contacte a EFAPEL. - Page 9 BOTÓN DE PRESIÓN CUÁDRUPLO SIN CABLES D40 LEYENDA Botón de Programación Botones del Mando (A|B|C|D) 4022 40227 7 LED de Modo de Funcionamiento (MF) Botón de RESET...
-
Page 10: Modos De Funcionamiento
LED estén medio encendidos. 2.1 - El LED MF em- 2º PASO pieza a parpadear, Hacer clic PROG. indicando que está 4022 40227 7 listo para ser añadi- do a la red, durante un período de 10” . - Page 11 EMPAREJAMIENTO DE LOS MECANISMOS QUE YA ESTÁN PUESTOS EN RED - ƒ EN EL BOTÓN DE PRESIÓN CUÁDRUPLO SIN CABLES PASO Hacer clic PROG (programación). 1.1 - El LED A se enciende, indi- cando que puede iniciar el EMPARE- JAMIENTO. 4022 40227 7...
- Page 12 B, C o D para iniciar ezan a parpadear. EMPAREJAMIENTO. Nota: En el caso de mecan- ismos alimentados con bat- ería (Ref. 40227), el LED no 4022 40227 7 parpadea para maximizar la durabilidad de la batería. ƒ EN LOS MECANISMOS ACTUADORES 3º...
- Page 13 EMPAREJAMIENTO. 4022 40227 7 Nota: Para localizar el Actuador emparejado a un botón Emisor es suficiente con reiniciar el EMPAREJAMIENTO (1 PASO y 2º PASO). De esta forma el LED C de los mecanismos con actuador emparejado queda encendido.
- Page 14 CARACTERÍSTICAS Función - Emisor Alimentación Pila CR 2032 (pila incluida) Temperatura de Funcionamiento -5º - +35°C Tecnología Radio Frecuencia 2.4 GHz DESMONTAJE DE LA TECLA...
-
Page 15: Sustitución De La Pila
La declaración de conformidad de la UE completa está disponible en el sitio www.efapel.com/domus40 EFAPEL se reserva el derecho de modificar este documento o los productos contenidos en él sin previo aviso. En caso de dudas, por favor póngase en contacto con EFAPEL. - Page 16 WIRELESS 4-GANG PUSH BUTTON D40 LEGEND Programming Button Command Buttons (A|B|C|D) 4022 40227 7 Operating Mode RESET Button LED (OM)
- Page 17 LEDs are at half brightness. 2.1 - The LED OM STEP starts to blink, indi- Click on PROG. cating that it is ready 4022 40227 7 to be added to the network, during a pe- riod of 10 seconds .
- Page 18 PAIRING OF THE DEVICES THAT ARE ALREADY IN A NETWORK - ONLINE ƒ ON THE WIRELESS 4-GANG PUSH BUTTON STEP Click on PROG (programming). 1.1 - The LED A switches on, indi- cating that you can start the PAIRING. 4022 40227 7...
- Page 19 D to start PAIRING. all the devices in the network blink as well. Note: In the case of battery powered devices (Ref. 40227), the LED does not blink in order 4022 40227 7 to extend the battery’s life.
- Page 20 STEP Click on PROG to complete PAIRING. 4022 40227 7 Note: To locate the Actuator that is paired to a Transmitting button, simply restart the PAIRING (1 STEP and 2 STEP). This way, the LED C of the devices with paired Actuators stays on.
- Page 21 CHARACTERISTICS Function - Transmitter Rated Voltage Battery CR 2032 (battery included) Operating Temperature -5º - +35°C Technology Radio Frequency 2.4 GHz ROCKER DISASSEMBLY...
-
Page 22: Replacing The Battery
EFAPEL declares that radio equipment belonging to this leaflet conforms to the 2014/53/UE directive. The complete UE declaration of conformity is available on the following website, www.efapel.com/domus40 EFAPEL reserves the right to amend this document or the products contained in it without notice. If in doubt please contact EFAPEL. - Page 23 PRESSOIR QUADRUPLE SANS FILS D40 LÉGENDE Bouton de Programmation Boutons de Commande (A|B|C|D) 4022 40227 7 LED de Bouton de RESET Mode de Fonctionnement (MF)
- Page 24 LEDS soient toutes à demi-bril- lance. 2.1 - La LED MF com- ÉTAPE ÈME mence à clignoter, Appuyer sur PROG. en indiquant qu’il est 4022 40227 7 prêt à être ajouté au réseau, pendant une période de 10” .
- Page 25 ère SYNCHRONISATION DES APPAREILS DÉJÀ MIS EN RÉSEAU - ONLINE ƒ SUR LE POUSSOIR QUADRUPLE SANS FILS ÉTAPE ÈRE Appuyer sur PROG (programmation). 1.1 - La LED A s’al- lume, en indiquant que le SYNCHRONISATION peut commencer. 4022 40227 7...
- Page 26 B, C ou D débuter clignotent également. le SYNCHRONISA- Note: Pour les appareils TION. alimentés par batterie (Réf. 40227), la LED ne clignote pas pour maximiser la dura- 4022 40227 7 bilité de la batterie. ƒ SUR LES APPAREILS ACTUATEURS 3.1 - Des LEDs indiquent...
- Page 27 S Y N C H R O N I S A - TION. 4022 40227 7 Nota: Pour localiser l’Actuateur couplé à un bouton Émetteur, il suffit de réinitialiser le SYNCHRONISATION (1 ÉTAPE et 2 ÉTAPE). Ainsi, la LED C des appareils avec Actuateur couplé...
-
Page 28: Caractéristiques
CARACTÉRISTIQUES Fonction - Émetteur Alimentation 230V~ - 50Hz Température de Fonctionnement -5º - +35°C Technologie Radio Fréquence 2.4 GHz DÉMONTAGE DE LA TOUCHE... - Page 29 L’EFAPEL déclare que les équipements avec qui appartiennent à cette brochure explicative sont conforme la directive 2014/53/UE. La déclaration de conformité UE est complète et disponible sur le site www.efapel.com/domus40. EFAPEL se réserve le droit de modifier ce document ou les produits ci-inclus sans préavis. En cas de doute, veuillez contacter EFAPEL.
- Page 30 KABELLOSER 4-FACH-TASTER D40 LEGENDE Programmierschaltfläche Befehlsschaltflächen (A|B|C|D) 4022 40227 7 Betriebsart RESET-Schaltfläche LED (OM)
- Page 31 7 Sekunden, bis sich alle LED auf mittlerer Hellig- keitsstufe befinden. 2.1 - Die LED OM beginnt zu blinken, SCHRITT 2 um die Verbindungs- Auf PROG klicken. 4022 40227 7 bereitschaft zum Net- zwerk für 10 Se- kunden anzuzeigen.
- Page 32 KOPPELN DER GERÄTE, DIE SICH BEREITS IN EINEM NETZWERK BEFINDEN - ƒ AM KABELLOSEN 4-FACH-TASTER SCHRITT 1 PROG anklicken (Programmierung). 1.1 - Die LED A schaltet sich ein und zeigt damit an, dass das PAIRING ge- startet werden kann. 4022 40227 7...
- Page 33 Schaltfläche A, B, C Geräte des Netzwerks oder D zum Start des blinken ebenfalls. PAIRING. Hinweis: Bei batteriebetriebenen Geräten (Ref. 40227) blinkt die LED nicht, um die Lebensdauer 4022 40227 7 der Batterien zu verlängern. ƒ AN DEN AKTORGERÄTEN SCHRITT 3 Auswahl 3.1 - Die LEDs zeigen...
- Page 34 SCHRITT 4 Auf PROG klicken, um das PAIRING abzuschliessen. 4022 40227 7 Hinweis: Zur Lokalisierung eines mit einer Sendertaste verbundenen Aktors einfach PAIRING neu starten. (SCHRITTE 1 und 2). So bleibt die LED C der Geräte mit gepaarten Aktoren an.
- Page 35 EIGENSCHAFTEN Funktion - Herausgeber Versorgung Batterie CR 2032 (batterie enthalten) Betriebstemperatur -5º - +35°C Technologie Funkfrequenz 2.4 GHz DEMONTAGE DER WIPPE...
- Page 36 EFAPEL erklärt, dass die zu diesem Merkblatt gehörenden Funkgeräte der Richtlinie 2014/53/UE entsprechen. Die vollständige UE-Konformitätserklärung ist auf der folgenden Website verfügbar www.efapel. com/domus40. EFAPEL behält sich das Recht vor, dieses Dokument oder die darin enthaltenen Produkte ohne vorherige Ankündigung zu ändern. Im Zweifelsfall kontaktieren Sie bitte EFAPEL.
- Page 40 Serpins PORTUGAL ESPAÑA EXPORT 3200-355 Serpins +351 239 970 136 900 535 746 +351 239 970 135 +351 239 970 132 PORTUGAL comercial@efapel.com espana@efapel.com export@efapel.com sat@efapel.com...
Need help?
Do you have a question about the 40227 and is the answer not in the manual?
Questions and answers