Table of Contents
Advertisement
Quick Links
█ www.freenove.com
Welcome
Thank you for choosing Freenove products!
About Battery
First, read the document
If you did not download the zip file, please download it and unzip it via link below.
https://github.com/Freenove/Freenove_Robot_Dog_Kit_for_Raspberry_Pi/archive/master.zip
Get Support and Offer Input
Freenove provides free and responsive product and technical support, including but not limited to:
Product quality issues
Product use and build issues
Questions regarding the technology employed in our products for learning and education
Your input and opinions are always welcome
We also encourage your ideas and suggestions for new products and product improvements
For any of the above, you may send us an email to:
support@freenove.com
Safety and Precautions
Please follow the following safety precautions when using or storing this product:
Keep this product out of the reach of children under 6 years old.
This product should be used only when there is adult supervision present as young children lack necessary
judgment regarding safety and the consequences of product misuse.
This product contains small parts and parts, which are sharp. This product contains electrically conductive
parts. Use caution with electrically conductive parts near or around power supplies, batteries and
powered (live) circuits.
When the product is turned ON, activated or tested, some parts will move or rotate. To avoid injuries to
hands and fingers, keep them away from any moving parts!
It is possible that an improperly connected or shorted circuit may cause overheating. Should this happen,
immediately disconnect the power supply or remove the batteries and do not touch anything until it
cools down! When everything is safe and cool, review the product tutorial to identify the cause.
Only operate the product in accordance with the instructions and guidelines of this tutorial, otherwise
parts may be damaged or you could be injured.
Store the product in a cool dry place and avoid exposing the product to direct sunlight.
After use, always turn the power OFF and remove or unplug the batteries before storing.
Need support? support@freenove.com
About_Battery.pdf
in the unzipped folder.
1
List
Advertisement
Table of Contents

Related Manuals for Freenove Raspberry Pi Model A

Summary of Contents for Freenove Raspberry Pi Model A
- Page 1 If you did not download the zip file, please download it and unzip it via link below. https://github.com/Freenove/Freenove_Robot_Dog_Kit_for_Raspberry_Pi/archive/master.zip Get Support and Offer Input Freenove provides free and responsive product and technical support, including but not limited to: Product quality issues ...
- Page 2 This means you can use these resource in your own derived works, in part or completely, but NOT for the intent or purpose of commercial use. Freenove brand and logo are copyright of Freenove Creative Technology Co., Ltd. and cannot be used without written permission.
-
Page 3: Table Of Contents
Step 15 Verify Assembly ............................76 Chapter 3 Module test (Required) ..........................77 Chapter 4 Robot Dog ................................ 88 Server ................................... 89 Client .................................... 97 Free your innovation ............................... 125 Android and iOS app .............................. 131 What's Next? ..................................133 Need support? support@freenove.com... -
Page 4: List
█ List List If you have any concerns, please feel free to contact us at support@freenove.com Robot Shield for Raspberry Pi Bottom Need support? support@freenove.com... -
Page 5: Machinery Parts
█ www.freenove.com List Machinery Parts Note: You may receive M1.4*4 or M1.4*5. Both are suitable. Need support? support@freenove.com... -
Page 6: Transmission Parts
█ List Transmission Parts ES08MA Ⅱservo package x12 S90 servo package x1 Acrylic Parts Need support? support@freenove.com... -
Page 7: Electronic Parts
HC-SR04 ultrasonic module Connector Jumper wire F/F(4) for ultrasonic module 10cm 3Pin LED cable (same direction) 25cm 15Pin camera cable (reversed direction) Tools Cross screwdriver (3mm) x1 Cable tidy x80cm Red ball Cross screwdriver (2mm) x1 Need support? support@freenove.com... -
Page 8: Required But Not Contained Parts
The continuous discharge current >10A It is not easy to find proper batteries on Amazon. Search 18650 3.7V high drain on eBay or other websites. Raspberry Pi (Recommended model: Raspberry 4B / 3B+/ 3A+ /3B ) x1 Need support? support@freenove.com... -
Page 9: Preface
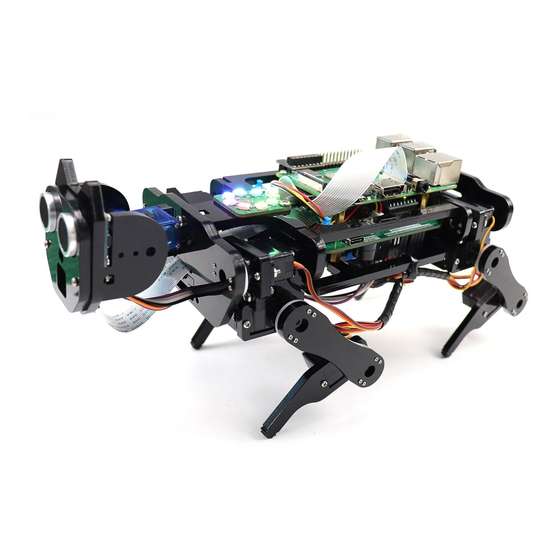
Preface Preface Welcome to use Freenove Robot Dog Kit for Raspberry Pi. Following this tutorial, you can make a very cool robot dog with many functions. This kit is based on Raspberry Pi, a popular control panel, so you can share and exchange your experience and design ideas with many enthusiasts all over the world. -
Page 10: Introduction To Raspberry Pi
Below are the Raspberry Pi pictures and model pictures supported by this product. Practicality picture of Raspberry Pi 4 Model B: Model diagram of Raspberry Pi 4 Model B: Need support? support@freenove.com... - Page 11 █ www.freenove.com Preface Practicality picture of Raspberry Pi 3 Model B+: Model diagram of Raspberry Pi 3 Model B+: Practicality picture of Raspberry Pi 3 Model B: Model diagram of Raspberry Pi 3 Model B: Need support? support@freenove.com...
- Page 12 █ Preface Practicality picture of Raspberry Pi 2 Model B: Model diagram of Raspberry Pi 2 Model B: Practicality picture of Raspberry Pi 1 Model B+: Model diagram of Raspberry Pi 1 Model B+: Need support? support@freenove.com...
- Page 13 █ www.freenove.com Preface Practicality picture of Raspberry Pi 3 Model A+: Model diagram of Raspberry Pi 3 Model A+: Practicality picture of Raspberry Pi 1 Model A+: Model diagram of Raspberry Pi 1 Model A+: Need support? support@freenove.com...
- Page 14 █ Preface Practicality picture of Raspberry Pi Zero W: Model diagram of Raspberry Pi Zero W: Practicality picture of Raspberry Pi Zero: Model diagram of Raspberry Pi Zero: Need support? support@freenove.com...
- Page 15 Connector x4 Power Connector MINI HDMI Camera Audio Connector x2 Connector Connector Hardware interface diagram of RPi 3B+/3B/2B/1B+ are shown below: GPIO Connector Connector Display Connector Ethernet Power Connector Connector HDMI Camera Audio Connector Connector Connector Need support? support@freenove.com...
- Page 16 Hardware interface diagram of RPi 3A+/A+ is shown below: GPIO Connector Connector Display Connector Power Connector HDMI Audio Camera Connector Connector Connector Hardware interface diagram of RPi Zero/Zero W is shown below: GPIO Connector Camera Connector Power HDMI Connector Connector Connector Need support? support@freenove.com...
- Page 17 Each pin is defined as below: For more details about pin definition of GPIO, please refer to http://pinout.xyz/ Need support? support@freenove.com...
- Page 18 WiringPi GPIO Numbering Different from the previous two types of GPIO serial numbers, RPi GPIO serial number of the WiringPi are numbered according to the BCM chip use in RPi. (For more details, please refer to https://projects.drogon.net/raspberry-pi/wiringpi/pins/ Need support? support@freenove.com...
- Page 19 █ www.freenove.com Preface You can also use the following command to view their correlation. gpio readall For more details about wiringPi, please refer to http://wiringpi.com/ Need support? support@freenove.com...
-
Page 20: Chapter 0 Raspberry Pi Preparation
Camera cable(>25cm) for zero w, 15 Pin 1.0mm Pitch to 22 Pin 0.5mm, OTG cable (USB Type micro B to USB Type A) Raspberry Pi 2 Model B wireless network adapter Raspberry Pi 1 Model A+ wireless network adapter Raspberry Pi 1 Model B+ wireless network adapter Need support? support@freenove.com... - Page 21 Power requirements of various versions of Raspberry Pi are shown in following table: Product Recommended Maximum total USB Typical bare-board PSU current peripheral current draw active current capacity consumption Raspberry Pi Model A 700mA 500mA 200mA Raspberry Pi Model B 1.2A 500mA 500mA Raspberry Pi Model A+ 700mA...
- Page 22 Raspberry Pi through SSH, then open the VNC or RDP service. This requires the following accessories. Item Pi Zero Pi Zero W Pi A+ Pi 3A+ Pi B+/2B Pi 3B/3B+/4B Micro-USB to USB-A OTG cable USB transferring to Ethernet interface Need support? support@freenove.com...
- Page 23 “Raspberry Pi OS”. Raspberry Pi OS supported by RPI is an operating system based on Linux, which contains a number of contents required for RPi. We recommended Raspberry Pi OS to beginners. All projects in this tutorial are operated under the Raspberry Pi OS. https://www.raspberrypi.org/downloads Need support? support@freenove.com...
- Page 24 Write System to Micro SD Card First, insert your Micro SD card into card reader and connect it to USB port of PC. Then open imager tool. Choose system that you just downloaded in Use custom. Need support? support@freenove.com...
- Page 25 █ www.freenove.com Chapter 0 Raspberry Pi Preparation Choose the SD card. Then click “WRITE”. Need support? support@freenove.com...
- Page 26 After login, you should see the following screen. Congratulations! You have successfully installed the RASPBERRY PI OS operating system on your RPi. Then you can connect WiFi on the right corner. Now you can skip to VNC Viewer. Need support? support@freenove.com...
-
Page 27: Remote Desktop & Vnc
RPi and turn on the power supply. Enter router client to inquiry IP address named “raspberry pi”. For example, my RPi IP address is “192.168.1.108". Then open Putty, enter the address, select SSH, and then click "OPEN", as shown below: Need support? support@freenove.com... - Page 28 █ Chapter 0 Raspberry Pi Preparation Step2: Step1: enter Select SSH the IP address Step3: Click “OPEN” There will appear a security warning at first login. Just click “YES”. Need support? support@freenove.com...
- Page 29 This is normal. After the correct input, press “Enter” to confirm. Then enter the command line of RPi, which means that you have successfully login to RPi command line mode. Need support? support@freenove.com...
- Page 30 If you want to use built-in Remote Desktop Connection under Windows, you need install xrdp service on Raspberry Pi. Next, install a xrdp service, an open source remote desktop protocol(xrdp) server, for RPi. Type the following command, then press enter to confirm: sudo apt-get install xrdp Later, the installation starts. Need support? support@freenove.com...
- Page 31 █ www.freenove.com Chapter 0 Raspberry Pi Preparation Enter "Y", press key “Enter” to confirm. After the installation is completed, you can use Windows remote desktop applications to login to your RPi. Need support? support@freenove.com...
- Page 32 Use "WIN+R" or search function, open the remote desktop application "mstsc.exe" under Windows, enter the IP address of RPi and then click “Connect”. Later, there will be xrdp login screen. Enter the user name and password of RPi (RPi default user name: pi; password: raspberry) and click “OK”. Need support? support@freenove.com...
- Page 33 Raspberry Pi 4B/3B+/3B integrates a Wi-Fi adaptor. You can use it to connect to your Wi-Fi. Then you can use the wireless remote desktop to control your RPi. This will be helpful for the following operation. Raspberry Pi of other models can use wireless remote desktop through accessing an external USB wireless card. Need support? support@freenove.com...
- Page 34 You can also use the IP address to log in Pi. Enter router client to inquiry IP address named “raspberry pi”. For example, I have inquired to my RPi IP address, and it is “192.168.1.131". Open the terminal and type following command. ssh pi@192.168.1.131 Need support? support@freenove.com...
- Page 35 █ www.freenove.com Chapter 0 Raspberry Pi Preparation Need support? support@freenove.com...
- Page 36 Chapter 0 Raspberry Pi Preparation VNC Viewer & VNC Type the following command. And select 5 Interfacing OptionsP3 VNC YesOKFinish. Here Raspberry Pi may need to be restarted, and choose ok. Then open VNC interface. sudo raspi-config Need support? support@freenove.com...
- Page 37 Enter IP address of your Raspberry Pi and fill in a Name. And click OK. Then on the VNC Viewer panel, double-click new connection you just created, and the following dialog box pops up. Enter username: pi and Password: raspberry. And click OK. Need support? support@freenove.com...
- Page 38 Raspberry Pi. In addition, your VNC Viewer window may zoom your Raspberry Pi desktop. You can change it. On your VNC View control panel, click right key. And select Properties->Options label->Scaling. Then set proper scaling. Need support? support@freenove.com...
- Page 39 Here, you have logged in to Raspberry Pi successfully by using VNC Viewer and operated proper setting. Raspberry Pi 4B/3B+/3B integrates a Wi-Fi adaptor. If you did not connect Pi to WiFi. You can connect it to wirelessly control the robot. Need support? support@freenove.com...
-
Page 40: Robot Shield For Raspberry Pi
The shield is connected to the Raspberry Pi through the IO Port on the board. The positioning holes on the board are suitable for the Raspberry Pi. The features and functions are as follows. S2(CTRL) Battery level indicator D3 indicator S1(LOAD) D2 indicator D1 indicator Type-C charge port LED port IO port MPU6050 port Need support? support@freenove.com... - Page 41 Servo port: There are 16 servo ports with control accuracy of 0.09 degrees. Sonic module port: The interface of HC-SR04 Ultrasound Module is provided. Buzzer: It is directly controlled by raspberry pi, which is turned on at high level and off at low level. Need support? support@freenove.com...
- Page 42 If the battery contact is abnormal, the output is short-circuited and the charging stops, or if the battery temperature is abnormal, the D3 indicator will flash and charging will stop. If D3 keeps blinking, please use another adapter(5V2A) to try again, and check whether the batteries are contacted well with battery holder. Note: Need support? support@freenove.com...
- Page 43 Chapter 0 Raspberry Pi Preparation In the process of charging with 1A current, the two positions of the shield (marked in the illustration) will be hot, which is normal. Please avoid touching them with your hands. Need support? support@freenove.com...
-
Page 44: Chapter 1 Install Python Libraries (Required)
Downloading takes much time. Please wait with patience. You can also find and download the code by visiting our official website (http://www.freenove.com) or our GitHub repository (https://github.com/freenove). Please note that all codes for this robot dog is written with Python3. If executed under python 2, there will be error messages. - Page 45 And pressing Tab key again will list all the eligible options. However, when there is only one eligible option, the command/path will be completely typed as soon as you press the Tab key.. As shown below, under the ‘~’directory, enter the Documents directory with the “cd” command. After typing Need support? support@freenove.com...
- Page 46 “cd D”, press Tab key, there is no response. Press Tab key again, all the files/folders that begin with “D” is listed. Continue to type the character "oc", then press the Tab key, and then “Documents” is typed automatically. Need support? support@freenove.com...
-
Page 47: Step 2 Enable I2C And Camera
█ www.freenove.com Chapter 1 Install Python Libraries (Required) Step 2 Enable I2C and Camera Click Click Need support? support@freenove.com... - Page 48 █ Chapter 1 Install Python Libraries (Required) Choose Enabled for Camera Choose Enabled for VNC Choose Enabled for I2C Finally Click OK Click No Need support? support@freenove.com...
- Page 49 Press "CTRL"+"O" and then "Enter" to save the modified content. Then press "CTRL"+"X" to exit editing. After the modification is completed, reboot Raspberry Pi to make the change work. You can also reboot the Raspberry Pi after completing the step 3 below. Need support? support@freenove.com...
- Page 50 # Enable audio (loads snd_bcm2835) # dtparam=audio=on It will take effect after restarting, and you can restart after executing the next section. If you want to restart the audio module, just restore the content modified in the above two steps. Need support? support@freenove.com...
-
Page 51: Step 3 Run The Installation Program
Pi after the installation is completed, as shown below. If the installation fails, please rerun setup.py. After the installation is completed, restart the Raspberry Pi. Most installation failures are caused by network reasons. sudo python setup.py Need support? support@freenove.com... -
Page 52: Chapter 2 Assemble Robot
It is recommended to assemble and use the robot dog according to the tutorial. Otherwise, there may be installation errors, device damage, etc. Don’t reverse batteries. Or the board will be damaged. Step 1 Install Disk Servo Arms Take out 12 disk servo arms from the servo packages. Disk servo arm Need support? support@freenove.com... - Page 53 There are 4 pairs of opposite holes on the disk servo arm, and the distance between each pair is different. Please use the 2 pairs of holes with longer distance. Disk servo arm M1.2x7 M1.2*7 screws are contained in following plastic bag. This side is Longer distance attached acrylic board. Need support? support@freenove.com...
- Page 54 █ Chapter 2 Assemble Robot Get following 4 parts. This side should be on the Don’t reverse it. left. M1.2x7 With two holes M1.2x7 Need support? support@freenove.com...
-
Page 55: Step 2 Install Body Bracket
█ www.freenove.com Chapter 2 Assemble Robot Step 2 Install Body Bracket Rectangular hole Head mark M3 Nut M3x12 Note its position With one hole M3 Nut Head mark M3x12 Brass standoffs M2.5x14+6 M2.5x8 Need support? support@freenove.com... -
Page 56: Step 3 Install Shield
█ Chapter 2 Assemble Robot Step 3 Install Shield Shield Brass standoffs M2.5x14 Need support? support@freenove.com... -
Page 57: Step 4 Install Mpu6050
█ www.freenove.com Chapter 2 Assemble Robot Step 4 Install MPU6050 Note: There are two rows of headers. Plug the MPU6050 into the outer Row. MPU6050 Step 5 Install LED module M3x12 LED module M3 Nut Need support? support@freenove.com... - Page 58 Install the top bracket. Head Rear Connect shield with LED module. 3-pin cable of LED This step will be very helpful for later assembly. Use tapes to cover the hole Use tapes to cover the hole Need support? support@freenove.com...
-
Page 59: Step 6 Install Raspberry Pi
█ www.freenove.com Chapter 2 Assemble Robot Step 6 Install Raspberry Pi M2.5x8 Raspberry Pi Need support? support@freenove.com... -
Page 60: Step 7 Install Connector
Press it till the pins protrude from the holes. Press connector to reach its end. × √ If you have any concerns, please feel free to contact us via support@freenove.com We will offer you satisfying solution. Need support? support@freenove.com... - Page 61 █ www.freenove.com Chapter 2 Assemble Robot Now we have assembled the main body part. We will assemble leg parts later. Need support? support@freenove.com...
-
Page 62: Step 8 Install Servo To Acrylic Board
█ Chapter 2 Assemble Robot Step 8 Install Servo to Acrylic Board M2x14 Acrylic part M2 Nut Black servo Note: There are four parts. They are different . Need support? support@freenove.com... - Page 63 █ www.freenove.com Chapter 2 Assemble Robot Assemble two sets. Servo M2x14 M2 Nut Assemble two sets. M2x14 M2 Nut Assemble parts to the top. M3x12 M3 Nut Now you get two sets of joint parts. Need support? support@freenove.com...
- Page 64 Assemble another two parts. Note: they are different from parts above. Assemble another two parts. Note: they are different from parts above. Asseble them. M3x12 M3 Nut Note, they are different. Now you will get four parts as below. Need support? support@freenove.com...
-
Page 65: Step 9 Run Servo Program (Necessary)
Step 9 Run Servo Program (Necessary) 12 black servos and 1 blue servo to servo port Randomly. And install batteries. Push batteries Connect to “+” ends. Install batteries 3.7v 18650 High drain 12 black servos 1 blue servo wiring Need support? support@freenove.com... - Page 66 Keep the power on and all servos connected during the assembly. Don’t disconnect servos. https://www.youtube.com/watch?v=7GkMYdVrong When running the code, if it reports “Remote I/O error”, please check the following three aspects: 1. Whether the connector is connected well Connector 2. Whether both S1 and S2 are turned ON Need support? support@freenove.com...
- Page 67 █ www.freenove.com Chapter 2 Assemble Robot 3. Whether the batteries are contacted well with the battery holder Need support? support@freenove.com...
-
Page 68: Step 10 Assemble Legs To Body
Close to 90° servo package Assemble legs of one side. Try to install them at 90°. The angles are acceptable within 65~115. Small screw in servo package Close to 90° Assemble legs of the other side. Need support? support@freenove.com... - Page 69 In this step, if you did not cover tape to the holes before, you can turn off Load S1 to install the screw. After the screw is installed, turn on the Load S1. M3 Nut M3 Screw M3 Nut M3 Nut M3x12 Only one bracket is needed. M3x12 Bracket M3 Nut Need support? support@freenove.com...
- Page 70 In this step, if you did not cover tape to the holes before, you can turn off Load S1 to install the screw. After the screw is installed, turn on the Load S1. M3 Nut M3x12 Need support? support@freenove.com...
- Page 71 █ www.freenove.com Chapter 2 Assemble Robot M3 Nut M3x12 Need support? support@freenove.com...
-
Page 72: Step 11 Assemble Head
█ Chapter 2 Assemble Robot Step 11 Assemble Head M1.4x4 Ultrasonic module Camera The servo arm and screws are included in the blue servo package. Screw in servo package Servo arm M2x14 M2 Nut Need support? support@freenove.com... -
Page 73: Step 12 Assemble Head To Body
Keep the power ON and servos connected when installing arm to servo. Small screw in servo package Install acrylic part on the other side. We will complete wiring in next section. Shut down the Raspberry Pi first. Do NOT turn on Raspberry Pi until chapter 3. Need support? support@freenove.com... -
Page 74: Step 13 Wiring
█ Chapter 2 Assemble Robot Step 13 Wiring Note servo ports 0, 1, 14 are not connected to servo. They Connect servos according to the numbers. are spare. Need support? support@freenove.com... - Page 75 Pay attention to the blue side of camera cable. (Note: plugging and unplugging the cable requires the Raspberry Pi to be powered off, otherwise the camera module may be burned.) × √ Need support? support@freenove.com...
- Page 76 █ Chapter 2 Assemble Robot Pay attention to the blue side of camera cable. √ × Need support? support@freenove.com...
-
Page 77: Step 14 Install Calibration Support
█ www.freenove.com Chapter 2 Assemble Robot Step 14 Install Calibration Support M3x12 M3x12 M3 Nut Support Need support? support@freenove.com... -
Page 78: Step 15 Verify Assembly
The robot should show the following posture. Servo screw If it does not look like this, you need to dissemble servo screws of incorrect servos. Then reassemble the incorrect servo to make the robot look like posture above. Need support? support@freenove.com... -
Page 79: Chapter 3 Module Test (Required)
If the terminal displays the directory as below (where test.py is located). You can directly execute the test.py command. 1. If not, execute the cd command: cd ~/Freenove_Robot_Dog_Kit_for_Raspberry_Pi/Code/Server 2. Execute test.py command: sudo python test.py Servo Need support? support@freenove.com... - Page 80 After assembly in the previous chapter, the robot should look as shown in picture A. After servo test program is executed, the robot’s posture will change to A, B, C, D gradually, which indicates the servo channel works normally. If the situation is not correct, check the servo wiring. Need support? support@freenove.com...
- Page 81 The first parameter indicates the servo channel The second parameter is the rotation angle Example: setServoAngle (0,60) The Servo of channel 0 is turned to 60 degrees setServoAngle (15,160) The Servo of channel 15 is turned to 160 degrees Need support? support@freenove.com...
- Page 82 If the terminal displays the directory as below (where test.py is located). You can directly execute the second command test.py. 1.If not, execute the cd command: cd ~/Freenove_Robot_Dog_Kit_for_Raspberry_Pi/Code/Server 2.Execute test.py command: sudo python test.py ADC Result: Print voltage value of batteries per second. You can press "Ctrl + C" to end the program. Need support? support@freenove.com...
- Page 83 Read the ADC value of the batteries voltage. The returned number ranges between 0-255. Divide the obtained value by 255.0 and then multiply by the reference voltage of 5.0V, and then triple the value to get the batteries voltage. Need support? support@freenove.com...
- Page 84 #Get the value print ("Obstacle distance is "+str(data)+"CM") time.sleep(1) except KeyboardInterrupt: print ("\nEnd of program") Reference getDistance() This function is used to obtain the distance between ultrasonic module and the obstacle in front of it in centimeters. Need support? support@freenove.com...
- Page 85 You can end the program ahead of time by pressing "ctrl+c". If the LED color display order is not correct, open the "Led.py" file in the current directory and modify the value of the "self.ORDER" variable on line 16. Need support? support@freenove.com...
- Page 86 The default is 50ms. For example, colorWipe(strip, Color(255,0,0),20) means that the LED0 color is red first, waiting for 20ms, and then the LED1 color is also red, and repeat the same to all 8 LEDs until they are all red. Need support? support@freenove.com...
- Page 87 ~/Freenove_Robot_Dog_Kit_for_Raspberry_Pi/Code/Server 2.Execute test.py command: sudo python test.py Buzzer Result: The buzzer will be turned ON lasting for 3s. Then the program will automatically end or you can press "Ctrl + C" to end the program. Need support? support@freenove.com...
- Page 88 KeyboardInterrupt: buzzer.run('0') print ("\nEnd of program") Reference buzzer.run(cmd) This function has one input parameter. If the input is ’1’, the buzzer will be turned on. If the input is ‘0’, the buzzer will be turned off. Need support? support@freenove.com...
- Page 89 (Note: plugging and unplugging the cable requires the Raspberry Pi to be powered off, otherwise the camera module may be burned.) Run program 1. execute the cd command: cd ~/Freenove_Robot_Dog_Kit_for_Raspberry_Pi/Code/Server 2. Execute test.py command: raspistill -o image.jpg Then please open and check the generated image.jpg under /Freenove_Robot_Dog_Kit_for_Raspberry_Pi/Code/Server. Need support? support@freenove.com...
-
Page 90: Chapter 4 Robot Dog
(LAN). Start Start Open server Open client Wait Connect connection server If success If success Wait Send command command If get If success command Done success keep Execute sending Command Need support? support@freenove.com... -
Page 91: Server
#Port 8000 for video transmission self.server_socket = socket.socket() self.server_socket.setsockopt(socket.SOL_SOCKET,socket.SO_REUSEPORT,1) self.server_socket.bind((HOST, 8000)) self.server_socket.listen(1) #Port 5000 is used for instruction sending and receiving self.server_socket1 = socket.socket() self.server_socket1.setsockopt(socket.SOL_SOCKET,socket.SO_REUSEPORT,1) self.server_socket1.bind((HOST, 5000)) self.server_socket1.listen(1) print('Server address: '+HOST) turn_off_server(self): try: self.connection.close() self.connection1.close() except print ('\n'+"No client connection") Need support? support@freenove.com... - Page 92 This function is used to send commands to the client. reset_serve() This function is used to close TCP and restart. transmission_video() This function is used to transmit video data to the client. receive_instruction() This function is used to receive commands from the client Need support? support@freenove.com...
- Page 93 Enter IP address of your Raspberry Pi and fill in a Name. And click OK. Then on the VNC Viewer panel, double-click new connection you just created, and the following dialog box pops up. Enter username: and Password: raspberry. And click OK. Need support? support@freenove.com...
- Page 94 In addition, your VNC Viewer window may zoom your Raspberry Pi desktop. You can change it. On your VNC View control panel, click right key. And select Properties->Options label->Scaling. Then set proper scaling. Step 2 Run commands Enter following command in the terminal. Need support? support@freenove.com...
- Page 95 IP address to connect the Raspberry Pi client with the server. The robot will start from this posture. We define it as Relax mode. It will also be referenced later. Need support? support@freenove.com...
- Page 96 Add the following contents to “start.sh” file. #!/bin/sh cd "/home/pi/Freenove_Robot_Dog_Kit_for_Raspberry_Pi/Code/Server" sleep 10 sudo cp point.txt /home/pi sudo python main.py Press Ctrl + O and then press Enter to save it. Press Ctrl+X to exit. Modify permissions. sudo chmod 777 start.sh Need support? support@freenove.com...
- Page 97 Press Ctrl + O and then press Enter to save it. Press Ctrl+X to exit. Modify permissions. sudo chmod +x .config/autostart/start.desktop Finally enter the following content to reboot Raspberry Pi. sudo reboot Note: To cancel auto start, please delete the files “start.sh” and “start.desktop” created above. Need support? support@freenove.com...
- Page 98 █ Chapter 4 Robot Dog Need support? support@freenove.com...
-
Page 99: Client
' try: self.client_socket.connect((ip, 8000)) self.connection = self.client_socket.makefile('rb') except: #print ("command port connect failed") pass while True: try: stream_bytes= self.connection.read(4) leng=struct.unpack('L', stream_bytes[:4]) jpg=self.connection.read(leng[0]) self.is_valid_image_4_bytes(jpg): self.video_flag: self.image = cv2.imdecode(np.frombuffer(jpg, dtype=np.uint8), cv2.IMREAD_COLOR) self.ball_flag: self.Looking_for_the_ball() self.video_flag=False except BaseException print break Need support? support@freenove.com... - Page 100 This function is used to find the small ball in the video image. send_data () This function is used to send commands to the server. receive_data () This function is used to receive commands from the server. Need support? support@freenove.com...
- Page 101 You can refer to this video: https://youtu.be/l2v9PdwQdvY Note: when Raspberry Pi is shut down, server will be closed. You need open server again the next time. Need support? support@freenove.com...
- Page 102 Pi first. After the installation is completed, turn on the Raspberry Pi and the server. Install python3 Download the installation file via the below link: https://www.python.org/downloads/windows/ Click Latest Python 3 Release - Python 3.8.1 (as an example). Choose “Windows x86-64 executable installer” to download and install. Need support? support@freenove.com...
- Page 103 █ www.freenove.com Chapter 4 Robot Dog Select “Add Python 3.8 to PATH”. And choose Customize installation. Select all options and click Next. Need support? support@freenove.com...
- Page 104 █ Chapter 4 Robot Dog Here python is installed into D disk as an example (You can choose your own installation path). Click Install. Wait for installation. Need support? support@freenove.com...
- Page 105 █ www.freenove.com Chapter 4 Robot Dog Installation is successful. Need support? support@freenove.com...
- Page 106 Or use python3 to run "setup_windows.py". Note: If the default python in your windows system is not python3 but python2, then change all "python" in "setup_windows.py" to "python3" and run the command "setup_windows.py" as shown below. Python3 setup_windows.py Need support? support@freenove.com...
- Page 107 Or double-click "Main.py". under following path: Freenove_Robot_Dog_Kit_for_Raspberry_Pi\Code\Client Or use python3 to run "Main.py". Note: If the default python in your windows system is not python3, then change the command to run Main.py as shown below. Python3 Main.py Need support? support@freenove.com...
- Page 108 After the connection is successful, you need to calibrate the robot in Calibration section. After the calibration is completed, the robot dog can be controlled to move. Note: when Raspberry Pi is shut down, server will be closed. You need open server again the next time. Need support? support@freenove.com...
- Page 109 Click Python 3.8.2. If your macOS is 11. Like 11.0, please install python 3.9. If your macOS is NOT 11, like 10.15, please install python 3.8. If you have installed python 3.9. You need uninstall it first. Need support? support@freenove.com...
- Page 110 █ Chapter 4 Robot Dog On the bottom of the page, click macOS 64-bit installer to download installer. Then install python. Click Continue. Need support? support@freenove.com...
- Page 111 █ www.freenove.com Chapter 4 Robot Dog Click Continue. Click Agree. Need support? support@freenove.com...
- Page 112 █ Chapter 4 Robot Dog Click Install. If your computer has a password, enter the password and click Install Software. Now the installation is completed successfully. Need support? support@freenove.com...
- Page 113 You can find in Applications. Install PyQt5、opencv、numpy and other libraries If there is no robot dog code in your macOS, you can download it via link below: https://github.com/Freenove/Freenove_Robot_Dog_Kit_for_Raspberry_Pi/archive/master.zip After downloading successfully, you can find it under “Downloads”. Open “Terminal”. Need support? support@freenove.com...
- Page 114 Most installation failures are caused by a poor network. You can check the network before installing. Just skip to “Open client”. If you are using macOS under 11.0, like 10.15. macOS 11.0 or later version. Please run commands below: If you are using pip3 uninstall PyQt5 pip3 install PyQt5 Need support? support@freenove.com...
- Page 115 After installation is completed in previous step, now it is in the directory that setup_macos.py is located. 1. Type following command to enter where the program is located. cd Client/ 2. Type following command to run the program. python3 Main.py Need support? support@freenove.com...
- Page 116 Then you need calibrate the robot in the Calibration section. After the calibration is completed, robot dog can be controlled to move. Note: when Raspberry Pi is shut down, server will be closed. You need open server again the next time. Need support? support@freenove.com...
- Page 117 1. Use the cd command to go to the directory where Main.py is located. cd ~/Freenove_Robot_Dog_Kit_for_Raspberry_Pi/Code/Client 2. Run Main.py: sudo python Main.py The interface is shown below. The face recognition cannot work well because it need more computing power than Raspberry Pi has. Need support? support@freenove.com...
- Page 118 After the connection is successful, you need to calibrate the four legs of the robot dog in Calibration section. After the calibration is completed, the robot dog can be controlled to move. Note: when Raspberry Pi is shut down, server will be closed. You need open server again the next time. Need support? support@freenove.com...
- Page 119 2. Install the calibration supports on the robot dog and place it on the corresponding position on the calibration paper. 3. Connect client with server successfully, click the "Calibration" button on the client, then a calibration window pops up. And the robot’s legs will automatically put to the following position. Need support? support@freenove.com...
- Page 120 Chapter 4 Robot Dog 4. Calibrate the four legs to make 4 foot points fall to the corresponding positions. Feel the contact force between the robot dog and the ground during calibration. Future control depends on this step. Need support? support@freenove.com...
- Page 121 1mm or 2mm. As the walking distance accumulates, this error is constantly superimposed. Then there will be a large offset from the original position. If the calibration is not good enough, it will affect walking. You can recalibrate the robot with same steps. Need support? support@freenove.com...
- Page 122 Then the robot can move for 3 minutes again. c) If the robot isn’t tired and is standing, when the robot does not receive motion command for 10s, it will get into relax mode. In this situation, it will respond to all commands. Need support? support@freenove.com...
- Page 123 The following is the corresponding operation of the buttons and keyboards. Button on Client Action ForWard Move BackWard Back off Turn Left Turn left Turn Right Turn right Step Left Step Left Step Right Step Right Connect/ Disconnect On/Off Connection Open Video/ Close Video On/Off Video Need support? support@freenove.com...
- Page 124 Open calibration interface Buzzer/Noise Space On/Off Buzzer Relax Relax station Open LED control interface Sonic Measure and display distance from obstacle Balance Open/Close balance mode Face/Ball/Close Face recognition and ball tracking Face ID Input images of human faces Need support? support@freenove.com...
- Page 125 5. After the 30 images are recorded, you can close the window and click "Face" on the Right to identify the face. Note: Do NOT use different names when re-entering images of the same person to avoid client working abnormally. Need support? support@freenove.com...
- Page 126 3. Check if the Raspberry Pi is stuck. 4. If all three points above work well, please restart server and client. If there still is any abnormality, please contact us by email (support@freenove.com). We will help you. Need support? support@freenove.com...
-
Page 127: Free Your Innovation
The robot dog program is based on python3. If your python is python2 by default, please change to python3. If you have never learned python before, you can learn some basics through the following links: https://python.swaroopch.com/basics.html Program First, open Thonny Python IDE which is easy to use for beginners. Need support? support@freenove.com... - Page 128 █ Chapter 4 Robot Dog Create a new file. Name it with myCode as an example and save it in Server folder of robot code folder. Need support? support@freenove.com...
- Page 129 Chapter 4 Robot Dog Open the Server folder of the robot dog code and you can see the file you created. Write the code in myCode.py as below and click save after finished, as shown below. Need support? support@freenove.com...
- Page 130 Turn left one step turnRight() Turn right one step stop() Stop. setpLeft() Move to left one step setpRight() Move to right one step upAndDown() Adjust height of body beforeAndAfter() Make body move forward or backward Need support? support@freenove.com...
- Page 131 The default value is 20ms Servo.py Function Description setServoAngle(channel, angle) Turn the servo of the specified channel to specified angle. Ultrasonic.py Function Description getDistance() Obtain the distance between the obstacle in front and the ultrasound. Need support? support@freenove.com...
- Page 132 █ Chapter 4 Robot Dog Custom Action We have also customized some specific actions, such as push-up, greeting, etc. You can run "Action.py" to play. Need support? support@freenove.com...
-
Page 133: Android And Ios App
In this GitHub repository, you can find the App instruction (Tutorial.pdf). You can download and install the Freenove iOS app by searching freenove in app store. Relax mode. a) When the robot dog moves for 3 minutes in total, it will feel tired (the servo will get hot). In order to protect the servo, the robot will get into relax mode for 1 minute. - Page 134 Raspberry Pi wlan0 IP Balance Time slider Attitude control Connec Set speed Angle of head Relax Height Control motion Voltage Attitude control Distance Slide one finger on the screen Frame rate Gravity mode Control body position Need support? support@freenove.com...
-
Page 135: What's Next
If you want to learn more about Arduino, Raspberry Pi, Smart Cars, Robotics and other interesting products in science and technology, please continue to visit our website. We will continue to launch fun, cost-effective, innovative and exciting products. http://www.freenove.com/ Thank you again for choosing Freenove products. Need support? support@freenove.com...
Need help?
Do you have a question about the Raspberry Pi Model A and is the answer not in the manual?
Questions and answers