
Related Manuals for Smartro SC93

Summary of Contents for Smartro SC93
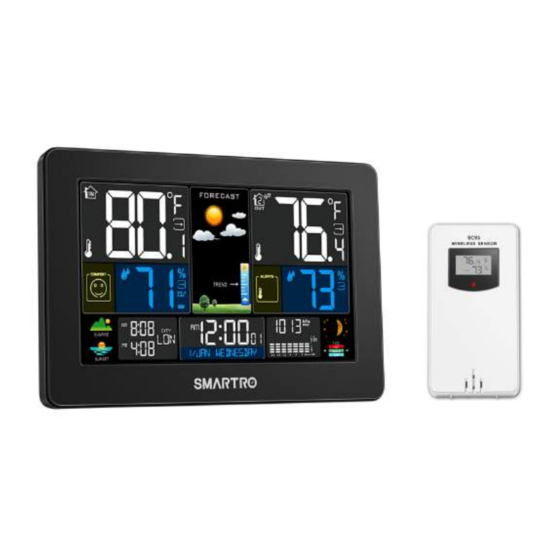
- Page 1 Instruction Manual WIRELESS WEATHER STATION Model: SC93 TIME Moon In&Out In&Out Adjustable Phase Temp Humidity Backlit Dual Weather Snooze °C/°F Alarms Forecast Switchable Function Function...
-
Page 3: Table Of Contents
Content 1. Preface 2. Attention 3. Package Content 4. Product Specification 4.1 Color Weather Station 4.2 Wireless Remote Sensor 5. Know Your Device 5.1 Screen 5.2 Buttons 5.3 Wireless Remote Sensor 6. Preparation 7. Initial Time Setup 8. Dual Alarm Setting 8.1 Alarm Setting 8.2 How to Turn on/off the Alarms 8.3 How to Check the Alarms... -
Page 4: Preface
1. Preface Thank you for choosing this weather station from SMARTRO. Before Use ● Make sure to read the instruction manual carefully. This information will help you to familiarize yourself with your new device, to learn all of its functions and get advice in the event of problems. -
Page 5: Product Specification
4. Product Specification 4.1 Color Weather Station ● DST function ● Weather forecast ● Low battery indicator ● Moon phases and tides ● Sunrise and sunset time ● Time in 12/24-hour format ● Tabletop stand/wall mount ● Dual alarms with snooze function ●... -
Page 6: Know Your Device
5. Know Your Device 5.1 Screen TREND MOLD RISK SUNRISE TIDE HIGH MEDIUM SUNSET A8 A9 A10 A1: Indoor mold risk A2: Indoor temperature A3: Indoor humidity A4: Indoor comfort indicator A5: Sunrise time A6: City A7: Sunset time A8: Month and date A9: Time A10: Day of the week A11: Historical pressure histogram... -
Page 7: Buttons
5.2 Buttons B10 B11 : Night mode setting (long press 2s to set) : Time setting (long press 2s to set) Backlight setting : Alarm setting (long press 2s to set) B4: ▲ : For setup preference B5: ▼ : For setup preference Max/min temperature and humidity check : Channel switch : Temperature alert setting (long press 2s to set, short press to turn on/off) -
Page 8: Wireless Remote Sensor
5.3 Wireless Remote Sensor SC93 WIRELESS SENSOR C / F C1: Temperature C2: Humidity C3: Transmission signal light C4: "°C/°F" switch button C5: "TX" button C6: Channel switch knob C7: Battery compartment C8: Wall-mount hole... -
Page 9: Preparation
6. Preparation ● Open weather station battery compartment cover, insert 2 x AA batteries, ensure correct battery polarities [ "+" and "–" ] and connect the DC adapter to power the weather station. ● The screen will light up, and the device will make a beeping sound. The weather station will start to detect indoor temperature and humidity. -
Page 10: Dual Alarm Setting
● The PRESSURE value will be flashing, press "▲" or "▼" to set the correct pressure and press " " to confirm. ● The WEATHER icon will be flashing, press "▲" or "▼" to set the current weather icon. Press " "... -
Page 11: How To Turn On/Off The Alarms
Note: ● During the alarm setting, double clicking " " or not operating any buttons within 20 seconds will cause the weather station to save the current settings and automatically return to the normal display. ● The snooze time can be set from 5 ~ 60MIN. It can also be deactivated by setting it to OFF. ●... -
Page 12: Weather Station And Remote Sensor Pairing & Manual Signal Reception
9. Weather Station and Remote Sensor Pairing & Manual Signal Reception 9.1 Weather Station and Remote Sensor Pairing Step 1: — Insert 2 x AA batteries in the weather station and connect it with the adapter. — Insert 2 x AA batteries in the remote sensor. Step 2: —... -
Page 13: How To Check Maximum/Minimum Temperature/Humidity
- Please ensure that the channels of the weather station and sensor are the same. - Long press " " button to receive signals manually. A flashing RF antenna symbol will be displayed beside the channel. This means that the weather station is in a receiving state. -
Page 14: Temperature & Humidity
10. Temperature & Humidity 10.1 How to Set Temperature Alert ● Firstly choose a channel you want to set the outdoor temperature and humidity alert on, then press " " to activate the alert, " " will be displayed in the ALERT column. -
Page 15: Frost Point Alert
10.2 Frost Point Alert When the outdoor temperature reaches +30.2°F (-1.0°C) ~ +37.3°F (+2.9°C), the frost alert will be automatically activated and the icon " " will be flashing. 10.3 Comfort Indicator & Mold Risk ● Indoor comfort level is generated based on the indoor temperature and humidity, there are 5 levels as follows: Comfortable too cold or too hot... -
Page 16: Weather Forecast
11. Weather Forecast 11.1 Weather Forecast Statement ● The weather station calculates the weather forecast based on the historical recorded barometric pressure where you are located. ● The weather forecast cannot be compared with the professional weather services supported by satellites and high-performance computers. ●... -
Page 17: Air Pressure
13. Air Pressure The barometric pressure updates every hour. The weather station will record the pressure of the last 3, 6, 9, 12, 18, 24 hours and compare it with the current barometric pressure to generate a histogram. 14. Backlight & Night Mode 14.1 Backlight Setting —... -
Page 18: City Setting For Sunrise & Sunset Time
● The minute of the exit time of night mode will be flashing, press "▲" or "▼" to set the required minute and press " " to confirm. After completing these steps the weather station will return to the original display. Note: ●... -
Page 19: Low Battery
" button on the the weather transmission. weather station till the dashes appear. station is different 3. Press "TX" button on the sensor to from that on the send signals. sensor. If the problem persists, please contact after-sales support at: support@smartro.co. -
Page 20: After-Sales Support
If your device fails to work despite these measures or your experience with us was less than perfect in any way, please do not hesitate to contact us. For more products, please visit our website: https://www.smartro.co/ For further support and discount information, join our Facebook group or follow us on Instagram. -
Page 21: Waste Disposal
19. Waste Disposal ● This product is manufactured with high-grade materials and components which can be recycled and reused. ● As a consumer, you are legally required to take them to your retail store or an appropriate collection site depending on national or local regulations in order to protect the environment. -
Page 22: Appendix 1: City Code Of The United States
Appendix 1: City Code of the United States Country City Abbr Washington DC New York Los Angeles Chicago Houston Phoenix San Antonio San Diego Dallas San Francisco Philadelphia Charlotte Seattle Denver Boston Detroit Nashville United States(US) Memphis Portland Oklahoma city Las Vegas Milwaukee Kansas City... - Page 23 Buffalo Richmond Columbia Little Rock Columbus Grand Rapids Salt Lake City Providence Manchester (NH) San Diego Santa Fe Bismarck Reno New Haven Baltimore South Carolina (SC) Savannah...
-
Page 24: Appendix 2: City Code Of Other Countries
Appendix 2: City Code of other Countries Country City Abbr City Abbr Kiel Berlin Leipzig Bremen Magdeburg Köln München Dortmund Nürnberg Dresden Osnabrück Düsseldorf Germany(DE) Passau Erfurt Regensburg Frankfurt Rostock Freiburg Saarbrücken Hamburg Stuttgart Hannover Würzburg Kaiserslautern Kassel Salzburg Bregenz Vienna Graz Austria(AT) - Page 25 Greece(GR) Athens Hungary(HU) Budapest Ireland(IE) Dublin Naples Ancona Palermo Bari Parma Bolzano Perugia Cagliari Rome Florence Italy (IT) San Remo Foggia Triest Genoa Turin Lecce Venice Messina Verona Milan Liechtenstein(LI) Vaduz Luxembourg Luxemburg(LU) Monaco(MC) Monte Carlo Groningen Amsterdam Netherlands Rotterdam Arnhem (NL) The Hague...
- Page 26 Stockholm Gothenburg Sweden(SE) Karlstad Lugano Basel Sion Berne Switzerland St. Gallen Chur (CH) Zurich Geneva Lucerne London Aberdeen Manchester Belfast United Birmingham Newcastle upon Tyne Kingdom(GB) Plymouth Cardiff Glasgow Lithuania(LT) Vilnius Bulgaria(BG) Sofia Romania(RO) Bucharest Cyprus(CY) Nicosia Northen Belfast Ireland(NI) Ottawa Vancouver Quebec City...
- Page 28 : +1(323)287-5798 : support@smartro.co : http://bit.ly/smartro_01 : smartro_01 : https://www.smartro.co...
- Page 29 FCC Statement: This device complies with part 15 of the FCC Rules. Operation is subject to the following two conditions: (1) This device may not cause harmful interference, and (2) this device must accept any interference received, including interference that may cause undesired operation.
Need help?
Do you have a question about the SC93 and is the answer not in the manual?
Questions and answers
How do I reset my time on my SC93
To reset the time on the Smartro SC93, follow the "Initial Time Setup" procedure found in the manual. This typically involves entering setup mode using the device buttons, then adjusting the hour and minute settings manually. Exact button functions are explained in the manual's "Initial Time Setup" section.
This answer is automatically generated