Table of Contents
Advertisement
Indoor for domestic/home use
Rinser Cleaner
Instruction Manual
Contents
Preparations
Safety precautions ..............................................
Usage precautions..............................................
Parts ...................................................................
Operation instructions
Preparation .........................................................
How to use..........................................................
Maintenance ....................................................... 12
Others
Troubleshooting .................................................. 14
Specifications ..................................................... 15
Warranty and after-sales services ...................... 15
Warranty card....................................... Back cover
RNS-300
2
4
5
6
8
Advertisement
Table of Contents

Summary of Contents for Iris Ohyama RNS-300
-
Page 1: Table Of Contents
Indoor for domestic/home use Rinser Cleaner RNS-300 Instruction Manual Contents Preparations Safety precautions ..........Usage precautions..........Parts .............. Operation instructions Preparation ............How to use............Maintenance ............12 Others Troubleshooting ..........14 Specifications ............. 15 Warranty and after-sales services ...... 15... -
Page 2: Safety Precautions
Safety precautions Make sure to follow the precautions described below to avoid injury or unnecessary property loss to anybody. The safety precautions are classified according to the degree of harm or damage caused by misuse. Examples of symbols: This symbol means This symbol means This symbol means necessary “reminding”. - Page 3 ● Do not use the machine in places having ● Do not vacuum waste, dust, or sewage the possibility of getting wet, such as with the possibility of infection outside in the rain, wet areas, or in a Doing so could spread infectious diseases. Prohibited bathroom ●...
-
Page 4: Usage Precautions
Usage precautions ● This machine removes dirt by rinsing. Only put clean tap water, or alkaline ionized water under 40 C degrees Celsius into the water tank. ● Art works, water sensitive fibers (silk, acetate, rayon, cupra, etc.), water sensitive products (fur, leather products, kimono, plain wood furniture, wooden products with varnish, lacquer ware, etc.), vulnerable surfaces (flooring, table, etc.) cannot be rinsed with the machine. -
Page 5: Parts
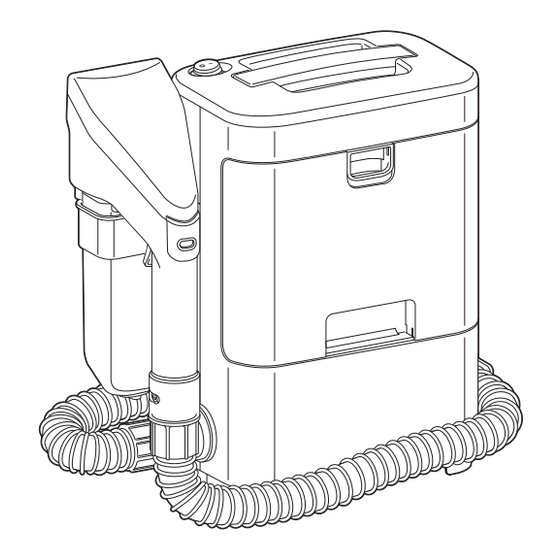
Parts ■ Body Handle Cord hook Hand tool Power switch Collecting tank Holder Full water mark Hose hook Power cord Exhaust outlet Power plug Vacuum hose Connection port for the vacuum hose * When moving the machine, fix the hand tool into the holder, fix the vacuum hose to the hose hook, and wind power cord around the cord hook. -
Page 6: Preparation
Preparation ●Be sure to close the cap to the clean Fit the holder, hose hook, cord hook to water tank. the body ●Only use tap water or alkaline ionized water in the clean water t a n k . F a i l u r e c o u l d c a u s e t h e machine to malfunction. - Page 7 Hold the hand tool and squeeze the spray Do not leave the hand tool hooked on the lever several times with the nozzle tip holder after using the machine pointing down • Waste water could drip from hand tool which could lead to messing of furniture or the floor •...
-
Page 8: How To Use
How to use remain and cause mold or a bad smell. Insert the power plug Vacuum left water without spraying the ●Be sure to turn the power switch “ (OFF)” cleaning water before inserting the power plug into the socket •... - Page 9 ■ When vacuuming severe dirt; Vacuum the dirt Clean dirt which is hard to clean or has stained after • Put tap water into the clean water tank according releasing the dirt with a detergent. → to the instructions ( P.6) and vacuum the dirt →...
- Page 10 How to use continued ■ Drain waste water from the Rinse the collecting tank after finishing the operation collecting tank • Rinse the tank with tap water by pouring water from the inlet at the back side of the collecting Turn off the power switch tank after finishing the operation.
- Page 11 ■ Drain any water left in the • Push the collecting tank until it clicks into place. clean water tank Click Remove the vacuum hose from the hand tool by turning it counterclockwise Hand tool Vacuum hose ●Incorrect installation of the collecting tank may reduce collecting capability.
-
Page 12: Maintenance
Maintenance • Clean the hand tool with water after removing ●Conduct maintenance after stopping the transparent cover to the inlet port. the operation and removing the plug from the electrical power socket. <How to remove the transparent cover> ●Do not wet the machine's body. Lift this part Failure could cause an electric shock, injury, or machine malfunction. - Page 13 • Check if there is a hole in the vacuum hose. Storage • When storing the machine, be sure to drain any water from collecting tank. • Do not store the machine in a place with a temperature below freezing. • ...
-
Page 14: Troubleshooting
Troubleshooting Please confirm the following problems after reading the operation manual carefully before you entrust to repair it. State Causes Measures ● The power plug has not been ➡ ➡ ● Move the power switch “ (OFF)” and plug in c o n n e c t e d t o t h e s o c k e t the power plug again. -
Page 15: Specifications
Specifications Rated voltage 220V~, 50Hz Rated power consumption 330W Suction power Effective capacity of the collecting tank 0.5L Capacity of the clean water tank 0.3L φ31.5mm×1.1m Length of the hose Operating temperature of the hot water C degrees Celsius or below (Approximately) Product dimensions (body dimensions) W248mm x D146mm x H312mm...
Need help?
Do you have a question about the RNS-300 and is the answer not in the manual?
Questions and answers