Table of Contents
Advertisement
Instruction Manual
Dear customer:
Thank you to purchase the
Please read this instruction carefully before using our
plotter!
It is our pleasure that you have been one of our customers. In order to
enable you to grasp the
compiled this instruction manual. You may obtain some basic knowledge:
system disposition, installing steps, and operating application method etc.
Please kindly be advised that you must read this instruction manual very
carefully, it's helpful that you will understand the plotter very well. Any damage
caused by incorrect operation, we will not undertake the responsibility.
We have made our best effort to provide correct and reliable information in
this instruction manual. However, we could not completely guarantee that
there is no mistake in printing. If you find out the mistake in the booklet, please
inform us to make the corresponding correction.
In some cases, we possibly make some small adjustments in some
products in order to enhance the performance and reliability of the components
in the machine. This may lead to the actual situation of the machine slightly
inconsistent to those in the instruction manual. But the adjustments will not
have any effect on the use of the plotters.
If you encounter any problem in the using process of the plotter, please call
the service center of AUDACES, the hot line is: 0086519 86731568, or enter
the AUDACES corporation website at
technical support in the customer information feedback.
Thank you for your kind cooperation!
Audaces Automação e Informatica Industrial Ltda
AUDACES
AUDACES
plotters as soon as possible, we have
AUDACES
http://www.audaces.com/
1
plotter!
to get the
Advertisement
Table of Contents

Summary of Contents for Strima AUDACES Jet Lux Plus
-
Page 1: Instruction Manual
AUDACES Instruction Manual Dear customer: Thank you to purchase the plotter! AUDACES Please read this instruction carefully before using our plotter! It is our pleasure that you have been one of our customers. In order to enable you to grasp the plotters as soon as possible, we have AUDACES compiled this instruction manual. - Page 2 AUDACES...
-
Page 3: Table Of Contents
AUDACES Table of Contents INSTRUCTION MANUAL ......................1 TABLE OF CONTENTS ......................3 CHAPTER 1 INTRODUCTION OF AUDACES PLOTTER ............. 5 1.1 P ....................5 RINCIPAL HARACTERISTICS 1.2 T ..................... 5 ECHNICAL ARAMETERS 1.3 D ......................6 RIVE OFTWARE CHAPTER 2 SYSTEM REQUIREMENTS .................. - Page 4 AUDACES 6.2.6 Help ........................37 CHAPTER 7 MAINTAINING AND TROUBLESHOOTING ............. 38 7.1 C ..................... 38 LEANING THE PLOTTER 7.2 L ................... 38 UBRICATING THE GUIDE TRACK 7.3 C ....................38 LEANING THE PAPER ROLLS CHAPTER 8 SOLUTIONS ....................39 8.1 G ......................
-
Page 5: Chapter 1 Introduction Of Audaces Plotter
AUDACES Chapter 1 Introduction of AUDACES plotter 1.1 Principal Characteristics The AUDACES series plotters are the professional Apparel CAD inkjet plotters which have been specially developed for the Apparel industry by AUDACES Science and Technology. The plotters have reasonable costs and possess high output speed, high resolution, large output breadth, low work noise, clear line shape, high precision, and completely automatic detection and protection functions. -
Page 6: Drive Software
AUDACES Deviations of unidirectional vertical lines: <0.4mm/m Maximum printing length: 50m Maximum printing width: 1.65m 1.85m Paper Type: 40-120g/m ordinary roller paper Paper roll diameter Maximum: 24.1cm (9.5 ") Paper Core Size 7.6cm ( 3" ) Plotter size: 2220×500×930;2400×500×930 Packing size: 2360×570×1060;2550×570×1060 1.3 Drive Software The AUDACES Plotter Control Center and special USB driver software are provided together with the plotter. -
Page 7: Chapter 2 System Requirements
AUDACES Chapter 2 System Requirements 2.1 Connecting of power source An independent power with a proper earth grounded system is required. The power supplier shall not be shared with other machines or devices. The lightning preventing system is highly recommended. The operating voltage of the plotter can be seen in the label on the back of the plotter. -
Page 8: Working Conditions
AUDACES Connection to computer: make sure that the plotter is OFF, insert one of the USB line ends into the computer USB port, and connect the other end to the plotter USB port. Attention: It would be better that a computer is specially used only for the plotter. -
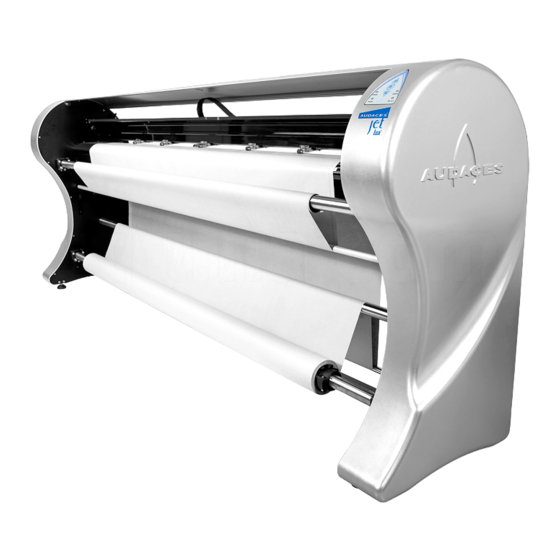
Page 9: Chapter 3 Getting Acquainted With Your Plotter
AUDACES Chapter 3 Getting acquainted with your plotter 3.1 Installation of plotter AUDACES plotters are the overall constructions, after you open the packing case, only need to lift the plotter from the plywood board to a steady position. 3.2 Front view of the plotter (Figure3-1) Figure3-1 3.3 Operator panel 3.3.1... -
Page 10: Indicator Lights
AUDACES can be independently carried out without an online computer. The status of the plotter can also be observed on the pad, such as proper connection of the AC power, request for the replacement of the ink, the status of the system, etc. The actual view of the control buttons is as following (Figure3-2): Figure3-2 3.3.2 Indicator lights... -
Page 11: 3Functional Buttons
AUDACES problems need to be solved. Otherwise the plotter is working in the normal state. Indicator Light of Ink out (ink out):It indicates current ink-level. When the ink is run out, the indicator light will be on or flash. 3.3.3Functional buttons Pause Button(PAUSE):This button is used in making the plotter enter or exit the pause state. -
Page 12: Chapter 4 Loading Printing Media
AUDACES Chapter 4 Loading Printing Media 4.1 Loading of a new feed roll Switch off the plotter, stand behind and face the plotter, and pull the feed roll to the left by hand with a little strength. As the right side of the feed roll is separated from the coupling, lift up the feed roll and take it off. -
Page 13: The Directions Of The Movement Of Paper (Figure4-1)
AUDACES 4.3 The directions of the movement of paper (Figure4-1) Figure4-1 4.4 Paper Roll Weight requirement Do not use paper which is moist, torn or crumpled. Do not use paper with holes or dirty dark spots which may lead to unclear printing result. Please use smooth plotting paper of 40g-120g/m2 and the weight of paper roll shall be less than 35~40kgs. -
Page 14: Chapter 5 Cartridges
AUDACES Chapter 5 Cartridges Cartridge models The cartridge used in AUDACES is HP 51645A or HP 51645B. It can be purchased from your supplier or the HP Company. 5.2 Ink level The following figure (Figure5-1) shows the position of the ink level marker on the cartridge. -
Page 15: Cleaning A Cartridge
AUDACES Attention: It’s better that to replace a cartridge while plotter power status is OFF to avoid any damage to cartridge. 5.4 Cleaning a cartridge This plotter is equipped with automatic print head cleaning and protection device. The dust accumulated on the nozzle can be automatically cleaned during the printing process. -
Page 16: Chapter 6 Installation And Use Of The Software
AUDACES Chapter 6 Installation and use of the software 6.1 Installing the software 6.1.1 USB driver installation instructions If the connection port between computer and plotter is USB port, the USB driver software must be installed on your computer so that the plotter can be operated normally. - Page 17 AUDACES [2] Choose search routine, click browsing, choose installation directory. [3] If the system is WIN98, please choose Drive R:\USBDRIVER \WIN98. If the system is WIN2000 or WIN-XP, please choose Driver R:\ USBDRIVER \WIN2K-XP. Attention: You must choose the correct driver software; otherwise the plotter will not work normally.
- Page 18 AUDACES [4] And then click “NEXT”, follow below guide to finish the installation. After seeing "Figure6-1", click "continue anyway". "Figure 2" means installing successfully. Figure6-1 Figure6-2 6.1.2 Running the installation software Open the folder “Control center software” on the CD-ROM and double click the “setup.exe”...
-
Page 19: Running The Software And Interface Of The Software
AUDACES 6.2 Running the software and interface of the software 6.2.1Running the software Start the computer, enter the Windows system, and this program will be started automatically. You can also click Start/Program/Start-up Program of Audaces Ultraspool 8 in the Start menu to run the program. After the program is started, it will be in a minimized state. - Page 20 AUDACES The operation area includes: <Plot>, <Stop>, <Pause>, <Continue>; <Directory>, <File>, <Merge>, <Split>, <Stack>, <Up>, <Down>, <Delete>; and some auxiliary plotting buttons: <Zoom in>, <Zoom out>, <Z+A>, <Eagle Eye>, <Bird's-Eye>, <Enlargement>, <Box select>, <Pan>, <Measure>; and <Auto plot> tick box. The window below the operation area is for “Prepare files to be plotted”...
-
Page 21: Setup
AUDACES If click <Pause> first, then click <Delete>, the plotting file will be stopped and deleted. Note: After the plotting is finished each time, then the file which has been plotted will be deleted automatically. In the operation area, the user will find <Auto plot>, tick <Auto plot>, then the plotter will in the automatic plotting situation. - Page 22 AUDACES Click <Save>, X (Length) Scale and Y (Width) Scale can be backed up in the middle boxes. It is suggested that the paper type is used for the Name of the Configuration. According to the different paper, calculate several sets of scale factor and save them so that you can choose different calibration parameters as needed.
- Page 23 AUDACES This parameter used to adjust most right lines deviation in printing area Figure6-5 Step1 . Adjust middle line in printing area first. Adjust <INK1 Negative Deviation> value to make sure middle line straight. As picture <figure6-5>, printing line left deviation, you should decrease <INK1 Negative Deviation>...
- Page 24 AUDACES <Value of Step> is to adjust the deviation of plotting along X (Length) direction. Methods of adjusting lines deviation: 1>, Adjust middle line in printing area: A>.adjust parameter <INK2 Positive Deviation> Add “ImpressaoGabarito-2AB.PLT” into control center. Use two heads bi-directional print this file, after print one row then print STOP bottom.
- Page 25 AUDACES B>, Adjust most right line. Make most right line straight by adjusting <Right 1>/< Right 2>/< Right 3>/< Right 4> value. As below picture<Figure6-8>. Normally <Right1> value keeps same, adjust Right 2/ Right 3/ Right 4 value. If printing line deviation left, you should decrease value; if printing line deviation right, you should increase value.
- Page 26 AUDACES Add “ImpressaoGabarito-4AB.PLT” into control center. Use four heads bi-directional print this file, after print one row then print STOP bottom. Observe the lines inside first row which we use small ellipse to mark; see which line is perfect straight then put line number into <INK2 Positive Deviation>...
- Page 27 AUDACES Figure6-10 C>.adjust parameter <INK4 Positive Deviation> Add “ImpressaoGabarito-4AB.PLT” into control center. Use four heads bi-directional print this file, after print one row then print STOP bottom. Observe the lines inside first row which we use small ellipse to mark; see which line is perfect straight then put line number into <INK4 Positive Deviation>...
- Page 28 AUDACES Figure6-11 D>.adjust Parameter <Negative Deviation> Use four heads bi-directional print “ImpressaoGabarito-4AB.PLT” file, finish print complete file. Observe second and third row lines which we big ellipse to mark, see which line is perfect straight then put line number into <INK1 Negative Deviation>...
- Page 29 AUDACES Figure6-12 2>,Adjust two side lines parameter in printing area A>, adjust most left line. Make most left line straight by adjusting <Left 1>/<Left 2>/<Left 3>/<Left 4>/<Left 5>/<Left 6>/<Left 7>/<Left 8> value. As below picture <Figure6-13>. Normally <Left 1> value keeps same, adjust <Left 2>/<Left 3>/<Left 4>/<Left 5>/<Left 6>/<Left 7>/<Left 8>...
- Page 30 AUDACES 6.2.3.1.3 Font Click tab < Font >, then appears following dialogue box: According to your plotting file, you might select font size and line size. 6.2.3.1.4 Other Click tab < Other >, then appears following dialogue box:...
- Page 31 AUDACES <Ink Cartridge Detect Interval>: It is set to realize 24 hours non-stop plotting under unattended mode. You can input the interval parameter you want and the plotter will self-examine its cartridge working status when finish such an interval. Once the cartridge is damaged or without ink, the plotter will give warning signal and stop plotting.
- Page 32 AUDACES <SendPaper Mode>: two selections for this option. Free Printing means push down rollers to print paper directly to floor; Take-up Paper means use take up roll and lift up rollers to print. Click <Save> to save the parameter. <File Type>: this option use to add printing file name extension. Use <;> as separator;...
- Page 33 AUDACES If it is LAN port plotter, choose <Auto> to let the plotter automatically identify it is one head or two head. 6.2.3.3 Connect type Click <Setup> / <Connect Type>, then appears following dialogue box: There are two types according to the port of the plotter: one is USB port, another is LAN port.
- Page 34 AUDACES “last data” “Front 3 data” • Method: 1. In case computer not connected with Local Area Network, (1) Use AUDACES supplied LAN cable to connect computer and plotter, (2)Open "IPConfig.exe", then Click "Set" (ensure success) (3)Open AUDACES control center, click 'Setup"---"Connect Type"----select "LAN"...
-
Page 35: Plot History
AUDACES "AdapterIPConfig.ini"; also front 3 data of "IP Address" the same as "AdapterIPConfig.ini"; but "IP Address" last data is different (data between 2~254, you can select bigger data such as 250 etc)------click "save"----click "yes" (ensure success)----click "close" (7)Open "IPConfig.exe", then Click "restore" (ensure success) (8)Disconnect computer and plotter-----then connect plotter with "hub"... -
Page 36: Backup
AUDACES Choose the related date, and you will get the information of plotting files. 6.2.5 Backup Click <Backup> / <Backup Plot Parameter>, then following dialogue box appears: We can copy the parameters on the other place of the computer by <Backup Plot Parameter>... -
Page 37: Help
AUDACES 6.2.6 Help Click <Help> / <Help>, then following dialogue box appears: Please read it carefully, and pay attention to the details of the operations. -
Page 38: Chapter 7 Maintaining And Troubleshooting
AUDACES Chapter 7 Maintaining and Troubleshooting 7.1 Cleaning the plotter Notice: Before the cleaning process, the plotter power must be turned off; power source should be disconnected to avoid being shocked. Please avoid having water remaining inside the plotter. Attention: Please do not use the corrosive cleanser to clean plotter. Please use sponge or soft cloth and the neutral home-using detergent, such as non-corrosive liquid soap, to clean the out cover of the plotter according to the requests. -
Page 39: Chapter 8 Solutions
AUDACES Chapter 8 Solutions 8.1 General Problems Problems Possible Solutions reasons Indicator light 1. Connecting of 1. Check whether the power of power source power source cord is connected correctly. is not on. 2. Check whether the power switch is set to ON No short 1. -
Page 40: Plotter Errors
AUDACES The software of 1. Problems 1. Reinstall the control center with the software software of the could not be or WINDOWS. plotter or started up. WINDOWS software. 8.3 Plotter errors Problems Possible Solutions reasons Indicator light of 1. The cover is 1. -
Page 41: Problems Of Output
AUDACES indicated position which is between the RIGHTPLOT and LEFTPLOT. Remarks:When the indicator light of ERROR is on, the plotter will alarm. 8.4 Problems of output Problems Solutions There are gaps in plotting lines. Clean the nozzle of the print-head. There are left and right deviations See 6.2.8 Deviation adjusting in plotting lines. -
Page 42: Chapter 9 Appendix
AUDACES Chapter 9 Appendix Please fill in following values in the Control Center after finish the software installation 9 speed Values: The related <Control Center> items: Scale in X: control center\control\calibrate \ Scale in X Scale in Y: control center \control\calibrate \ Scale in Y Value of even deviation: Control center\control\\Deviations adjust\Value of even deviation...
Need help?
Do you have a question about the AUDACES Jet Lux Plus and is the answer not in the manual?
Questions and answers