
Summary of Contents for EHP DRC 433
- Page 2 Connections ............................10 OLED display ............................11 Input keyboard ..........................12 Integrated data storage ........................14 Menu ..............................16 Frequency tables ..........................28 Change frequency & scale number of the crane scale ..............29...
- Page 3 Address: Dieselstrasse 8 D-77815 Bühl (Baden) hereby declares that the product: Data Receiver Type DRC 433 with all options complies with the following harmonized standards: EN 61000-4-2, EN 61000-4-3, EN 61000-4-4, EN 61000-4-5, EN 61000-4-6, EN 61000-4-11 according to Directive 2004/108/EC (electromagnetic compatibility) EN 60950-1:2006 in accordance with Directive 2006/95/EC (Low Voltage Directive).
- Page 4 In this technical manual you will find information on the operation of the data receiver type DRC 433 ► Read the operating instructions before starting up the DRC 433 data receiver. This will protect you and prevent damage to your device.
- Page 5 Table 1 - Technical data...
- Page 6 In case of malfunctions ● Repairs may only be carried out by qualified personnel! ● Read through the chapter "Help in case of malfunctions" and "Error detection ● Contact EHP customer service.
- Page 7 Non-intended use of the manufacturer's specifications in this operating manual • Use outside of use • mechanical damage, damage due to moisture and liquids • Opening or mechanical modification • Use of non-original EHP chargers and batteries • Manipulation of the loading device...
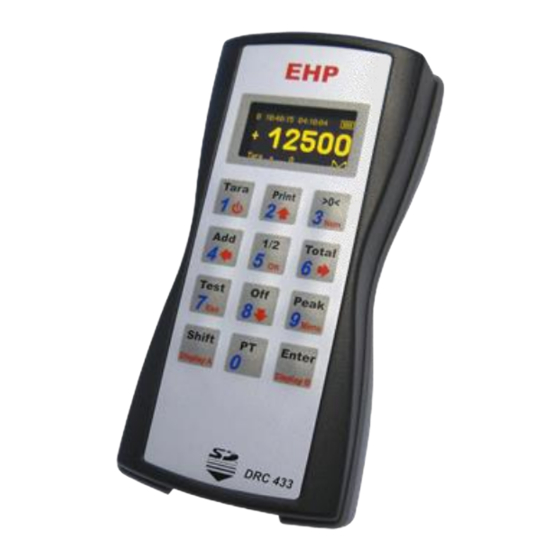
- Page 8 ● Data receiver type DRC 433 Figure 2- Data receiver type DRC 433 The following accessories are included as standard: • 3 NiMH batteries 1.2V 2400-2850mAh • Plug-in power supply • Driver and Firmware CD The driver and firmware CD contains: •...
- Page 9 The DRC 433 is supplied with built-in AA batteries and can be used directly. Switch on the DRC 433 by pressing and holding the "Tara | 1 | " key on the input keypad. The battery compartment is located on the rear of the DRC 433 and can be opened by loosening the two Phillips screws.
- Page 10 The charging process is started automatically. When the DRC 433 is switched on, a charging animation is shown in the display as long as the battery is being charged. As soon as the battery is fully charged, the animation stops. The remote control can...
- Page 11 When using batteries, the supplied charger must not be connected. This may cause damage to the DRC 433! There are 2 displays available on the DRC 433. Display A is the detailed view, which shows all important values. Display B is the simplified operator view (net display).
- Page 12 In the operator view, the display shows the following values: Switch the DRC 433 on or off by pressing and holding the "Tara | 1 | " key on the input keypad (Figure 5). The operation of the DRC 433 is divided into 3 key levels.
- Page 13 Red: Control key Setup, Setup abort Black: Switches the scale off. Note: If the scale is switched off, the DRC 433 also switches off automatically. Press key longer Switches the scale on. Blue: The numerical values can be used for weight, code value or for delivery note number input Red: Control key Setup, value down;...
- Page 14 With the DRC 433, weighing data can be saved on the integrated data memory By pressing the print key, the current weight value is stored. This is symbolized in the DRC 433 display by a brief flashing of the "P".
- Page 15 Examples of how the DRC433 stores the data: PRINT 1000 kg PRINT, 1000 kg 1000 kg 5005 kg Add, 5005 kg 1500 kg Add, 6505 kg 2000 kg Add, 8505 kg Total 2255 kg Total, 8505 kg 8505 kg Print 7564 kg Print, 7564 kg 7564 kg...
- Page 16 The settings of the DRC 433 are intuitive: Open the settings menu by pressing and holding the (Menu) key. The desired menu item can be selected using the arrow keys (↑ | ↓). Press (→) to open the respective menu item.
- Page 17 • Max: 60:00 (Print, Add, symbolized by flashing "P" in the Total) display of the DRC 433 when the Print, Add or Total function is activated. Select setting value "Yes" if DRC 433 is used as the only receiving device.
- Page 18 Using the delivery note function, an individual alphanumeric data record can be linked to each weighing. Pressing and holding the (Num) key opens the delivery bill function. The display shows "Delivery bill" and 0000000000000000"". There are 16 characters available. If a delivery note number has already been edited, the last number entered appears.
- Page 19 With the help of the software, the functions and the radio connection of the DRC 433 can be tested safely. Copy the "Setup Tool" folder from the supplied CD to the computer (assuming unrestricted read and write rights). Then open the program "EHP Setup Tool.exe".
- Page 20 Flashes red with each data packet received from the scale "Connection - Port" Select the port of your DRC 433 via scroll-down (see driver installation DRC 433). Connect/Disconnect" key establishes the connection between software and433 DRC. Each time you press "Connect", the current settings of the software are loaded.
- Page 21 The output format of the software is a CSV file. This is automatically saved under the name EHP.csv in the path stored in the application. The content is saved in follow format: "2021-09-06";"14:42:50";"01";"0.0";"0.0" "YYYY-MM-DD"; "HH:MM:SS"; "WW"; "NNNNN"; "DTTTT" YYYY-MM-DD = date...
- Page 22 Only relevant for customer-specific applications. The preconfigured data log has the following data format (28 bytes): Start signal No comma (e.g. 19520) One decimal place (e.g. 1952.0) Two decimal places (e.g. 195.20) Three decimal places (e.g. 19,520) Four decimal places (e.g.
- Page 23 The control commands to the DRC 433 are confirmed by a return command. Depending on the amount of data, some time may pass between the return command of the DRC 433 and the data transfer to the USB interface. The successful sending of the measuring data is confirmed by the same command...
- Page 24 ASCII = OK ETX CR LF positive response DRC 433 command was 4F 4B 03 0D 0A recognized and is executed. Sending of the SD card data was successful and has been completed. ASCII = ERRxxxx ETX CR LF negative response DRC 433 command was not recognized or an error occurred during data processing.
- Page 25 To do this, open the "Windows Device Manager". Under the tab "Other devices" there is an entry "FT232R USB UART", marked with a yellow "!". Install the driver manually using the supplied "EHP Drivers and Manuals" CD: Right-click the uninstalled device and select...
- Page 26 Select the "Search for drivers on my computer" option. Select the driver - this can be found on the supplied CD in the USB_Box/Driver folder. Then click on "Next" to start the installation. Confirm the successful driver installation with the "Close" button. There is now a new device "USB Serial Port"...
- Page 27 (COM&LPT)" tab. Here you will find an entry "USB Serial Port (COMxx) → XX=COM Port No.. Note the COM port number for your later application. Restart the PC after successful installation. If the DRC 433 is connected to a different USB port on the same computer, Windows automatically installs a new COM port.
- Page 28 A uniform radio frequency is preset between EHP crane scale and DRC 433 from delivery. This corresponds to channel 01 (433.075 MHz) by default. You can adjust the radio frequency via the menu of your DRC 433 remote control. The following table shows the radio frequency of the respective channel numbers. When selecting the radio channel, make sure that it is not already occupied by other radio users (e.g.
- Page 29 You can only receive data from a scale if the settings of the crane scale are identical to the values of the DRC 433 remote control. ► Press the TEST key of the crane scale, the most important setting parameters are now displayed one after the other.
- Page 30 Change the scale and channel number on your EHP crane scale as follows: Table 9 - Set scale & channel number Press the On and Test keys simultaneously, EEEEE appears in the display. Press the Test key repeatedly until P 13(frequency channel) appears in the display.
- Page 31 Using the tare key, activate the parameter and move it to the position to be changed. Use the Test key to enter a value between 01- 16 (corresponds to scale 01-16). Close the parameter with the zero key. Press the Test key repeatedly until P 99(save parameter) appears in the display.
- Page 32 The DRC 433 works with error codes. Error codes that you may be able to correct yourself are listed below. If you get an extended system error displayed that is not listed here, please contact EHP Service. Check the batteries/rechargeable batteries.
- Page 33 Set a valid time. Transmission of the measurement data to the USB port 6055 canceled by pressing the Off button on the DRC 433. Measurement data on SD card incorrect, unusable. The measurement data were manipulated with a PC. 6100-6238 The measurement data are fragmentary due to a defective SD card.
- Page 34 Do you need our support in the fastest way? No problem - just call us free of charge. Hotline: +497223 9366-0 Hotline hours: 8am - 4pm (CET) (Monday - Thursday); 8am - 12pm (CET) (Friday)
- Page 35 EHP WÄGETECHNIK GmbH...
Need help?
Do you have a question about the DRC 433 and is the answer not in the manual?
Questions and answers