Table of Contents
Advertisement
Quick Links
Advertisement
Table of Contents

Summary of Contents for C-Dax XC3
- Page 1 XC3 V2 Smart Console Operation Manual Version: 2400-6672 – 1 November 2017...
-
Page 2: Introduction
This section contains: Introduction Important Safety Warning Important Safety Information Warranty Disclaimer. Limit of Liability Table of Contents Unpacking your XC3... - Page 3 NEVER PUT HANDS/FINGERS NEAR MOVING PARTS OF UNIT IMPORTANT SAFETY WARNING The C-Dax XC3 Console is designed to be used with the C-Dax CDIT spreaders, Goldline Sprayers, and Pasturemeters either towed behind an agricultural vehicle or mounted to a three point linkage.
-
Page 4: Important Safety Information
IMPORTANT SAFETY INFORMATION Be warned of the dangers of loading your ATV or other vehicle in excess of its carrying capacity. It is important to understand that any loads or attachments whether fastened to, or placed on a vehicle or an ATV, will alter the stability or handling characteristics of that vehicle or ATV. Spray tanks or other equipment must be filled only to a level where the gross weight is within the load limit of the ATV or other vehicle. -
Page 5: Warranty
(6 months from date of first retail sale if the equipment is sold in the U.K.) subject to the terms set out below. C-Dax will at its option repair or replace the defective equipment (or part of the equipment) or notify the retailer of the equipment to refund the purchase price for such defective equipment to you in the event of a breach of this warranty, subject to the terms set out below. - Page 6 You agree that the transactions entered into between you and the retailer (and C-Dax) are for the purposes of trade and that, having regard to all relevant circumstances of the transactions, it is fair and reasonable that the provisions of the Consumer Guarantees Act 1993 (NZ) do not apply to those transactions to the fullest extent permitted by law.
-
Page 7: Table Of Contents
Assembly & Setup ................................8 Introduction ................................. 9 The XC3 Console ................................9 Assembly & Setup – XC3 Console ..........................10 Getting a background map ............................12 Download via C-Dax SmartMaps ........................... 12 Download via XC3 USB drive ..........................14 Using AB Guidance .............................. -
Page 8: Assembly & Setup
This section contains: Console mounting Assembly & Setup – Console... -
Page 9: Introduction
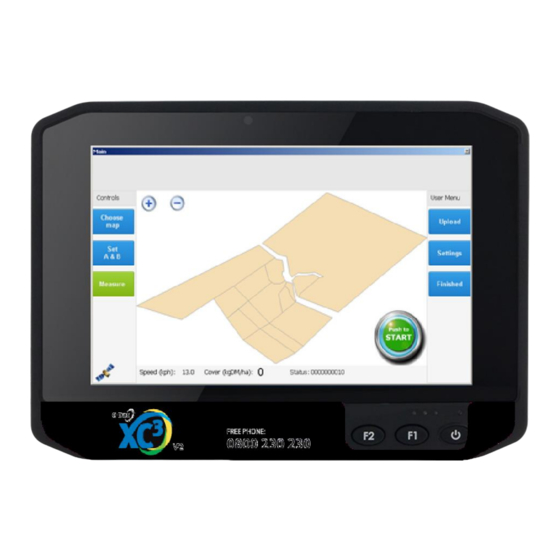
The XC3 console is a sophisticated piece of electronics, C-Dax recommend keeping the XC3 console dry. If the XC3 is exposed to moisture then remove the battery and store the console in a warm dry place. -
Page 10: Assembly & Setup - Xc3 Console
Before operating, connect power to the implement being operated (Spreader/Sprayer/Pasture Meter). The XC3 console should connect wirelessly to the spreader/sprayer or Pasture Meter It is advised that the console power is plugged/unplugged using the round plug in the power line. - Page 11 Note: The battery connector cable is supplied for connection to batteries that do not already have a C-Dax battery connector cable fitted. If already fitted, connect the console power cable directly to it.
-
Page 12: Getting A Background Map
Getting a background map The XC3 console has the ability to download farm maps from C-Dax SmartMaps or from a portable USB drive. OWNLOAD VIA MART If you already have a SmartMaps account and have drawn paddocks on your map then skip to number 3. If not then there are several steps that you need to go through in order to download a map from SmartMaps. - Page 13 4. If you have not established an internet connection via the windows Wi-Fi connection wizard then please do this first. 5. Once you have established an internet connection and have the XC3 console running, press “Choose Map” and press “SmartMaps” and fill in your Customer Number (or email address) and Password from above.
-
Page 14: Download Via Xc3 Usb Drive
2. The coordinate system of the shapefile needs to be WGS 84 (World Geodetic System 1984). If the above criteria are met, insert your USB drive into the USB plug on the top left of the XC3 console and wait a few seconds for Windows to detect the new device, you will need to remove the screws/cover to insert the USB drive. -
Page 15: Using Ab Guidance
2. Drive to your A point (the start of your straight line) and press “Set A” 3. Drive to your B point (the end of your straight line) and press “Set B”. When a C-Dax implement is connected the track spacing will be automatically set depending on what the implement is, and what material is being applied. - Page 16 This section contains: Understanding the console in MEASURE mode How the measuring process works...
-
Page 17: Measure
Understanding the Console In preparation for using your XC3 console with your Pasture Meter + you need to ensure that you have attended to the following: Made the initial hardware setups for the Pasture Meter+ (see Pasture Meter+ manual) ... -
Page 18: How The Measurement Process Works
How the measurement process works The steps below outline the overall process for measuring operations. Plug in Pasturemeter Sled The XC3 console has a built in battery but should always be connected to the Plug in XC3 console ATV/RTV power supply when operating. -
Page 19: The Measurement Process In Detail
With the Pasturemeter sled connected to the tow hitch and plugged into the vehicles 12v power source you are now ready to start the XC3 console. To turn the console on, hold the inset button on the top right hand side of the console until the LED lights on the front of the console become illuminated. - Page 20 At any time the unit can be forced into the upright position by simply pressing the Start/Stop button in the bottom right hand corner of the XC3 console.
- Page 21 If you want to overwrite or update the ride trail for that farm map simply click “Measure” and then under C-Dax ride trail click “Update” Update the ride trail for the current map...
- Page 22 Changing the Pasturemeter equation Press the Measure button on the bottom left hand side of the screen. Press Edit Equation (see image above) Touch the up/down arrows to the right of the Multiplier or Constant edit box. ...
-
Page 23: Uploading Pasture Data
Uploading Pasture Data To upload the recorded data to SmartMaps two requirements must be met. A valid internet connection must be present. This can either be a network cable connected to the left hand side of the console, or an established Wi-Fi wireless network connection. - Page 24 This section contains: Understanding the console in SPRAY mode How the spraying process works...
-
Page 25: Spray
Understanding the Console In preparation for use of your XC3 console with your Goldline sprayer you need to ensure that you have attended to the following: Made the initial hardware setups for the Goldline sprayer (see Goldline manual) ... -
Page 26: How The Spraying Process Works
How the spraying process works The steps below outline the overall process for spraying operations. Plug in Sprayer The XC3 console has a built in battery but should always be connected to the Plug in XC3 console ATV/RTV power supply when operating. -
Page 27: The Spraying Process In Detail
With the sprayer connected to your tractor and plugged into the vehicles 12v power source you are now ready to start the XC3 console. To turn the console on, hold the inset button on the top right hand side of the console until the LED lights on the front of the console become illuminated. - Page 28 Likewise, as soon as the unit is no longer overlapping, the unit will automatically resume spraying. At any time the unit can stop spraying simply by pressing the Start/Stop button in the bottom right hand corner of the XC3 console.
-
Page 29: Changing The Sprayer Settings
As you begin spraying the map will orientate to your heading and a red spray trail will be drawn showing where spray has been applied. A break in the line shows a break in the spraying. This is triggered either by the user pressing the Start/Stop button, the speed dropping under 5km/hr, or an automatic SmartStop event if SmartStop is enabled. -
Page 30: Using The Chemical Rinse
3. Turn on the red handled tap for the chemical rinse (part of the electronic valve bank). 4. Switch on the PTO, press “Settings”, press “More” then adjust the pressure by pressing “Up” or “Down” 5. C-Dax recommends returning the taps to their original position once you have finished rinsing the tank. Adjust pressure... -
Page 31: Uploading Spray Data
Uploading Spray Data To upload the recorded data to SmartMaps two requirements must be met. A valid internet connection must be present. This can either be a network cable connected to the left hand side of the console, or an established Wi-Fi wireless network connection. (Set Wi-Fi via the standard windows Wi-Fi connection, onscreen keyboard is located on the Desktop for your convenience.) ... - Page 32 This section contains: Understanding the console in SPREAD mode How the spreading process works...
-
Page 33: Spread
Understanding the Console In preparation for use of your XC3 console with your CDIT spreader you need to ensure that you have attended to the following: Made the initial hardware setups for the CDIT spreader (see CDIT manual) ... -
Page 34: How The Spreading Process Works
How the spreading process works The steps below outline the overall process for spreading operations. Plug in Spreader The XC3 console has a built in battery but should always be connected to the Plug in XC3 console ATV/RTV power supply when operating. -
Page 35: The Spreading Process In Detail
With the spreader connected to your tractor and plugged into the vehicles 12v power source you are now ready to start the XC3 console. To turn the console on, hold the inset button on the top right hand side of the console until the LED lights on the front of the console become illuminated. - Page 36 GPS signal. C-Dax SmartStop When enabled, C-Dax SmartStop will automatically switch flow off. For example, with smart stop enabled, the user need only press the Start/Stop button once to begin spreading.
-
Page 37: Changing The Spreader Settings
As you begin spreading the map will orientate to your heading and a red spread trail will be drawn showing where product has been applied. A break in the line shows a break in the spreading. This is triggered either by the user pressing the Start/Stop button, the speed dropping under 5km/hr, or an automatic SmartStop event if SmartStop is enabled. -
Page 38: Uploading Spread Data
Uploading Spread Data To upload the recorded data to SmartMaps two requirements must be met. A valid internet connection must be present. This can either be a network cable connected to the left hand side of the console, or an established Wi-Fi wireless network connection. (Set Wi-Fi via the standard windows Wi-Fi connection, onscreen keyboard is located on the Desktop for your convenience.) ...
Need help?
Do you have a question about the XC3 and is the answer not in the manual?
Questions and answers