Table of Contents
Advertisement
Quick Links
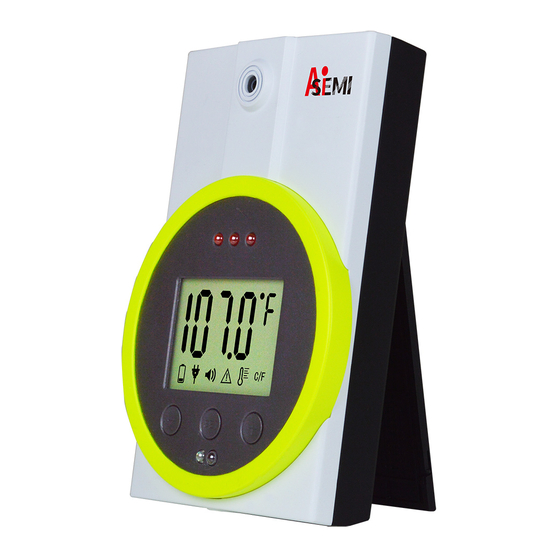
Temperature Measurement System Manual
With array-typed thermopile module sensor and integrated prime lens, the AiSEMI simple can measure surface skin temperature accurately
when used correctly. Please install the AiSEMI simple on the optional Tripod or placed on the table. Power on the system with a 5V_1A USB
charger (Alkaline Batteries are only for backup). Position the person being evaluated at 50cm distance directly facing the AiSEMI simple for
1-3 seconds when used.
Distance will affect the result of temperature measurement.
Please keep the system in a room with no draft (movement of air). For best results, avoid direct sunlight and away from radiant heat or AC
vent. Please make sure that there is no 940nm light source in front of this product, such as sunlight, TV screen light, or camera with night
vision function, etc.
If the body temperature exceeds 37.5°C or 99.5°F, AiSEMI simple will turn on a red light with a warning sound.
*To obtain accurate temperature measurement, please turn on the AiSEMI simple 15 minutes before being used to warm it up so the
temperatures between system and the room temperature balance out.
* Please place the AiSEMI simple at 130cm height. Avoid strong lighting and away from radiant heat or AC vent.
* Position a floor sign at a fixed distance 50cm from the AiSEMI simple system, directly facing the camera before measurement.
(A)
Out-of-the-box inspection:
(A) AiSEMI simple Main Body x1
(B) Type-C to USB Cable x1
(C) Positioning Sticker x1
(D) Tripod x1
(Optional)
(E) 5V_1A USB Adapter
(Excluded)
Turn (A) over, lift the back cover, connect (B) Type-C power cable or alternatively install batteries (4* AA Alkaline Batteries) for use.
(A) can be placed on the table (at a height of about 110cm) or installed on the tripod (D) (at a height of about 130cm.)
Button and Function Description :
Battery Mode
High Temp.
Warning Light
DC Mode
Volume
High Temp. Warning
Downward
Adjustment Key
Warning Temp.
IR Receiver
Temp. Unit
After powering on, please press
upward adjustment key to turn on the machine, the screen will appear, and the red LED will light up
and turn off automatically. Press
upward adjustment key and hold for 6 seconds to shut down the machine.
After pressing
mode setting key, these settings can be made in sequence:
SET
Temperature Unit, Warning Temperature, High Temperature Warning, Multi-lingual Voice, Volume.
AiSEMI simple
(B)
(C)
(D)
Put Your Feet Here
請 站 在 此 處
(Fixed distance 50cm
from the system)
Tripod screw hole
(1/4 inch)
Multi-lingual Voice
Upward
Adjustment Key
Mode Setting Key
SET
1.
Temperature Unit : One-click
After setting, press
again or wait 5 seconds for it to finish automatically.
SET
2.
Warning Temperature : Double-click
37.5°C (99.5°F). Press
or
light and give off a warning voice. After setting, press
3.
High Temperature Warning : Three-click
reminder of high temperature. Press
automatically.
3-1. Temperature Measurement Sensitivity Value Adjustment:Three-click
hold
(without letting go) and then press
then let go. The user can adjust the value according to their needs.
3-2.
Increase Sensitivity
:Some materials of clothing may absorb near-infrared rays, which may cause component test delay or distance
measurement error. If this occurs, the sensitivity setting value can be increased.
Press
to decrease the value,
distance is allowed,
and vice versa. After setting, press
Battery Compartment
process, user can carry out temperature measurement to see whether it conforms to the user environment until it is satisfied.
(for 4*AA batteries)
recommend that the subject stand at 50cm from the machine to avoid temperature measurement errors.
Type-C Cable
3-3. Decrease Sensitivity
:Press
or wait 5 seconds for it to finish automatically.
4.
Multi-lingual Voice Prompts : Four-click
language. The default language order is:
English (L1), Chinese (L2), French (L3), German (L4), Japanese (L5), Spanish (L6), Portuguese (L7), and Korean (L8).
voice is 'Hello'. After setting, press
5.
Volume : Five-click
to
SET
press
again or wait 5 seconds for it to finish automatically.
SET
6.
DC Mode : Six-click
to
SET
own USB charger above 5V_1A.)
7. Battery Mode : Seven-click
<4.6V,
the battery symbol will flash, and it is recommended to replace the battery. It will automatically shut down after a beep sound
(1 second) when the battery voltage <4.2V.
Unit: mm
to
Temperature Unit icon. Press
or
to select the unit of °C (Celsius) or °F (Fahrenheit).
SET
to
Warning Temperature icon. This is the warning value of high temperature. Default is
SET
to select the warning value. When the temperature exceeds this value, AiSEMI simple will turn on a red
again or wait 5 seconds for it to finish automatically.
SET
to
High Temperature Warning icon. This is to turn on/off the red LED light and voice
SET
or
to turn on or turn off. After setting, press
to
SET
, then the sensitivity value (factory setting is 130) will be displayed on the screen and
the lower the value, the higher the sensitivity. The higher the sensitivity, the longer the measurement
again or wait 5 seconds for it to finish automatically. During the adjustment
SET
to increase the value,
the higher the value, the lower the sensitivity.
to Multi-lingual Voice Prompts. When L 1 appears on the screen, press
SET
again or wait 5 seconds for it to finish automatically.
SET
Volume icon. Press
or
to adjust the volume level, 1 is mute, 5 is the loudest. After setting,
Power icon. This is the symbol that appears when the device uses DC power.
to
Battery icon. This is the symbol that appears when the device uses batteries. If the battery voltage
SET
1900
1500
Unit: mm
500
(Fixed distance 500mm from the system)
again or wait 5 seconds for it to finish
SET
High Temperature Warning icon, first press and
*It is
After setting, press
again
SET
or
to select
The default recognition
(Please prepare your
1900
1500
500
(Fixed distance 500mm from the system)
Advertisement
Table of Contents

Subscribe to Our Youtube Channel
Summary of Contents for JETWAY AiSEMI simple
- Page 1 With array-typed thermopile module sensor and integrated prime lens, the AiSEMI simple can measure surface skin temperature accurately when used correctly. Please install the AiSEMI simple on the optional Tripod or placed on the table. Power on the system with a 5V_1A USB Warning Temperature : Double-click Warning Temperature icon.
- Page 2 AiSEMI simple 人體測溫系統使用說明書 1. 溫度單位:按1下 模式設定鍵進入 溫度單位後, 按下 或 可選擇°C(攝氏) 或 °F(華氏)單位。設定完成後可再按一次 , 或是等待5秒自動完成。 AiSEMI simple 使用陣列式溫度檢測傳感零件與定焦鏡頭,請使用5V_1A USB 充電器通電(鹼性電池僅做為備用),將AiSEMI simple安裝在 腳架上或置放於台面上,站在距離系統50cm處,停留1~3秒量測溫度。距離遠近會影響量測溫度的結果。 2. 警示溫度:按2下 模式設定鍵進入 高溫警示溫度後,預設溫度為 37.5°C (99.5°F)。按下 或 可調整設定值。當溫度高於設 適用於室內無風環境,請避免光線直射與避開空調出風口。請確定本產品前方不能有940nm光線的光源,如:太陽光、電視機螢幕、或具 定值時,AiSEMI simple會亮紅燈與語音提醒溫度異常。設定完成後可再按一次 ,或是等待5秒自動完成。 有夜視功能的攝影機等。 如果體溫超過 37.5°C或 99.5°F,AiSEMI simple會亮紅燈與發出警示聲。 3. 高溫警示:按3下...
Need help?
Do you have a question about the AiSEMI simple and is the answer not in the manual?
Questions and answers