Table of Contents
Advertisement
Quick Links
Advertisement
Table of Contents

Summary of Contents for LINKFLOW NEXX ONE
- Page 1 USER MANUAL...
-
Page 2: Table Of Contents
Product Information ............................. 10 1.3.1 Certificates ............................... 10 1.3.2 Trademarks ..............................11 1.3.3 Software Licenses ............................11 WHAT IS NEXX ONE? ........................12 Components ................................12 2.1.1 Basic Components ............................12 2.1.2 Optional Accessories ........................... 13 Part Names and Description ..........................13 2.2.1... - Page 3 VoIP Exchange Server (PBX) Registration ....................80 PC View Registration ............................80 7.2.1 NEXX ONE Device Registration ......................81 Using VoIP on PC Viewer ........................... 81 7.3.1 Registering NEXX ONE to Viewer ......................81 7.3.2 Outbound VoIP Calls ..........................82 7.3.3 Inbound VoIP Calls ............................83...
- Page 4 7.3.4 Missed Call Notifications .......................... 84 7.3.5 Call Waiting ..............................84 7.3.6 Call History ..............................85 Using VoIP on NEXX ONE Device ........................86 7.4.1 Web-based Configuration for VoIP ..................... 86 7.4.2 Microphone and Earphones ........................87 7.4.3 Making a Call..............................87 7.4.4...
-
Page 5: Introduction
1.1.1 Copyright The copyright of this manual is reserved by LINKFLOW Co., Ltd., the manufacturer of NEXX ONE. No part of this manual may be used or reproduced in whole or in part in any manner without the prior permission of LINKFLOW Co., Ltd. -
Page 6: Signs And Labels
1.1.3 Signs and Labels In this manual, particular safety or information features on the product are specified with the following labels: Label Description A CAUTION indicates either an important safety instruction or restriction. CAUTION A NOTE indicates important or supplementary information that helps you make better use of your device. -
Page 7: Safety Precautions
Do not use the device in areas affected by heavy smoke or steam. Otherwise, it can lead to ■ product failure or damage. Always use genuine accessories, batteries and cradles specified or provided by LINKFLOW. ■ Unauthorized components may shorten the product life or cause overheating, a fire or an explosion, possibly resulting in serious injuries and product damage. -
Page 8: Rf Safety Guidelines
It is recommended that the cradle be stuck to a large, flat fixed glass surface. ■ The AC adapter supplied with the device is only for use with NEXX_ONE cradles. Do not use ■ any charger other than this adapter. Using any other charger can result in an explosion damaging your device. -
Page 9: Safety Precautions For Handling Batteries
If your device interferes with any such station, discontinue using it immediately and contact ■ the seller or LINKFLOW to enquire about measures to avoid interference, such as by installing a partition. Please contact the seller or LINKFLOW regarding any other product interfering with an on- ■... -
Page 10: Product Information
recycle the battery. Dispose of it immediately in accordance with applicable waste regulations. Keep the battery and cradle out of the reach of children. Call an ambulance, if you suspect a ■ battery has been swallowed. Do not use batteries other than those designated. Otherwise, there is a risk of battery ■... -
Page 11: Trademarks
• All product names and brands used in this manual are trademarks of their respective owners. 1.3.3 Software Licenses This product includes software licensed under different licenses. This product includes open source software. For more details, please visit the LINKFLOW website. -
Page 12: What Is Nexx One
2. What is NEXX ONE? NEXX ONE is a wearable neckband CCTV. NEXX ONE comfortably wraps around your neck and makes it easier to record your surroundings and share both video and audio with the control room in real time, which can be very useful in many different settings. -
Page 13: Optional Accessories
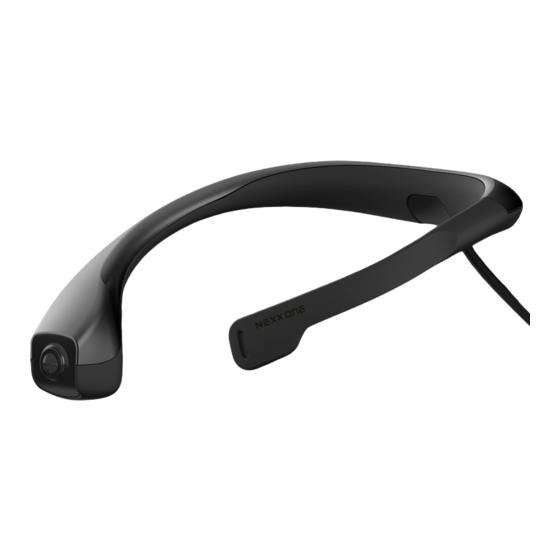
2.1.2 Optional Accessories Figure 2-2 Optional Accessories Part Names and Description 2.2.1 Neck camera Uses built-in cameras to shoot 360-degree videos. Figure 2-3 Neck Camera Structure Label Name Description Camera Lens Uses 1 camera lens to capture footage. System Body Supplies power to the camera and transmits the footage to the system Connector body. -
Page 14: System Body
2.2.2 System Body The system body compresses the footage captured by the neck camera, and stores and transmits the compressed footage in real time. Figure 2-4 System Body Structure Label Name Description Call Button Starts or ends a call with the control room. (Front left) Press and hold to adjust volume. - Page 15 ■ Checking the system body LED display Figure 2-5 System Body LED Display Label Indicator LED Status Description The system is functioning normally. System Green: On System firmware is being updated. Red: Flashing Battery A percentage of battery life remaining is displayed. The wireless network (wireless LAN or LTE/5G) is not connected.
- Page 16 Label Indicator LED Status Description Flashing A call connected with the viewer. The camera LED displays the operational status of each camera. • The network and memory card storage may be displayed differently, depending on the • NOTE dongle attached or the space remaining. This device does not support GPS dongles.
-
Page 17: Cradle
2.2.3 Cradle Charges the system body/external battery or transmits data to a PC. Figure 2-6 Cradle Structure Label Name Description Provides a sturdy mount for the suction cup. Pushing the switch up Suction Mount creates a vacuum inside the suction cup for sturdy mounting. System Body &... -
Page 18: External Battery (Optional)
■ Cradle LED Display Figure 2-7 Cradle LED Lamps Item Indicator LED Status Description The cradle is not powered on. Power The cradle is powered on. The system body is being charged. System Body The system body is fully charged. The external battery is being charged. - Page 19 Figure 2-8 External Battery Structure Label Name Description Battery Status Button Checks the remaining battery power. Connects with the charging/data transmission connector of the system System Body Connector body. Label A label with product details. Connects with the cradle system/external battery connector. Charges Cradle Connector the system body and external battery, or transmits data to a PC.
-
Page 20: Preparing Nexx One
3. Preparing NEXX ONE This section explains how to put the parts together and set up the network before you start using this product. Connecting Components 3.1.1 Connecting the Power and LAN Cables Insert the power/LAN cables from the router into the power/LAN ports on the back of the cradle. -
Page 21: Attaching A Dongle (For Wireless Models Only)
Note the orientation of the memory card. (See figure below.) Figure 3-3 Inserting Memory Card 3.1.4 Attaching a Dongle (For wireless models only) Plug in a wireless LAN dongle into the USB port on the system body. Figure 3-4 Attaching Dongle 3.1.5 Mounting the External Battery Insert the system body into the external battery. -
Page 22: Turning On/Off
The SYS LED on the front of the cradle will light up in red ( ) while the system body is being charged and in green ( ) when it is fully charged. Figure 3-6 Charging System Body For how to check the cradle status, see “Cradle LED Display”. •... - Page 23 • Check if the neck camera cable is connected. • Check if a memory card is inserted. • Press the power button on the system body. It will beep twice, and the power indicator will light up. • Press the power button when the device is on. It will beep twice, and the power will go off. The system body will not be powered on without a memory card in place.
-
Page 24: Nexx One Settings
This product can be configured: • with NEXX Manager installed on your PC, • or in the web browser. NEXX Manager is a program used by NEXX360/NEXX ONE. • NEXX Manager is a program used to configure device settings and view recorded •... - Page 25 By default, the installation directory is C:\Program Files\NEXX Manager. Click [Browse…] to change the installation location. Figure 4-2 Installation Wizard Specify a name for the start menu folder. The default name is NEXX Manager. Click [Install] to copy the program files to your PC. Figure 4-3 Installation Wizard...
- Page 26 Once the installation is complete, you can run NEXX Manager. Figure 4-4 Installation Wizard...
-
Page 27: Nexx Manager Settings
NEXX Manager Settings NEXX Manager must be installed on your PC to configure your device settings. • NOTE Do not run multiple NEXX Managers on the same PC. • Figure 4-5 Main Interface Label Name Description Menu Bar Provides access to the main menus. Provides a set of tools to configure live streaming, recordings and device Tool Tabs settings. - Page 28 Figure 4-7 Setting Menu Label Description Network Allows you to configure the network settings. Playback Playback settings for recorded footage. Capture Settings for the directory where screenshots are saved. Call Configure the VoIP of the viewer . Allows you to import previously saved settings or export the current settings. Configuration Import: Imports previously saved settings.
- Page 29 ■ Playback Settings Playback settings for recorded footage. Figure 4-9 Playback Controls Label Option Description Mute as default The sound of recorded footage is not played. Repeat playback (video Allows you to repeat videos automatically. loop) as default Playback Allows you to accelerate playback of streaming videos. Settings Hardware Acceleration None: Disables hardware acceleration.
- Page 30 ■ Capture Settings Figure 4-10 Capture Menu Label Option Description Selects the location where the captured or recorded Save files to footage is saved. Capture Settings Limits the recording time. Max record duration Length: 1, 3, 5 or 10 minutes. Depending on the situation, a time difference of ±1 second may occur.
- Page 31 Label Description Call Server Address The VOIP server address of the viewer. Call ID VOIP call number of the viewer. Call Recording Recordings of VOIP communication. (Default: OFF) ■ Configuration - Import/Export Imports previously saved settings or exports the current settings to a file. Label Option Description...
-
Page 32: Tool Tabs
4.2.2 Tool Tabs Provides a set of tools to configure live streaming, recordings and device settings. Figure 4-12 Tool Tabs Label Name Description Streaming Video Allows you to view, select, add and delete predefined profiles. Recordings Plays recorded videos loaded from the memory card. Device Settings This menu provides a set of system options. - Page 33 Right-click a profile to open a pop-up menu with a set of options. Name Description Connect Video Attempts to access the selected profile. Connect Video & Call Displays camera images and makes a VOIP call at the same time. Remote Device Configuration Allows access to the web-based settings page.
- Page 34 Applies keyword filtering to the list of videos. Videos that contain the ③ Keyword Filter text are listed. Lists folders where the recorded footage is saved. Add Folder ( ): Adds a new folder. • ④ List of Video Folders Delete Folder ( ): Removes a folder from the list.
- Page 35 Right-click the video list to open a pop-up menu with the option below. • NOTE Convert to single-channel videos: Converts the selected video recording into separate files for each camera feed (C1 - C4). (Four .avi files are created.) Right-click the recording date filter to open a pop-up menu with a set of options. •...
-
Page 36: System Body Settings
4.2.3 System Body Settings ■ How to Set Up the System Body 1. Turn off the device and remove the memory card from the card slot. 2. Insert the memory card into your PC on which NEXX Manager is installed. 3. - Page 37 6. On the device settings window, click each tab to configure the system settings. Figure 4-17 Image of Device Settings Label Description Camera Configures recording/streaming video quality settings Operation Configures recording settings Network Configures network settings Server Configures server settings User Manages ONVIF/RTSP streaming user accounts.
- Page 38 Value (*Factory Label Option Description default settings) for Recording 512Kbps - 4Mbps Bitrate Bitrate settings for recorded footage (*4Mbps) Rate Control Variable/Constant bitrate settings VBR*/CBR Frame rate Frame rate settings for live streaming 1fps - 30fps(*30fps) 512Kbps - 8Mbps Bitrate Bitrate settings for live streaming Video Quality (*4Mbps)
- Page 39 Wireless IP settings for wireless LAN IP Type STATIC/DHCP* connection. 0.0.0.0 - Wireless IP settings for wireless LAN IP Address 255.255.255.255 connection (192.168.0.252)* NEXX ONE Device 0.0.0.0 - Gateway address settings for wireless LAN (Wireless) Gateway 255.255.255.255 connection (192.168.0.1)* 0.0.0.0 -...
- Page 40 Value (*Factory default Label Option Description settings) Sets the IP type of the Ethernet connected to IP Type STATIC*/DHCP the cradle. 0.0.0.0 - Sets the IP address of the Ethernet IP Address 255.255.255.255 connected to the cradle. (192.168.1.252)* Cradle 0.0.0.0 - (Wired) Sets the gateway address of the Ethernet Gateway...
- Page 41 Figure 4-20 Server Tab Value (*Factory default Label Option Description settings) Server IP VoIP Server(BPX) IP address 52.78.124.88 NEXX ONE device’s VoIP caller Dev. Caller ID Blank number VoIP Peer Caller ID Viewer’s VoIP number Blank Configuration Option to block the VoIP...
- Page 42 Value (*Factory default Label Option Description settings) server. 192.168.1.23* Up to 15 English letters, numbers and/or special Sets an ID of the backup server. characters (- _!@#$%^) FTP_ID* Up to 15 English letters, numbers and/or special Sets a password for the backup Password characters server.
- Page 43 Value (*Factory default Label Option Description settings) NTP (Network Synchronizes the time using the ON*/OFF Time Protocol) NTP. NTP (Network Up to 31 English letters, Time Protocol) The URL address of the server to Time Server numbers and/or dots synchronize the time with. (time.google.com) Enable ONVIF The option to enable the ONVIF...
- Page 44 Sets a user ID. Up to 31 English letters, numbers and/or admin*/NULL special characters (- _!@#$%^) Sets a password. Up to 31 English letters, numbers and/or Password admin*/NULL special characters (- _!@#$%^) ■ System Tab This tab allows you to view your product information and change the device ID. Figure 4-22 System Tab Label Option...
-
Page 45: Web Settings
4.2.4 Web Settings You can access and configure product settings in a web browser. All settings except the User and System Settings can be configured in the same way as • NOTE NEXX Manager. For more details, see “System Body Settings”. Web browser configuration is updated when the system is restarted. - Page 46 Incorrect ID/password will prompt you with an error message as shown below. Figure 4-25 Authentication Error Page When you first log in, you will be directed to change your password and log in again with the new password. (Only the password can be changed.) Figure 4-26 Change Password Page You can access the configuration page after changing your password.
- Page 47 Select and configure the settings that you want to change. Figure 4-27 Main Web Page...
-
Page 48: Camera Settings
4.2.5 Camera Settings You can configure the recording and streaming resolution. Figure 4-28 Camera Settings Page... -
Page 49: Operation Settings
4.2.6 Operation Settings Figure 4-29 Operation Settings Page... -
Page 50: Network Settings
4.2.7 Network Settings You can configure the network (Wireless/Wired/AP) settings. Figure 4-30 Network Settings Page... -
Page 51: Server Settings
4.2.8 Server Settings Figure 4-31 Server Settings Page... -
Page 52: System Settings
4.2.9 System Settings Figure 4-32 System Settings Page Refer to 4.5.2 Updating firmware for details... -
Page 53: User Settings (Change Password Option)
4.2.10 User Settings (Change Password Option) 1. You can change the web administrator’s password. You can change the password for your ONVIF account. (ID (admin) is unchangeable.) RTSP account settings: If ONVIF is enabled, the ID and password should be the same as the ones for your ONVIF account. -
Page 54: 4.2.11 Restart
4.2.11 Restart On the main page, click APPLY (RESTART) to restart the system. Figure 4-34 Confirmation Dialog Box for Restart Click OK. Then, a message will appear as shown below. Figure 4-35 Confirmation Dialog Box for Reboot During restart, messages will appear on your screen, as shown below. Figure 4-36 Rebooting Once the reboot is complete, the changes in settings will be applied. -
Page 55: Network Settings
Network Settings 4.3.1 Defining Mode Communication modes are divided into the basic mode for transmitting video files as a backup and LAN/LTE mode for watching live streams on a PC. The basic models support the basic mode only, and the wireless models support all modes. ■... - Page 56 ■ Wireless LAN Mode The wireless LAN mode refers to a communication mode using the wireless LAN. Its configuration diagram is presented below. Figure 4-38 Wireless LAN Mode Diagram The (wireless) IP address is assigned according to the local wireless LAN protocol*. (* Contact your network administrator.) Watch live streams via NEXX Manager on your PC connected to the local network.
- Page 57 ■ LTE Mode The LTE mode is a communication mode using the external network. A wireless dongle can be used to connect NEXX360 with your PC. Its configuration diagram is presented below. Figure 4-39 LTE Mode Diagram A static IP is recommended for the LTE mode. In this case, you need an LTE sim •...
- Page 58 ■ NEXX Streaming Mode If your NEXX360 and PC in the wireless LAN/LTE mode are on different networks (public, private), they can be connected without setting port forwarding and DMZ. Its configuration diagram is presented below. Figure 4-40 NEXX Streaming Mode Diagram...
-
Page 59: Setting Options
The setting options required for each mode are described below. ■ Wireless LAN Label Setting Options Basic Mode LTE Mode* Mode IP Type – – ✔ IP Address – – NEXX ONE Device ✔ (Wireless) Gateway – – ✔ Netmask – – ✔ IP Type ✔ ✔ ✔... -
Page 60: Backup Server Settings
Backup Server Settings A backup server (FTP server) allows you to transmit and save the videos files from the memory card to the backup server. 4.4.1 Backup Server Network Settings The AP LAN cable must be connected to the cradle. •... -
Page 61: Ftp Server Program Settings
21 (recommended) server. The backup server and cradle need to be on the same network. • CAUTION For how to set up the network, see “NEXX ONE Settings”. • NOTE 4.4.2 FTP Server Program Settings To back up video recordings, you need to install an FTP server and client program before the network setup. -
Page 62: Installing Firmware
Insert the memory card into the PC on which NEXX Manager is installed. Run NEXX Manager. Click the device settings ( ) tab in the tool tabs. You can check the firmware version of NEXX ONE if the memory card is successfully read. Figure 4-42 Checking Firmware Version... -
Page 63: Updating Firmware
Or, you can check the version in Settings > System by double-clicking Device ID. Figure 4-43 Checking Firmware Version You can check the version of NEXX Manager in Help -> About. • The firmware version is also displayed in the System Settings on the web-based •... - Page 64 File name: NEXXONE_0.09.10_full.dat Figure 4-44 NEXX ONE Firmware File 5. Remove the memory card from your PC and insert back into the NEXX ONE body. 6. Press the power button to turn on the device. The update starts automatically. 7. Once the update starts, the device beeps three times and the LED display flashes.
- Page 65 From this page, Firmware update can be completed remotely. 1. Maintenance -> Firmware Update -> and click [ ... ] button Figure 4-45 Click Firmware update from the website 2. Find and click the file of firmware update (For example, NEXXONE_1.01.03_full.dat) Figure 4-46 Selecting NEXX ONE Firmware File...
- Page 66 3. Click Update > button and press OK button to start the update. Figure 4-47 Firmware update message 4. It will show the process of firmware update. Depends on the network speed, the time of updating firmware will vary. Stay on this page until uploading is completed. Otherwise, the update will not be completed.
- Page 67 Figure 4-50 Completion of Firmware update 5. If the firmware has an error, it will display the following messages. Figure 4-51 Error messages of Firmware Update...
- Page 68 8. Turn off the system body, remove the memory card, and format it on the PC. Figure 4-52 Formatting Memory Card Back up the data on the memory card before formatting as the data will be lost • otherwise. CAUTION Set the file system to exFAT when formatting.
-
Page 69: Video Recording And Streaming
5. Video Recording and Streaming Wearing the Device This section explains how to wear the device. Wear appropriate clothing to avoid skin contact with your neck camera, system body • and external battery. CAUTION Make sure the system body or external battery is kept in the pouch when in use. •... -
Page 70: Recording
Recording Figure 5-2 Recording 1. Wear the device. Press the power button to turn on the device. Turning on the power will automatically start recording. - Once recording starts, the REC ( ) lamp on the LED display of the body system will flash in red. - Page 71 You can see the AP settings on the network in [NETWORK SETTING] - [Wireless LAN • NOTE ACCESS POINT]. Up to three PCs can simultaneously access a single NEXX ONE to watch live streams. • Run NEXX Manager on your PC. Go to Streaming Video tab ( ) - Add Profile ( In the Add Profile window, enter the name and IP address of the device to add.
-
Page 72: Watching Live Streams
VOIP call number of the device. VOIP ID VOIP call number is allocated based on UID number. NEXX Streaming The device's UID is used to determine whether to use a P2P connection. Server(NSS) Use NSS in a case when the network environment has a firewall. Click OK. -
Page 73: Recording Live Streams
VideoInfo (about resolution, frame rate and bitrate) Reset Screen (restored to its original size from the enlarged/reduced size) Zoom (Fit To Screen < or 100% size> 50% · 100% · 150% · 200% enlarged/reduced) Stop Video When using the Zoom options in the right-click menu, you can change the display •... -
Page 74: Playing Recorded Footage
6. Playing Recorded Footage Playing Recorded Footage 1. Turn off the device and remove the memory card. Insert the memory card into the PC on which NEXX Manager is installed. Run NEXX Manager. Go to Tool tabs - Recordings ( ) tab. Figure 6-1 Playing Recorded Footage Click Add Folder ( Figure 6-2 Playing Recorded Footage... - Page 75 The recorded footage saved in the added folder is listed. Figure 6-4 Selecting Video Folder When there are just too many recordings, the easier way to find a video is to use the • NOTE recording date/keyword filters. For more details on filtering, see “Recordings Tab”. •...
-
Page 76: Playing Recorded Live Streams
Playing Recorded Live Streams You can set the save path for recording and playing live streams. The save path is set in “Capture Settings”. Playback Controls Figure 6-6 Video Playback Screen Label Name Description Play/Pause Starts or pauses playback. Stop Stops playback. - Page 77 Label Name Description Volume Slider Controls the volume of the video. Screenshot Captures an image of the video from its current frame. By default, captured images are saved in the “Documents” folder. The save path can be • NOTE changed in “Capture Settings”. Right-click the video screen to configure the following settings: •...
-
Page 78: Video Screen
Video Screen This is where you can watch recorded footage or live streams. Figure 6-7 Video Input Screen 6.4.1 Screen View Figure 6-8 Screen View Label Name Description Default Displays a single footage transmitted from 1 neck camera. Displays 4 footages simultaneously transmitted from 4 neck 2x2 Grid cameras. -
Page 79: Screen View Controls
6.4.2 Screen View Controls Figure 6-9 Screen View Controls for Live Streaming Figure 6-10 Screen View Controls for Video Playback Label Name Description Screen Mirroring for Flips the screens of the rear cameras (No. 2 and No. 3). Rear Cameras Blends the left and right video inputs to create panoramic Wide View images. -
Page 80: Voip Communication
7. VoIP Communication VoIP Exchange Server (PBX) Registration In VoIP communication, a VoIP Exchange (PBX) plays the role of a transmitter between the two devices. For the devices to communicate using VoIP, a call ID for each device must be registered to the VoIP Exchange. -
Page 81: Nexx One Device Registration
Registering NEXX ONE to Viewer VoIP calls can only be made from the NEXX ONE device. To register your device to the Viewer, opt for NEXXONE as [Device Type] and enter your device’s VoIP ID in the [NSS UID] field as shown in Fig. -
Page 82: Outbound Voip Calls
You can make outbound VoIP calls from the device list on the left-hand side of the Viewer. Click the green call icon ( ) of your NEXX ONE. Then, the device list will change as shown on the left in Fig. 7-5 and an outgoing call screen will appear as shown on the right in Fig. 7-5. -
Page 83: Inbound Voip Calls
Figure 7-6 VoIP Call Controller on Streaming Screen 7.3.3 Inbound VoIP Calls When an inbound VoIP call arrives, you will see “Incoming...” with the device which has made the call as shown on the left of Fig. 7-7 and the incoming call screen as shown on the right of Fig. 7- Figure 7-7 Receiving VoIP Call Options available on the call window are as follows: Item... -
Page 84: Missed Call Notifications
Figure 7-8 Incoming Call during RTSP Streaming Inbound calls from devices unregistered to the Viewer are ignored. • NOTE 7.3.4 Missed Call Notifications Any missed call from devices will appear in the device list on the left side of the Viewer as shown in Fig. -
Page 85: Call History
7.3.6 Call History Right-click on the device in the list you wish to view the call logs of, and click [VOIP Call Log]. Figure 7-11 Call History It shows the records of incoming, outgoing, and missed calls of the device. Also, click the microphone icon on the right to playback recorded calls. -
Page 86: Using Voip On Nexx One Device
Using VoIP on NEXX ONE Device 7.4.1 Web-based Configuration for VoIP Go to Server Settings on the main configuration page in a web browser. Enter the details in the VOIP CONFIGURATION at the top of the Server Settings page. Restart the device to apply the changes. -
Page 87: Microphone And Earphones
7.4.2 Microphone and Earphones ■ Connecting Earphones Open the rubber cap on the neck camera and plug in your earphones. Figure 7-14 Neck Camera Earphones ■ Microphone The microphone is circled in red in the figure of the neck camera below. Figure 7-15 Neck Camera Microphone 7.4.3 Making a Call... -
Page 88: Answering A Call
Figure 7-16 Making a Call Connect to a wireless LAN or LTE (dongle/tethering) to set up an external network connection. ■ Press the VoIP button to make a call. You will hear the calling sound through your earphones. ■ 7.4.4 Answering a Call Figure 7-17 Answering a Call An incoming call beeps at one-second intervals, which you can hear through your earphones. -
Page 89: Appendix
8. Appendix Troubleshooting 8.1.1 Checking Your Computer’s IP Address 1. Click the search icon ( ) on the taskbar. Or press the Windows logo key + R. Type cmd and press Enter. Figure 8-1 Checking the IP Address of Your PC On the Command Prompt, type ipconfig and press Enter. -
Page 90: Setting An Ip Address On Your Computer
Figure 8-3 Checking the IP Address of Your PC 8.1.2 Setting an IP Address on Your Computer 1. Click the Windows icon ( ) on the taskbar. Click the Settings icon ( In the Windows Settings, click Networks & Internet. Figure 8-4 Windows Settings Select the network currently in use (Ethernet or wireless LAN). - Page 91 Figure 8-5 Network Scroll down the details of the selected Ethernet until you find the saved IP settings. Click Edit. Figure 8-6 Network Information Enter a new IP address and save the change.
-
Page 92: What If The Time Stamp On Video Is Incorrect
Figure 8-7 Changing Network Information 8.1.3 What If the Time Stamp on Video is Incorrect? Mount the system body on the cradle and external battery while the external Internet (via a LAN cable) is connected. The time will be automatically set to the time zone of the system body. The Time Zone can be set in the “Server Tab”. - Page 93 Label Item Specifications Dimensions 133.7mm (W) x 175.7mm (H) x 63.1mm (D) Cradle Weight 375g Power Supply DC 19V/3.42A (65W) Dimensions 81.5mm (W) x 142.8mm (H) x 26.5mm (D) Weight 330g Type: Memory Card (Class 10 or higher) External Storage Capacity: Up to 64GB Built-in Battery: About 3 and a half hours System...
-
Page 94: Power Supply (Ac Adapter) Specifications
Label Item Specifications Interface USB 2.0 Type A Microphone Built-in Microphone Speaker Beep Speaker Wireless IEEE802.11 b/g/n Available (with a wireless version) Available (with a wireless version) Available (with a wireless version) Flammability Main Parts of Neck Camera, System Body (V0) Rating and Neck Camera Rubber (HB) Neck Camera = IP67... -
Page 95: Warranty
For technical support, contact us at +82 1833 2526 ■ LINKFLOW Co., Ltd. will not be liable for any loss or damage caused to the product when: an unapproved part or accessory is used with the product, ■... - Page 96 Purchase Date Year Month Seller...
Need help?
Do you have a question about the NEXX ONE and is the answer not in the manual?
Questions and answers