
Summary of Contents for Seaside MINI WARDEN
- Page 1 SeaSide Automation ARDEN Installation & Operation Standard Version SeaSide Automation 12933 Drummer Way, Grass Valley, CA 95949 Telephone (530) 487-5007 • www.seasideautomation.com Manual date 12/2021...
-
Page 2: Table Of Contents
Contents SYSTEM COMPONENTS Maximum Electrical Specifications Certifications Models and Options Mounting MiniWarden Flow Cell To Circulation Plumbing Sensor Wire Connection Supply 110/220 Vac Input Selection Load / Equipment Connection & Installation Relay Board Acronyms for ORP & pH 120 VAC Relays: ORP DRY CONTACT RELAY Supported Auxiliary Dry Contact Loads / Equipment: DEFAULT READINGS SCREEN... - Page 3 IMPORTANT WARNING AND SAFETY INSTRUCTIONS READ AND FOLLOW ALL INSTRUCTIONS SAVE THESE INSTRUCTIONS WARNING – To reduce the risk of injury, do not permit children to use this product DANGER – Risk of injury 4.1 Replace damaged cord immediately. 4.2 Do not bury cord. 4.3 Connect to a grounded, grounding type receptacle only.
- Page 4 WARNING – Disconnect all power to MiniWarden prior to any service including the main AC power. Never apply power when MiniWarden service door is unlocked or in the open position. Only qualified and licensed technicians should perform any service or repair. WARNING –...
-
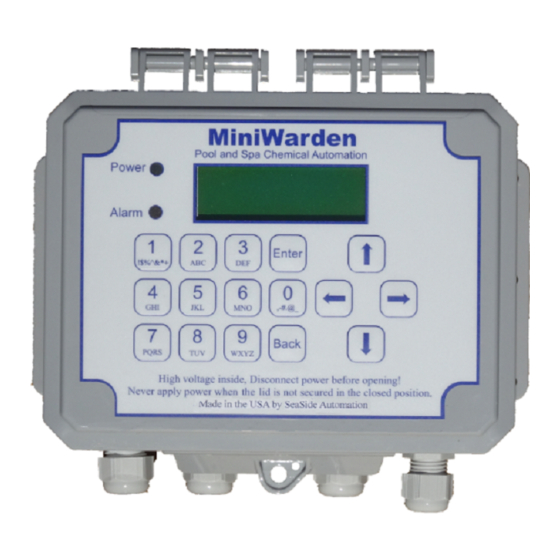
Page 5: System Components
MiniWarden OVERVIEW SeaSideAutomation, with over 20 years of technological leadership in Pool & Spa Chemical Control Systems congratulates you on your selection of the MiniWarden Chemical Controller. MiniWarden is a water chemistry control system with capabilities to control the pH and sanitizer on a pool, spa, fountain or any other similar body of water. -
Page 6: Certifications
ITEM DESCRIPTION LIMIT Input Voltage Maximum input AC voltage 120/240 VAC Input Current Maximum input current 5.0 A Relay Voltage Maximum relay voltage 240 VAC Relay Current Maximum Relay Current 2.5 A Temperature Minimum/Maximum Operating Temperature 30/110 °F Standby Current Maximum operating current 0.1 A Max Measurement of pH... -
Page 7: Mounting Miniwarden
MiniWarden INSTALLATION Mounting MiniWarden Turn off any heaters, pool or spa circulation systems, chemical feed pumps or any related shut-off valves or equipment and relieve pressure from the filtration system. Find a suitable mounting location near a 120/240 VAC power source that meets the following criteria: ●... -
Page 8: Sensor Wire Connection
If not pre-mounted, find a suitable location to mount the acrylic flow cell within 3 feet of the controller. Mount and assemble flow cell parts according to Picture 2. There is a small magnet in the flow cell that is held in place with a piece of tape. -
Page 9: Supply 110/220 Vac Input Selection
Supply 110/220 Vac Input Selection The MiniWarden supports both 110 VAC and 220 VAC. For 110 VAC the power cord includes a GFCI on the end of the cord that plugs in. For 220 VAC the cord should be removed and the MiniWarden should be hardwired to a circuit breaker with a GFCi by a licensed electrician. -
Page 10: Orp Dry Contact Relay
❑ ORP NC: The connection to the relay that has voltage when the relay is off. When the relay is on there is no voltage. ORP DRY CONTACT RELAY A dry contact relay is not connected to any voltage and acts as a switch. To supply power to a load / equipment (such as a chemical pump) through a dry contact relay, the voltage must be supplied using a jumper to the appropriate voltage. - Page 11 MiniWarden Operation This section reviews all the navigation features associated with MiniWarden’s keyboard. Back: From the main readings display the Back button provides access to the main menu where all of the configurations are. If MiniWarden is password protected then you will need to enter the password to access the main menu.
-
Page 12: Default Readings Screen
DEFAULT READINGS SCREEN The Default Readings Screen is displayed after power up and when a Default Readings Screen button isn’t pressed for a period of time. It is the most critical screen as it Flow will display the current pH & ORP sensor readings, flow status, relay status, alarm status and various symbols that are defined below. -
Page 13: Handy Menu
Handy Menu MiniWarden has 2 Menus (Handy and the Main Menu) that are all accessible directly from the Default Readings Screen. Only the Handy is NOT password protected. Handy Menu: Press Down Arrow Enter from the default readings screen to access the handy menu. ❑... -
Page 14: Miniwarden Simple Mode
MiniWarden Simple Mode When switching between simple and advanced mode all settings are reset to factory defaults. Some of the features that are not supported in simple mode include: 1. Communication: Simple mode will not send data to the data server and the Ethernet module isn’t supported. -
Page 15: Simple Mode Main Menu
Simple Mode Main Menu ORP Setpoint: Select to change the ORP set point. The range is 600 to 900 mV. If the current ORP measurement is below the set point the relay will be in a feed cycle if there is flow and the feed limit hasn’t been reached. - Page 16 Options Menu: ORP and pH Spread: Time Proportional Control: Options With Time Proportional Control (TPC) the relay will cycle ON for part of the cycle ORP Spread: 0 time (either 30 or 60 seconds) depending on the deviation from the set point. Spread: 0.0 The smaller the deviation, the less time the relay will be on.
-
Page 17: Miniwarden Advanced Mode
MiniWarden Advanced Mode The Main Menu Simply press Back from the Default Readings Screen to gain access to the “Main Menu”. From the “Main Menu” simply use the Up & Down arrow keys to navigate to each sub menu item and press Enter to go to that sub menu. -
Page 18: Programming - Getting Started
PROGRAMMING - GETTING STARTED The menu tree below represents the “Getting Started” menus that are necessary to get MiniWarden setup. The remaining menus represent more advanced features that will be covered in later sections. Become very familiar with the 4 menus below surrounding the Main Menu as they will be utilized most of the time. Any menu utilizing the Back button for access can be password protected. - Page 19 Step 3 - Relay Control Type Menu The Relay Control Type Menu is the next step in programming MiniWarden and getting started. The Relay Control Type Menu sets each relay to the control type the relay will use. For Example: Will the ORP Relay use Liquid Chlorine, an Erosion Feeder or a Salt System? This is where the MiniWarden relays are set up to the appropriate way to control the installed equipment.
- Page 20 ORP Relay: In the Relay Setup Menu scroll down to the ORP relay and press enter. ORP Relay Selected The following reviews each command within an ORP Relay selection that is ManualTime 00:02:00 setup as Liquid Chlorine (the control type can be changed in the Relay Proportional 10% Control Types Menu) .
- Page 21 Off If RLY On -none: The default setting is none or disabled. This feature prevents 2 relays being on at the same time. It means this ORP Relay will be Off if the pH relay is On. This is useful in cases where the chemical injection points are very close together and prevents the ORP relay injecting at the same time the pH relay is injecting.
- Page 22 pH Relay In the Relay Setup Menu scroll down to pH and press Enter. The following pH Relay Selected reviews each command within a pH Relay selection that is set up as acid ManualTime 00:02:00 (change to base in the Relay control Types Menu). Proportional 10% Manual Time 00:02:00: Is the amount of time you can set a relay to turn On If pH >...
- Page 23 SetOvrfeed 00:00:00: This type of overfeed requires the measurement to approach the setpoint. If a feed tube is broken and the chemicals are going on the floor this type of overfeed protection will detect that and shut down the relay sooner than the daily overfeed. Calculate how much feed time is required for the setpoint to be reached when the pH is a full point off.
- Page 24 On If Temp < 0: The factory default setting is “0” zero or disabled. The alarm will turn on if this condition is satisfied. To change the condition simply press Enter to change the value and press Enter again to save, enter “0” zero to disable. On If Flow Off - none: The factory default setting is “none”...
- Page 25 Step 5 - Service Menu Service Menu The Service Menu includes all items that a service technician needs to service a pool and is a critical next step in setting up MiniWarden. From Relay Manual Mode the Default Readings Screen simply press the Back button to access the Calibration...
-
Page 26: Advanced Features
ADVANCED FEATURES The rest of this manual will be dedicated to all of the Advanced Menus & Features which make MiniWarden one of the most versatile chemical controllers in the world. Please review each section carefully to understand how each menu item may help your organization. Simply press the Back button from the Default Readings Screen to gain access to the “Main Menu”. -
Page 27: System Menu
❑ ↑+big: Pressing the Up Arrow will jump forward 30 rows of data. The up arrow also works in conjunction with the #*10Big Jump above. If any number between 1 through 9 is pressed followed by the up arrow then it will jump the data by a factor of 10 times that number. ❑... -
Page 28: Advanced Relay Types
TrueDPD: This menu item is not used unless the TrueDPD sensor is installed. TrueDPD is an optional external sensor to PoolWarden that measures free chlorine using the DPD colorimetric method. Please refer to the TrueDPD Operation Manual to use this System Menu item. TrueDPD Cycle: This menu item is not used unless TrueDPD is installed. -
Page 29: Maintenance
Maintenance MiniWarden Enclosure The enclosure can be cleaned with a soft cloth that is moist with water. Take extra care when cleaning the clear display window. To clean the display window make sure the cloth hasn’t been used to clean anything else or it may have grit which may scratch the clear screen. -
Page 30: Troubleshooting
ORP drops. Forgot Your Password If you enabled the security feature and forgot your password all is not lost. Contact SeaSide Automation with the serial number and proof of ownership and a password reset code will be provided... -
Page 31: Technical Support
Each MiniWarden has it’s own unique reset code and one that works on one MiniWarden will not work on another. Technical Support Please contact SeaSide Automation at 530-212-3497 for support and 530-212-3496 for sales. Send support emails to support@seasideautomation.com. MiniWarden Manual... -
Page 32: Limited Warranty
LIMITED WARRANTY Models: This warranty applies to MiniWarden referenced here as “Controller”. SeaSide Automation LLC Warrants the controller to to be free from defects in manufacturing and workmanship for a period of Five (5) Years from the date of manufacture for the electronic main circuit board. All sensors and flow cells have a One (1) Year warranty.
Need help?
Do you have a question about the MINI WARDEN and is the answer not in the manual?
Questions and answers