Advertisement
Quick Links
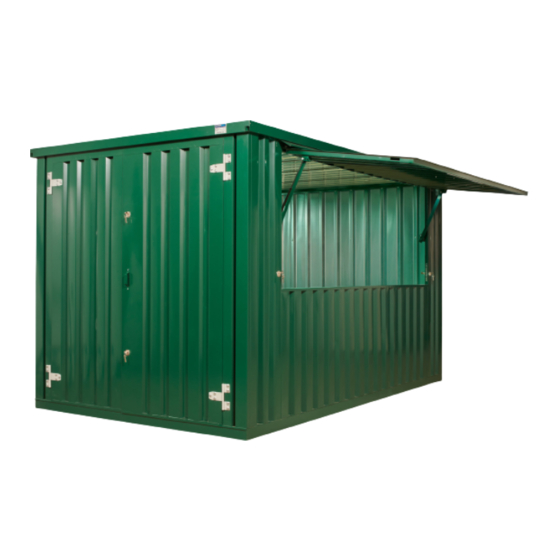
Flat Pack Kiosk
instructions and accessories
CONTENTS
1.
Flat Pack Kiosk – Assembly Instructions
2.
Linking Stores – Side by Side and End on End Linking Kits
3.
Locking Bar – Assembly Instructions
4.
Shelving – Assembly Instructions
For further information please contact Portable Space on
portablespace
cabin & container hire
01449 782123
(option 2) or email
|
sales
|
conversions
|
modular
12
14
sales@portablespace.co.uk
®
2
7
Advertisement

Related Manuals for portable space Flat Pack Kiosk

Summary of Contents for portable space Flat Pack Kiosk
- Page 1 Flat Pack Kiosk – Assembly Instructions Linking Stores – Side by Side and End on End Linking Kits Locking Bar – Assembly Instructions Shelving – Assembly Instructions For further information please contact Portable Space on 01449 782123 (option 2) or email sales@portablespace.co.uk...
- Page 2 FLAT PACK KIOSK ASSEMBLY INSTRUCTIONS Flat Pack Kiosk ASSEMBLY INSTRUCTIONS For assembling 3m Kiosk (XL) and 4m Kiosk (XL) Tools Hardware parts Tools and equipment you will need: A minimum of two people are needed to assemble the store. If parts need to be moved by hand, we recommend using four people to allow for one person at each corner.
-
Page 3: Maintenance
FLAT PACK KIOSK ASSEMBLY INSTRUCTIONS Assembly hints Maintenance Try to get the pack delivered as close as possible to Check foundations periodically to make sure that the erection area. If it arrives on one of our HIAB the unit remains level. Signs that the unit might have... - Page 4 FLAT PACK KIOSK ASSEMBLY INSTRUCTIONS Erection of the flat pack kiosk 1.16 Position the door panel on the chassis at the end required. 1.17 Using a 13mm socket now fit 4x M8 bolts and washers to secure the door panel to the chassis.
- Page 5 FLAT PACK KIOSK ASSEMBLY INSTRUCTIONS Drip 1.27 Now fit the drip above the hatch, with the hatch closed use the M12 nut and bolt with a washer each side. You will need someone to attach the nuts from the inside whilst the drip and each bolts are held in place on the outside 1.24...
- Page 6 FLAT PACK KIOSK OPERATING INSTRUCTIONS To open the side hatch 1.30 Before opening check that all bolts and components have been fitted correctly as per the assembly instructions. 1.31 Position the safety locks so that that at least one of them auto engages when you open the hatch panel.
- Page 7 Web Quick Find (QF Code): 4m XL GREEN (RAL6005) QF832 3m XL GREEN (RAL6005) QF830 3m XL GREY (RAL7015) QF831 4m XL GREY (RAL7015) QF833 For further information please contact Portable Space on 01449 782123 (option 2) or email sales@portablespace.co.uk...
- Page 8 FLAT PACK STORE OPTIONAL EXTRAS SIDE BY SIDE LINKING KIT ASSEMBLY INSTRUCTIONS Side by side linking kit assembly Plan where you intend to erect the two containers. You will need to support each container with at least six pads rather than the minimum pads when linking side by side (depending on location and planned use you may need more).
- Page 9 FLAT PACK STORE OPTIONAL EXTRAS SIDE BY SIDE LINKING KIT ASSEMBLY INSTRUCTIONS Now fit the galvanised internal roofing strip – from the 2.10 View of roof panels showing galvanised jointing inside push the galvanised roofing strip up into the strip in place. roof, then raise up the opposite end until the bolt holes match up.
- Page 10 FLAT PACK STORE OPTIONAL EXTRAS END ON END LINKING KIT ASSEMBLY INSTRUCTIONS End on end linking kit assembly Parts for end on end linking kit: 12 x M8 bolts 12 x M8 Nuts 24 x M8 washers Web Quick Find (QF Code): (Same on all stores) GREEN XL END LINK (RAL 6005) QF836 GREY XL END LINK (RAL 7015) QF837...
- Page 11 FLAT PACK STORE OPTIONAL EXTRAS END ON END LINKING KIT ASSEMBLY INSTRUCTIONS 2.21 Slide roof panels up from either end, the ID plates on 2.18 Fit Side joining strip from above. each roof should be facing outwards. 2.19 Secure side panels with M8 bolts. 2.22 Fit powder coated external roof strip between the roof panels.
-
Page 12: Locking Bar
3m Side hatch locking bar QF572 Safety glasses 4m Side hatch locking bar QF572 Pencil or marker pen Leather work gloves Eye protection For further information please contact Portable Space on 01449 782123 (option 2) or email sales@portablespace.co.uk... - Page 13 FLAT PACK STORE OPTIONAL EXTRAS LOCKING BAR ASSEMBLY INSTRUCTIONS For extra security its possible to fit more than one Mounting plate opposite padlock usually locking bar. (nearest the hinges). The recommended position when fitting a single locking bar fo the door is above the door handle. When fitting to the hatch we recommend the lower half of the hatch depending on your use.
- Page 14 For any 2m, 3m, 4m Flat Pack store Overview The Portable Space shelving system is extremely quick and easy to erect. It is made up of a minimum of two shelf uprights that slot quickly and easily into the wall of the flat pack container using no fixings.
- Page 15 FLAT PACK STORE OPTIONAL EXTRAS SHELVING SYSTEM ASSEMBLY INSTRUCTIONS Twist the shelf arm at around 45 degrees to enable it to slot into the shelf upright. Now twist the shelf arm, sometimes a small tap is required to locate the shelf arm into the final position.
- Page 16 FLAT PACK KIOSK OPTIONAL EXTRAS 3M XL FLAT PACK KIOSK UNITS WITH SHELVING 3m XL Flat Pack Kiosk Unit with 1 Tier Shelving 3m XL Flat-Pack Kiosk Unit with 1 Tier Shelving (One Side & Rear End) Quickfind Code: 1320...
- Page 17 FLAT PACK KIOSK OPTIONAL EXTRAS 3M XL FLAT PACK KIOSK UNITS WITH SHELVING 3m XL Flat-Pack Kiosk Unit with 2 Tier Shelving 3m XL Flat-Pack Kiosk Unit with 2 Tier Shelving (One Side & Rear End) Quickfind Code: 1324 (One Side Full Length) Quickfind Code: 1325...
- Page 18 FLAT PACK KIOSK OPTIONAL EXTRAS 4M XL FLAT PACK KIOSK UNITS WITH SHELVING 4m XL Flat-Pack Kiosk Unit with 1 Tier Shelving 4m XL Flat-Pack Kiosk Unit with 1 Tier Shelving (One Side & Rear End) Quickfind Code: 1330 (One Side Full Length) Quickfind Code: 1331...
- Page 19 FLAT PACK KIOSK OPTIONAL EXTRAS 4M XL FLAT PACK KIOSK UNITS WITH SHELVING 4m XL Flat-Pack Kiosk Unit with 2 Tier Shelving 4m XL Flat-Pack Kiosk Unit with 2 Tier Shelving (One Side & Rear End) Quickfind Code: 1334 (One Side Full Length) Quickfind Code: 1335...
Need help?
Do you have a question about the Flat Pack Kiosk and is the answer not in the manual?
Questions and answers