Table of Contents
Advertisement
Quick Links
Advertisement
Table of Contents

Subscribe to Our Youtube Channel
Related Manuals for Lite-Puter EDX-1210


Summary of Contents for Lite-Puter EDX-1210
- Page 1 User Manual EDX-1210/EDX-620 12/6 Channel Dimmer Pack EDX-1210/EDX-620 [EUM-D]...
-
Page 2: Table Of Contents
1-2 S ........................... 4 PECIFICATIONS 1-3 DP-E01 I ........................5 NTRODUCTIONS 1-4 D ....................... 6 IMMING ODULE NTRODUCTIONS 1-5 O (EDX-1210)/(EDX-620) ..................7 UTPUT ERMINALS 1-6 A (0-10V DC) O (EDX-1210)/(EDX-620) ............9 NALOG UTPUT ERMINALS 1-7 D ............................11 IMENSION 2 OPERATIONS .......................... -
Page 3: Caution
0-2 Instruction of Load Power In order to maintain the operation of EDX-1210 / EDX -620, please follow the instructions as below: EDX -1210 / EDX -620 must keep decent ventilation. Overheating will lead to EDX -1210 / EDX -620 to stop output to protect itself. -
Page 4: Introduction
1 Introduction 1-1 Features EDX-1210: 12 channels. Maximum output of each channel is 10A EDX-620: 6 channels. Maximum output of each channel is 20A EDX, DMX-512 compatible Square-law dimming curve (C2.0 dimming curve) Adjustable fade in/out time Build-in timer Each channel can be set as dimming /non-dimming/fluorescent mode. -
Page 5: Dp-E01 Introductions
1-3 DP-E01 Introductions 【0】-【9】 【】,【】 ,【】 ,【】 【DMX】,【ZONE】 ,【VR】 ,【FNC】 ,【ENTER】 DMX-512 Input/ RS-485 EDX-1210/EDX-620 [EUM-D]... -
Page 6: Dimming Module Introductions
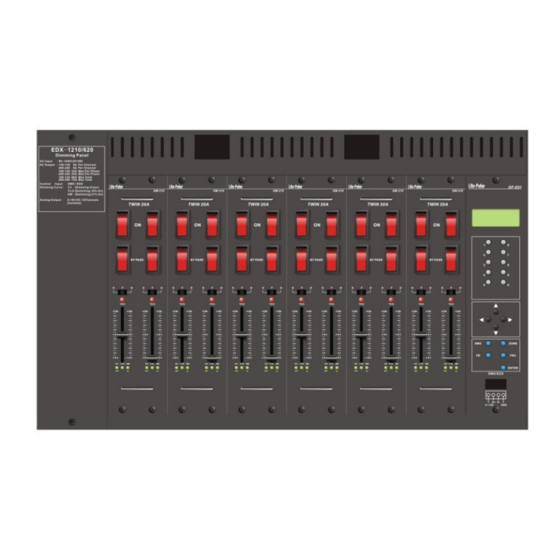
1-4 Dimming Module Introductions ON/OFF Output Bypass Dimming Mode Selection D: Leading-edge dimming S: Switch (On/Off) F: Fluorescent ( 0-10V DC) Dimming Sliders EDX-1210/EDX-620 [EUM-D]... -
Page 7: Output Terminals (Edx-1210)/(Edx-620)
1-5 Output Terminals (EDX-1210)/(EDX-620) EDX-1210 EDX-1210/EDX-620 [EUM-D]... - Page 8 EDX-620 EDX-1210/EDX-620 [EUM-D]...
-
Page 9: Analog (0-10V Dc) Output Terminals (Edx-1210)/(Edx-620)
1-6 Analog (0-10V DC) Output Terminals (EDX-1210)/(EDX-620) EDX-1210 EDX-1210/EDX-620 [EUM-D]... - Page 10 EDX-620 EDX-1210/EDX-620 [EUM-D]...
-
Page 11: Dimension
1-7 Dimension EDX-1210/EDX-620 [EUM-D]... -
Page 12: Operations
2 Operations 2-1 Function List After turning on the power, press 【FNC】 to enter main menu and press 【】or【】to select function, EDX-1210/EDX-620 [EUM-D]... -
Page 13: Initialization
Set minimum level of each output channel Data backup Data restore Initialization 2-2 Initialization STEP-1: Press 【FNC】to enter the menu. Select "F21: INITIAL", and LCD shows: STEP-2: Press【】 ,【】to select Yes or No. STEP-3: Press 【ENTER】to do initialization. EDX-1210/EDX-620 [EUM-D]... -
Page 14: Dmx-512 Start Address Setting
2-3 DMX-512 Start Address Setting Although we would recommend applying RS- 485 rather than DMX-512 on EDX systems, EDX-1210 is still compatible with DMX-512. Note that DMX-512 controllers have higher priority than other EDX controllers. STEP-1: Press 【FNC】to enter the menu. Select "F1: DMX_ADR", and LCD shows: STEP-2: Press【】or【】to set DMX-512 starting address. -
Page 15: Zone Setting
Definition of zone: In EDX system, the device must set the zone number before using, which consists of two parts, one is the zone number and another is the start channel. For example: There are 4 EDX-1210 (48 channels in total) in zone 1, the zone number of each device should be 01-01,01-13,01-25,01-37 respectively. -
Page 16: Recall Scenes
】 2-8 Clock Setting STEP-1: Press 【FNC】to enter the menu. Select "F4: CLOCK ", and LCD shows the system clock: STEP-2: Press【】or【】 to select year/month/day/weekday/hour/minute/second. Press【】or【】to set the number. STEP-3: Press 【ENTER】to save the setting or press【FNC】to exit. EDX-1210/EDX-620 [EUM-D]... -
Page 17: Timer Setting
STEP-5: Press 【】 or 【】 to select a weekday, press 【】 or 【 】 to enable or disable the timer on the selected weekday. In this example, we make the timer enabled every day: STEP-6: Press 【ENTER】to save the setting or press【FNC】to exit. EDX-1210/EDX-620 [EUM-D]... -
Page 18: Timer On/Off Setting
STEP-3: Press 【ENTER】to save the setting or press【FNC】to exit. 2-12 Set the Dimming Mode To set the dimming mode, please use the slide switch on the panel of the dimming module. D: Leading edge dimming S: Switch mode (on/off) F: Fluorescent mode (0-10V DC) EDX-1210/EDX-620 [EUM-D]... -
Page 19: Check The Dimming Modes
2-13 Check the Dimming Modes (EDX-1210) STEP-1: Press 【FNC】to enter the menu. Select "F8: DIM/SW ", and LCD shows: The LCD shows that channel 1 - 4 are in leading-edge dimming mode, "D"; channel 5 - 8 are in switch mode;... -
Page 20: Partition Setting
1); channel 3 to 4 are in partition 2 (zone 2). Install two controllers in each room, one is set to zone 1; the other is set to zone 2, and then you can control channel 1 and 2 by controller 1 and control channel 3 and 4 by controller 2. EDX-1210/EDX-620 [EUM-D]... -
Page 21: Partition On/Off Setting
STEP-8: Press【ENTER】to save the setting or press【FNC】to exit. 2-15 Partition On/Off Setting STEP-1: Press 【FNC】to enter the menu. Select "F10: PRTN ON/OFF ", and LCD shows: STEP-2: Press【】or【】 to select between partition on or partition off. STEP-3: Press【ENTER】to save the setting or press【FNC】to exit. EDX-1210/EDX-620 [EUM-D]... -
Page 22: Bypass Setting
STEP-3: Press 【ENTER】to save the setting or press【FNC】to exit. 2-18 Temperature STEP-1: Press 【FNC】to enter the menu. Select "F13: Temp. ", and LCD shows: It means that the temperature of module1 is 30℃. STEP-2: Press【】or【】 to view the temperature of other channels. EDX-1210/EDX-620 [EUM-D]... -
Page 23: Lcd Off Time Setting
STEP-1: Press 【FNC】to enter the menu. Select "F16:M-PASS ", and LCD shows: STEP-2:Press【】or【】to select open or close function. It means that the module 1-3 when Interface cpu damage will Full voltage output ,module 4-6 will current status remains. EDX-1210/EDX-620 [EUM-D]... -
Page 24: Module Check
STEP-1: Press 【FNC】to enter the menu. Select "F19: BACKUP", and LCD shows: STEP-2: Press【】or【】to select Yes or No and then press【ENTER】. 2-24 Restore Data STEP-1: Press 【FNC】to enter the menu. Select "F20: RESTORE", and LCD shows: STEP-2: Press【】or【】to select Yes or No and then press【ENTER】. EDX-1210/EDX-620 [EUM-D]... -
Page 25: Limited Warranty
Other Lite-Puter or non-Lite-Puter products or devices offered, packaged, or sold with the product. 5. Lite-Puter does not warrant that the product will operate without interruption or free of error. World Headquarters:...
Need help?
Do you have a question about the EDX-1210 and is the answer not in the manual?
Questions and answers