Table of Contents
Advertisement
Advertisement
Table of Contents

Related Manuals for Honeywell CHRONOTHERM IV T8665A


Summary of Contents for Honeywell CHRONOTHERM IV T8665A
- Page 1 ® T8665A Chronotherm Wireless Thermostat USER’S GUIDE 69-1536-3 69-1536–3...
- Page 2 69-1536–3...
-
Page 3: Table Of Contents
Keyboard ... Display ... ADAPTIVE INTELLIGENT RECOVERY Optimum Comfort and Energy Savings ... 11 OPERATING YOUR THERMOSTAT ... 13 Setting System and Fan Keys ... 13 Setting the System Key ... 14 Setting the Fan Key ... 14 Setting Temporary Temperatures ... 15 Changing Temperature to Temporary Setting Until Next Schedule Period ... - Page 4 SETTING THE CLOCK ... 25 Set Current Day and Time ... 25 Daylight Saving Time ... 27 PROGRAMMING YOUR THERMOSTAT ... 28 7-Day Program and Operation ... 28 7-Day Preprogrammed Schedule ... 29 Customizing Your Own 7-Day Schedule ... 30 Programming the First Day ...
-
Page 5: Using This Guide
USING THIS GUIDE The T8665A is a multi-functional thermostat. This means it can be used in single or multi-zone applications. The following symbols will help you identify the features that apply to your system: – Triple layer of thermostats with the word, zoning, below. These features are available when more... -
Page 6: Features
• Backlit display for improved readability – backlight- ing on demand (press any key to activate). • Programmable Fan – your thermostat can activate the fan in any programming period for improved air circulation and air cleaning when a Honeywell wholehouse air cleaner is installed. 69-1536–3... -
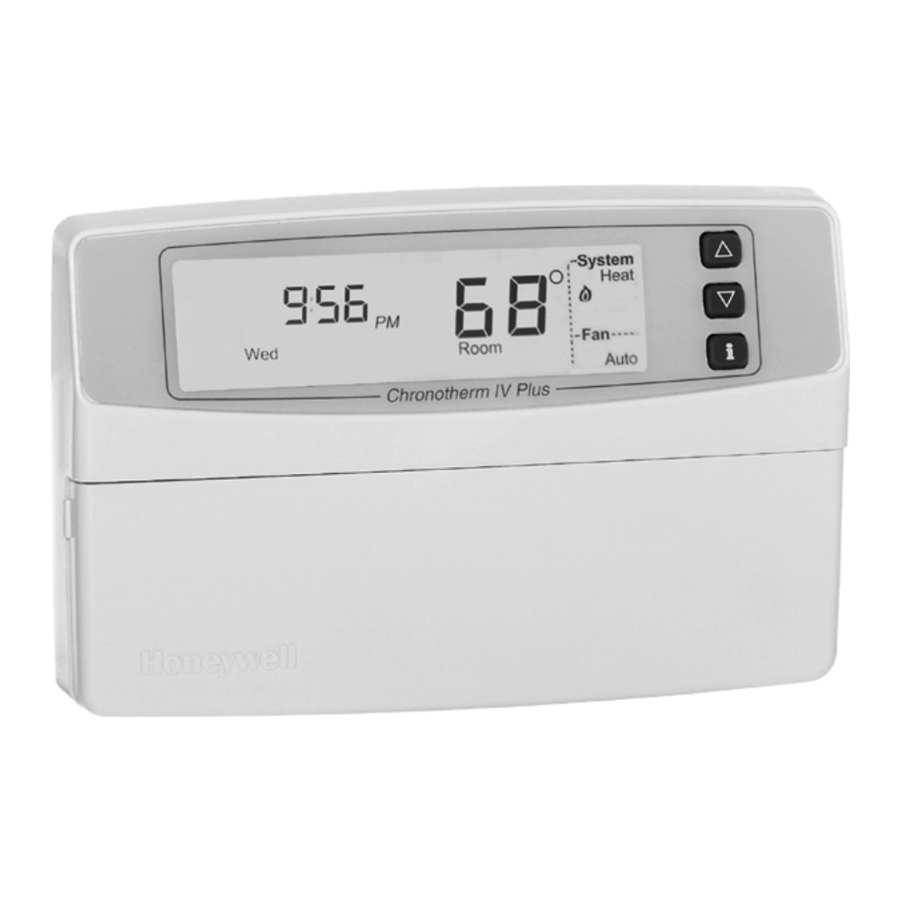
Page 7: Keyboard And Display Description
The keyboard is located behind the thermostat cover. Three frequently used keys, increase or decrease , are located next to the display. See Fig. 1. Display The thermostat displays important information such as day, time, schedule period, temperature, system and fan operation. See Fig. 2. 69-1536–3... - Page 8 Leave Day/Time Heat/Cool Settings Daylight Copy Time HEAT/COOL SETTINGS SWITCHES BETWEEN HEAT SETPOINTS AND COOL SETPOINTS WHILE PROGRAMMING Fig. 1. Thermostat keyboard description. DIGITAL INCREASE RAISES TEMPERATURE SETTING DISPLAY DECREASE LOWERS TEMPERATURE SETTING INFORMATION DISPLAYS CURRENT HEAT/COOL TEMPERATURE SETTING RETURN...
- Page 9 AND CONVENTIONAL SHOWS RECOVERY IS ON TEMPERATURE DISPLAYED IS THE CURRENT ROOM DISPLAYS EITHER ROOM TEMPERATURE OR SET TEMPERATURE Fig. 2. Example of thermostat display. SHOWS SHOWS TEMPERATURE TEMPERATURE DISPLAYED IS THE CURRENT SETTING CHANGED SET TEMPERATURE FOR THIS PROGRAM...
-
Page 10: Adaptive Intelligent Recovery
ADAPTIVE INTELLIGENT RECOVERY CONTROL Your new thermostat is so smart, it’s almost human. You perceive temperature from a variety of sources, not only from the air in the room, but also from your surrounding walls, windows and furnishings. Humans feel differences in temperature as slight as two degrees Fahrenheit. -
Page 11: Optimum Comfort And Energy Savings
(for example, 70° at 6:00 AM) and adjusts the next day’s recovery start time accordingly. After four to eight days, the thermostat has adjusted to local weather, your lifestyle, the construction of your home, and your heating and cooling system. - Page 12 Auto ENERGY SAVINGS PERIOD THE THERMOSTAT USES THE SAME SCHEME TO RETURN GRADUALLY TO LOWER COMFORT TEMPERATURE DURING THE COOLING SEASON. IF Recovery IS DISPLAYED, PRESS Fig. 4. Explanation of Adaptive Intelligent Recovery At 7:00 AM System Operating in Comfort Mode...
-
Page 13: Operating Your Thermostat
You can even program the thermostat to return to your regular programming schedule on your last day of vacation so you are comfortable when you return and yet save energy while you are away. -
Page 14: Setting The System Key
Setting the System Key Press the System key until the desired system (Heat, Off, Cool, or Auto) displays. Heat: The thermostat controls the heating. Off: Both the heating and cooling are off. Cool: The thermostat controls the cooling. Auto: The thermostat automatically changes between heating and cooling operation, depending on the indoor temperature. -
Page 15: Setting Temporary Temperatures
Setting Temporary Temperatures You can override the current schedule period to temporarily change the temperature setting until the next schedule period, or you can change and hold the temperature setting indefinitely. You can also change the temperature setting until a designated day and period (for example, while you are on vacation). Changing Temperature to Temporary Setting Until Next Schedule Period Press increase or decrease... - Page 16 Press the Run Program key to cancel the temporary temperature setting before the designated time. appears under the temperature display, it means that both the heating and cooling setpoints are being adjusted. Tapping the increase and cool setpoints by one degree. Press the setpoints.
-
Page 17: Changing And Holding Temperature Setting Indefinitely
Press Run Program key to cancel hold. Hold Temp to change the tempera- mode. Example display shows temporary heat setting of 60°. Program Heat Press Hold Temp key once to display the thermostat in Hold Setting System Heat Auto M14565... -
Page 18: Changing Temperature Setting Until A Designated Day And Period (Vacation Hold)
(1 to 255 days) displays. Hold for Hold Temp Wake Press Hold Temp key twice to display the thermostat in Vacation mode. Example display shows temporary heat setting of 60°. until the desired Hold for TIME Wake Press the Time days. - Page 19 NOTE: Only the heating temperature is used when the System is set to Heat. Similarly, only the cooling temperature is used when the System is set to Cool. The thermostat uses both the heating and cooling temperatures when the System is set to Auto.
- Page 20 84°, cooling equipment operates when the room temperature is above 84°F). To cancel the Vacation Hold before the designated time, press Run Program key at each thermostat. ZONING to adjust the temperature setting, if desired (for example, if cool is set at...
-
Page 21: Replacing The Batteries
Replacing the Batteries This thermostat uses three AA alkaline batteries. Batteries must be installed for programming and operation of the thermostat and heating (cooling system). The batteries are located in the wallplate. See illustration. IMPORTANT Although the thermostat has a low battery... - Page 22 Refer to Setting the Clock section for instructions. Nonalkaline batteries do not last as long; they also can leak, causing damage to the thermostat and the wall surface. Honeywell recommends Energizer® batteries. M16424 As a precaution when leaving home for...
-
Page 23: Using The (Information) Key
Using the (Information) Key (information) key provides information at your fingertips. The sequence of key presses is: • Current setpoint of mode in use (Heat or Cool). • Setpoint of mode not currently in use. Displaying Current Settings Press key once to check the current temperature setpoint. Press setpoint of the mode not currently in use. -
Page 24: Display Or Reset Filter Timer Settings
If more than one timer is active, all active timers show sequentially when pressing the i key several times. If you want to use this feature and it is not currently activated, check the Installation Instructions at M20243 www.honeywell.com/yourhome or call 1-800-468- 1502. M20244 69-1536–3... -
Page 25: Setting The Clock
SETTING THE CLOCK Setting Current Day and Time On initial power up or after an extended power loss, “1:00 PM” flashes on the display until a key is pressed. 1. Press Set Current Day/Time key. IMPORTANT Always press the keys with your fingertip or similar blunt tool. Sharp instruments like pens and pencil points can damage the keyboard. - Page 26 2. Press Day key until the current day displays. Mon = Monday, Tue = Tuesday, Wed = Wednesday, Thu = Thursday, Fri = Friday, Sat = Saturday, Sun = Sunday. 3. Press Time or Time TIME Tap the Set Current Day/Time key to advance the time in one-hour increments.
-
Page 27: Daylight Saving Time
Daylight Saving Time NOTE: If the current time is Daylight Saving Time, press Daylight Time key to display “DST.” Pressing Daylight Time key more than once within a five minute period scrolls you through various time options (example: one hour earlier or later with or without DST). -
Page 28: Programming Your Thermostat
7-Day Program and Operation Your thermostat is 7-day programmable. 7-day programming means you can set your thermostat for four periods (Wake, Leave, Return and Sleep) and up to eight temperatures (four Heat and four Cool) for each day of the week. -
Page 29: 7-Day Preprogrammed Schedule
7-Day Preprogrammed Schedule Your thermostat is preprogrammed with the schedule shown in Table 1 (same schedule for all days of the week). You may keep this schedule or develop your own. Before starting the programming procedure, use Table 2 to plan your schedule. -
Page 30: Customizing Your Own 7-Day Schedule
Customizing Your Own 7-Day Schedule WAKE TIME SUNDAY AUTO TIME MONDAY AUTO TIME TUESDAY AUTO TIME WEDNESDAY AUTO TIME THURSDAY AUTO TIME FRIDAY AUTO TIME SATURDAY AUTO Table 2. Your 7-Day Schedule. L E A V E TIME TIME AUTO TIME TIME AUTO... -
Page 31: Programming The First Day
About Power Outages… Don’t worry! Your thermostat retains the schedule (preprogrammed or your own) for the life of the product. The time and day information is retained for a minimum of twenty minutes during a power outage. After a longer power outage, you may need to set the current time and day (“1:00 PM”... - Page 32 1. Press the Wake key. Wake 2. Press Day key until the desired day displays. Set Program Wake Press the Wake key to enter the program mode. Example display shows 6:00 AM on Tuesday with Heat set to 70°F. Set Program Wake Press Day key to select the day to program.
- Page 33 3. Press Time or Time time displays. TIME The program times are in fifteen-minute intervals; for example, 8:00, 8:15, 8:30. 4. Press increase or decrease Wake temperature displays. The setpoint temperature range is 40 to 90°F (4 to 32°C) for heating and 55 to 99°F (13 to 37°C) for cooling.
- Page 34 5. Press Fan key to modify fan operation. Selecting Auto means the fan runs only when the heating or cooling equipment is operating. Selecting On means the fan runs continuously for the entire schedule period. 6. Press Heat/Cool Settings key to make selections for the opposite system setting (either Heat or Cool).
- Page 35 7. Press increase or decrease temperature setpoint displays. 8. Press Leave, Return or Sleep and repeat steps 3 through 6 to program the entire day. The day (first day of a 7-day schedule) is now programmed. IMPORTANT Repeat steps 1 through 7 for each day of the week that has a different schedule from the first day. Or refer to Copying a Day section to copy any programmed day to another day.
-
Page 36: Copying A Day
Copying a Day The thermostat must be in the program mode to use the copy feature. Go to step 2 if the thermostat is already in the program mode (set program displays in the upper left corner). 1. Press Wake, Leave, Return or Sleep key to enter program mode. - Page 37 3. Press Copy key. Copy M14594 Press Copy key to copy a day schedule into memory. Example display shows Monday schedule was copied into memory. 4. Press Day key until the day to be copied to is displayed. M14595 Press Day key again to select the day to copy to. Example display shows Monday and Wednesday.
- Page 38 5. Press Copy key. Copy NOTE: “donE” displays for two seconds before the normal display returns. M14596 Press the Copy key again to complete the copy command. Example display shows “donE”. Monday schedule was successfully copied to Wednesday (Monday and Wednesday now have the same schedule).
-
Page 39: Clearing A Program Period
Clearing a Program Period The thermostat must be in the program mode to use the clear feature. Go to step 2 if the thermo- stat is already in the program mode (Set Program displays in upper left corner). 1. Press Leave, Return or Sleep key to enter program mode. - Page 40 You do not have to program a replacement time for the remaining periods; for example, Wake and Sleep. If you clear only the Leave and Return periods for Saturday (or any day), the thermostat remains in the Wake period for all of Saturday until the Sleep period.
-
Page 41: Troubleshooting
Possible Cause • Check if the batteries are correctly installed. • Check if the thermostat is mounted and latched on the wallplate—mount and latch the thermostat on the wallplate. Check that the temperature setpoints are: Heating: 40 to 90°F (4 to 32°C) Cooling: 55 to 99°F (13 to 37°C). - Page 42 Check if the System switch at the equipment is in the Off position—set to the On position. Wait five minutes for the system to respond (thermostat displays “ Wait”). Set System selection to Cool. Wait a minute after seeing the check the registers.
-
Page 43: Warranty
Golden Valley, MN 55422 This warranty does not cover removal or reinstallation costs. This warranty shall not apply if it is shown by Honeywell that the defect or malfunction was caused by damage which occurred while the product was in the possession of a consumer. - Page 44 This warranty gives you specific legal rights, and you may have other rights which vary from state to state. If you have any questions concerning this warranty, please write our Honeywell Customer Relations, 1985 Douglas Drive North, Golden Valley, MN 55422 or call 1-800-468-1502, Monday-Friday, 7:00 a.m.
-
Page 45: Customer Assistance
CUSTOMER ASSISTANCE After reading this guide, if you have any questions about the operation of your thermostat, please contact the Honeywell Customer Relations at www.honeywell.com/yourhome or 1-800-468-1502. For service, contact your local heating and cooling contractor. 69-1536–3... - Page 46 FCCID: CFS8DL5800STAT CANADA: 1748A 12111 This device complies with Part 15 of the FCC Rules. Operation is subject to the following two conditions: (1) This device may not cause harmful interference, and (2) This device must accept any interference received, including interference that may cause undesired operation. FEDERAL COMMUNICATIONS COMMISSION (FCC) STATEMENT This equipment has been tested to FCC requirements and has been found acceptable for use.
- Page 48 Automation and Control Solutions Honeywell Honeywell Limited-Honeywell Limitée 1985 Douglas Drive North 35 Dynamic Drive Golden Valley, MN 55422 Scarborough, Ontario M1V 4Z9 69-1536–3 G.H. Rev. 11-02 Printed in U.S.A. www.honeywell.com/yourhome...
Need help?
Do you have a question about the CHRONOTHERM IV T8665A and is the answer not in the manual?
Questions and answers
how do I turn off the fan ? It comes on randomly once a week at night
To turn off the fan on the Honeywell CHRONOTHERM IV T8665A, set the fan operation to "Auto." This setting ensures the fan only runs when heating or cooling is active.
This answer is automatically generated
We have aChronotherm IV plus. our thermostat turned off and we can’t turn it back on .How do you turn it on? The battery is fine and power to the thermostat is on