Table of Contents
Advertisement
Advertisement
Table of Contents

Related Manuals for edding in-line 12

Summary of Contents for edding in-line 12
- Page 1 User manual edding in-line www.edding.tech...
-
Page 2: Table Of Contents
Table of contents Technical data ......................3 Description ........................3 Assembly notes ......................4 Introduction ......................6 Device overview ......................6 External keyboard ......................8 Start-Wizard ........................9 Main screen ........................10 Key combinations & Hotkeys ..................14 Selection and creation of texts ................15 Overview of all saved texts ................... -
Page 3: Technical Data
Now you own a powerful device allowing you to increase your production efficiency, eliminate coding errors and ultimately enter the industry 4.0 era. And even better: With an edding-printer, you are eligible for firmware upgrades that will improve your system every single day. -
Page 4: Assembly Notes
Dimensions (L/W/H) 123.5 x 77.2 x 83.0 m Weight 0.6 kg – without ink cartridge and mount Operating environment 5–40 °C (41–104 °F) at 10–90 % humidity (non-condensing) Quality Made in Germany Following ISO 9001, CIG 023, IEC 62368 (US) Assembly notes To assemble the system, please read the “step-by-step section”... - Page 5 Step-by-Step introduction: 1. Screw attachment piece to printer using two of the supplied screws 2. Mark base piece at the mounting position using the supplied drill hole marker 3. Attach base piece using the supplied screws and nuts, and screw first mounting rod to the base 4.
-
Page 6: Introduction
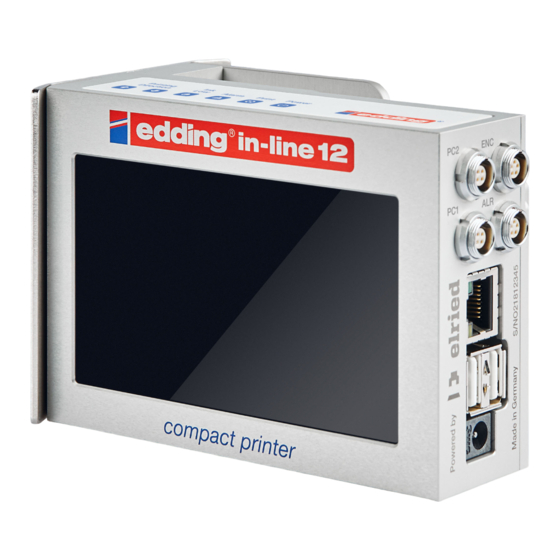
Introduction This chapter describes the printer, the input and the menu structure. Device overview Accessory ports Status LEDs Ethernet Touchscreen Internal photocell Power supply Connection for grounding cable Status LEDs Power: Printer is supplied with voltage and powered-up Print: Printer is in print mode; printing is performed when triggered Ink low: Remaining cartridge volume is <10%;... - Page 7 Ethernet Gigabit Ethernet port for integrating the printer into an existing network. As a default, the printer will have the IP address 192.168.0.200. 2x high-speed USB ports for external accessories such as keyboards or USB data carriers. Power supply Connection socket for the external mains adapter (C14 DC connector, Ø 5.5 / 2.1 mm). Only use original mains adapter with 24 V and 2.5 A.
-
Page 8: External Keyboard
External keyboard A wireless keyboard is part of the printer's scope of delivery and is required above all for entering new texts. It communicates wirelessly with the printer by plugging the small USB receiver (2.4 GHz Wireless Technology) into the left USB port on the back of the printer. Requires 2x AAA batteries (included). -
Page 9: Start-Wizard
Start-Wizard When the printer is first powered-up, use the “Basic Settings” assistant (under “Preferences”) for setting up the printer: Selection of the language for operating the printer. Selection is made using the red left or right arrows. Confirm with “Next”. Selection of the current date and time. -
Page 10: Main Screen
Main screen Printer and Cartridge status Print preview Control area Central control panel for all important print functions: General print status: green when the printer is ready to print and red when there is an error and printing is suspended. Clicking on this button will show further details on the ink and the device. - Page 11 Switch to print mode. The image currently in the preview is sent to the print processor and printing starts. Press again to pause the print mode. The name of the current message. The print delay of the current message in mm. Page...
- Page 12 By touching the print status in the control panel, the printer status display opens: Products: Number of products recognized by the photocell. Cartridge type: Type of ink cartridge (e.g. NP black, SP blue, etc.) Cartridge capacity: Max. filling level of the inserted cartridge in milliliter (ml) Ink remaining: Current fill level of the inserted cartridge Total prints per cartridge:...
- Page 13 The following only affects the in-line 25: The in-line system detects and selects the cartridge by itself. Therefore, the following section is not relevant for the in-line 12. Only on 25 mm printer models, you select the right cartridge type manually by the below menu:...
-
Page 14: Key Combinations & Hotkeys
Key combinations & Hotkeys Key combinations in text/message creation and display: Key combination Description Shift + Mousewheel Scroll the displayed message in the text field (see chapter 2.5 and 3.2). Only possible in the browser! Shift + Arrow keys Change the position of the message field when creating the text by 10 (see chapter 3.2) Hotkeys Name... -
Page 15: Selection And Creation Of Texts
Selection and creation of texts Overview of all saved texts Create new print text Search field for searching a print text/message by name incl. start search. Also partial matches will be displayed. Preview screen of a created print text Select text as new text to be printed Edit text Delete print text Set print delay for the current text in mm... - Page 16 Page display/selection for the messages. There are always 30 messages displayed per page. They are sorted by the message name (alphanumeric). Page...
-
Page 17: Creating A New Print Message
Creating a new print message Select one of the field types above: Text: Static text field comprising characters and letters Time/Date: Dynamic text field to print the current date, time or “Best Before” date Barcode: Prints any type of barcode 2D Code: Datamatrix Code or QR Code generated from static text Counter:... - Page 18 After the field type is selected the field content is prompted and diverse parameters such as font and size are displayed depending on field type. An external keyboard or the printer's on-screen keyboard can be used for input. After input is complete, confirm with ENTER. Then each field can be freely positioned within the message (the element to be positioned is pulsing/blinking gray-black).
-
Page 19: Settings
Settings Assistants & Setup Instructions Installation assistants configure the most important settings using simple questions: Setup instructions: Shows how to setup the printer (image slide show). Basic settings: Prompts the most important basic printer settings, which suffice for the majority of applications. -
Page 20: General
External Parameters: The system is delivered with 5 placeholders for variable data: Param_01, Param_02,… until Param_05, which can be processed in print messages using the following 2 field types: "Dyn. 2D" and "Param". General General system settings, as well as network configuration. Language: Selection of display language Onscreen Keyboard: Selection whether the virtual onscreen keyboard is displayed and used or not... - Page 21 User Management: Additional settings with three different user roles: - Admin (has access to all printer functionality - Editor (has access to messages and print functionality) - Operator (has access to print functionality) User management is switched off by default. To switch user management on, the admin password is required.
- Page 22 4.2.1 Configuration menu for the network (network/wifi) Ethernet settings DHCP: Automatic assignment of a network address via DHCP Static IP: Enter a fixed IP address Subnet: Enter the subnet mask for a fixed IP address DNS: Enter the DNS server for name resolution Gateway: Enter a gateway for network configuration if necessary Validate:...
- Page 23 Wifi settings WiFi SSID: Enter the name of the WiFi network WiFi Password: Enter the password for the WiFi network DHCP: Automatic assignment of a network address via DHCP Static IP: Enter a fixed IP address Subnet: Enter the subnet mask for a fixed IP address DNS: Enter the DNS server for name resolution Gateway:...
-
Page 24: Print
Print Configuration of all print-relevant parameters. Print: Configuration of the vertical resolution in the levels 75, 100, 150, 300dpi and 600dpi vertical resolution. Vertical resolution is mainly relevant to the intensity of the print image. 600 dpi provides considerably higher contrast but can also cause ink to bleed on non-absorbent materials. - Page 25 Printer mode: • normal: The message is printed once. • endless: The same message is printed endlessly. The delay defines the interval between the prints. • endless-trigger: Endless print, but only while photocell is triggered. • single-shot: The message is printed with the first value of the parameter queue(s). After each print the printed parameter values are removed from the queue.
-
Page 26: External Equipment
External equipment Settings for using external equipment such as the edding rotary encoder or the edding photocell. Photocell: Selection of whether the internal or external photocell should be used for printing. If an external photocell is connected, “PC 1” or “PC 2” must be selected here. These refer to the respective inputs of the printer PC 1 and PC 2. -
Page 27: Speed Charts
Speed charts Print speed and settings The following table shows which settings and which encoder are required to reach the desired print speed for a clean print image: Number of encoder Max. horizontal Max. vertical Print speed in m/min pulses in ppr (with resolution in dpi resolution in dpi 63.7mm diameter) -
Page 28: Message Frequency
Message frequency The following table shows the possible number of prints per second for different field types (static or dynamic): Field type Static field Static field Dynamic field dyn. 2D-Code 10mm with 4 variable Content Letter "M" Date parameter (14 digits) Font Roboto Roboto... -
Page 29: External Communication
External communication Access from PC or smartphone/tablet The in-line can be found, operated and controlled from any device on the same network as the printer. A few provisions must first be made: If there is only one slot for an Ethernet/LAN connection on your PC, please connect the PC to the Internet via Wi-Fi and make the Ethernet/LAN slot free for the printer. - Page 30 The following steps on the next page show how to set up the network to use the printer with the Press the key combination [Windows - R] to display the "Run" window. Then type the command ncpa.cpl and press Enter to open the network connections. Click on the displayed connection (unidentified network), press the right mouse button and open in the Properties menu.
- Page 31 Finally, set the settings described in the image in the printer à à under General Network/Wifi Ethernet settings and save them. Now open any browser on the computer, such as Chrome, and enter the static IP address previously specified in the printer (in this case 192.168.0.200). The same menu opens as on the printer itself.
-
Page 32: External +24V-Signals
External +24V-signals The in-line uses 4 external ports to receive external machine signals. These are also being used to connect your genuine edding accessories photocell, encoder and alarm light. The ports are assigned as followed: PC 1 / PC 2:... - Page 33 The maximum power drain of all external connectors shall not exceed 1.5 A. The signal outputs are NPN switched. If you are using the original edding alarm connection cable, the matching wire colours are on the open end: Pin 1...
-
Page 34: Uv-Lamp
UV-Lamp With the in-line it is possible to use special UV ink cartridges by using additional hardware: a UV lamp, a control unit, and associated cables. The diagram shows how the individual elements are connected and how the UV system works with the printer: 1. - Page 35 IMPORTANT! For a perfect result, the UV lamp must be placed close to the product (3-6 mm distance to the product) and the photocell for the UV lamp must be positioned at the height of the lamp! Safety Notes • Do not look directly to the working UV lamp;...
-
Page 36: Http-Requests
http-Requests Numerous printer functionalities can be accessed via http as well as via a TCP connection. More details can be found in the following guide: User Guide on connectivity (data bases - ERP - PLC systems) Page... -
Page 37: Dynamic Fields Via Tcp/Ip Port
Printing filling information on the product to improve traceability. etc. In order to do so, edding compact printers offer 5 fields for variable data: Param_01, Param_02, …until Param_05. These can be selected when creating a message. To then change the content of these data fields, you do not have to follow any complex commands. -
Page 38: Troubleshooting
Troubleshooting Error: The printer display is white and flickers every few seconds? Help: Update process has failed. Load USB stick with the firmware/update files to a FAT32 formatted stick, plug it into the right USB port of the printer and restart the device. Afterwards wait about 30min. Error: After starting/restarting the printer the message "This page isn't working"... -
Page 39: Printer Control Center
Printer Control Center The Printer Control Center is a web-based software for easy management and operation of several printers that are connected to the same network. The Printer Control Center is available for an additional fee. Any number of printers can be added by entering the printer’s IP-address. They can then be operated independently of one another.
Need help?
Do you have a question about the in-line 12 and is the answer not in the manual?
Questions and answers