Advertisement
Available languages
Available languages
Quick Links
Advertisement

Summary of Contents for Polar Electro Reebok C 7.1e
- Page 1 Computer C 7.1e COMPUTER MANUAL Reebok C 7.1e-20100121...
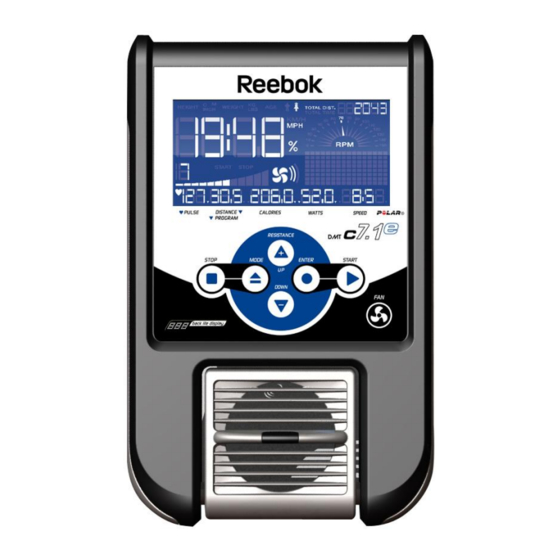
- Page 3 Lesen Sie bitte vor dem Zusammenbau und dem Gebrauch Ihres Fitnessgeräts ausführlich die Sicherheitshinweise, die der Aufbauanleitung beigefügt sind. DISPLAY Um von der metrischen auf die englische Anzeige zu wechseln, lesen Sie bitte das Kapitel „Umstellung von metrischer auf englische Anzeige“. (2) Körpergrößenanzeige (1) RPM Diagramm (Umdrehungen pro Minute) (6) Anzeige der Körpergröße von 50-250 cm;...
- Page 4 Kalorien Anzeige (13) Distanzanzeige (14) Anzeige des Kalorienverbrauchs von 0 bis 999 kcal. Diese Anzeige der zurückgelegten Strecke von 0 bis 99.9 km; Funktion dient nur zur Orientierung und kann nicht als Meilen. medizinische Bewertung herangezogen werden. Programm (14) Anzeige der Programme von P1 bis P9. Tasten und Funktionen START Taste Drücken Sie START um Ihr Training zu beginnen.
- Page 5 POWER ON Nachdem Sie Ihr Gerät an das Stromnetz angeschlossen haben, drücken Sie die POWER Taste. Der LCD Bildschirm leuchtet auf. Um den POWER ON Status zu verlassen, drücken Sie nach dem Gebrauch des Geräts zweimal die STOP Taste. Schnellstart Wenn sich der Computer im POWER ON Status befindet, drücken Sie START um das Schnellstartprogramm zu aktivieren.
- Page 6 VENTILATOR FUNKTION: Um den Ventilator einzuschalten, drücken Sie die VENTILATOR Taste. Durch Drücken der VENTILATOR Taste kann auch die VENTILATOR Geschwindigkeit reguliert werden. 1 x Drücken: 2 x Drücken: 3 x Drücken: 4 x Drücken: STOP Wenn Sie den Ventilator einstellen, achten Sie bitte darauf diesen nicht zu überdrehen. Der Ventilator ist so konzipiert, dass er in einem Winkel von 25 Grad nach vorne und hinten geschwenkt werden kann.
- Page 7 Benutzergröße Nachdem der Benutzer Code bestätigt wurde, blinkt im Display die Größenanzeige mit einem voreingestellten Wert von 170cm/67 inches. Drücken Sie die Pfeiltasten um Ihre Größe einzustellen und bestätigen mit ENTER. Benutzergewicht Nachdem die Größe bestätigt wurde, blinkt im Display die Gewichtsanzeige mit einem voreingestellten Wert von 68kg/150 lbs.
- Page 8 Programmeinstellung für P1 bis P9 Nachdem Sie das Geschlecht bestätigt haben, zeigt das LCD Display nun P1 an. Drücken Sie jetzt die Pfeiltaste um ein Programm von P1 bis P9 auszuwählen und bestätigen mit ENTER. P1: Zeit - Zielvorgabe Nachdem Sie P1 ausgewählt haben, zeigt Ihnen die Zeitanzeige die Zeiteinstellung 32:00. Drücken Sie die Pfeiltaste um Ihre Zeitzielvorgabe einzustellen und bestätigen mit ENTER.
- Page 9 P3: Kalorien – Zielvorgabe Nachdem Sie P3 ausgewählt haben, zeigt Ihnen die Kalorienanzeige die Einstellung 50. Drücken Sie die Pfeiltaste um Ihre Kalorienzielvorgabe einzustellen und bestätigen mit ENTER. Drücken Sie START um mit der Übung zu beginnen. Mit den Pfeiltasten können Sie den Widerstand während des Trainings ändern. Der eingestellte Kalorienwert wird auf 0 herunter gerechnet, die Zeit und die Distanz werden hochgerechnet.
- Page 10 P6: Intervall Programm Level Nachdem Sie P6 ausgewählt haben, zeigt das Geschwindigkeitsdisplay „L1“ an. Wählen Sie mit den Pfeiltasten zwischen den Leveln „L1“ bis „L8“ aus und drücken Sie dann ENTER um mit dem Programm fortzufahren. Zeit Nachdem Sie das Level eingestellt haben, drücken Sie ENTER. Das Zeitdisplay zeigt nun die Übungsdauereinstelllung 32:00 an.
- Page 11 P8: WATT Kontrollprogramm WATT Einstellung Nachdem Sie P8 ausgewählt haben, zeigt das WATT Display „120“ an. Wählen Sie mit den Pfeiltasten zwischen WATT Stufen von „20“ bis „400“ und drücken Sie dann ENTER um mit dem Programm fortzufahren. Mit den Pfeiltasten können Sie die WATT Stufen während des Trainings ändern.
- Page 12 P9: Ziel-Pulsprogramm Pulseinstellungen Nachdem Sie P9 ausgewählt haben, zeigt das Puls Display „157“ an. Wählen Sie mit den Pfeiltasten ihre Pulseinstellung und drücken Sie dann ENTER um mit dem Programm fortzufahren. Zeit Nach der Eingabe des Zielpuls drücken Sie ENTER. Das Zeitdisplay zeigt nun die Übungsdauereinstelllung 32:00 an. Drücken Sie die Pfeiltaste um die gewünschte Trainingsdauer einzustellen und bestätigen mit ENTER.
- Page 13 Ziel-Pulsprogramm (Hauptprogramm) Nachdem der aktuelle Puls das Minimum des Trainingszielpulses erreicht hat und das WARM UP Programm damit beendet ist, startet das Hauptprogramm und die gewählte Zeiteinstellung zählt zurück auf „0“. Während des Trainings ermittelt der Computer alle 15 Sekunden die momentane Herzfrequenz. Hierbei werden Widerstand, Strecke und Kalorien vom WARM UP weiterhin aufsteigend angezeigt.
- Page 14 Herzfrequenz Anzeige Das Gerät ist am Lenker mit EKG Handpulssensoren ausgestattet. Um die Herzfrequenz anzuzeigen, platzieren Sie Ihre Handflächen auf den Sensoren. Es kann ein paar Sekunden dauern bis Ihr Puls auf der Konsole angezeigt wird. Um den Puls zu beobachten, halten Sie weiterhin die Sensoren fest. Falls die Anzeige unterbrochen wird, haben Ihre Handflächen wahrscheinlich keinen direkten Kontakt mehr zu den Sensoren.
- Page 15 Herzfrequenzdiagramm Alter (Jahre) Age (years) Sie können Ihren Zielpuls folgendermaßen bestimmen: Maximale Herzfrequenz = 220 minus Alter Für die verschiedenen Trainingsziele sollten Sie mit den folgenden Prozenten Ihrer maximalen Herzfrequenz trainieren: Gesundheit/ Fettverbrennung: 65-75% Ihrer max. Herzfrequenz Fitness/ Body Shaping: 75-85% Ihrer max.
- Page 16 Individuelle Trainingspläne erstellen und downloaden Sie unter: www.getfit-concept.de Kunden Service Häufig gestellte Fragen (FAQs): Sollten Sie Fragen zu Ihrem Produkt oder dem Aufbau haben, oder auf Probleme bei der Bedienung stoßen, finden Sie Hilfe unter: Service FAQs www.reebokfitness.de Ersatzteilbestellung: Auf unserer Homepage können Sie unter Angabe der Seriennummer Ihres Geräts Ersatzteile bestellen: ...
-
Page 17: Table Of Contents
Before assembling or using your fitness equipment, please do carefully read the precautions included in the assembly instruction. DISPLAY To switch from Metric to English display please read the chapter Metric to English conversion. (2) HEIGHT (1) RPM DIAGRAM (6) The HEIGHT display range is from 50 to 250 cm. - Page 18 CALORIES (13) DISTANCE / PROGRAM (14) The CALORIES - display range is from 0 to 999. The DISTANCE display range is from 0.0 to 99 kilometres; miles. The PROGRAM display range was from P1 to P9. BUTTONS AND FUNCTIONS START button Press START to begin your exercise.
- Page 19 POWER ON After connecting the power cord switch the power button on. The LCD screen will light up. To switch back to the power on status after the machine has already been used press the stop button twice. QUICK START When the computer is in the POWER ON STATUS, press the start button to activate the QUICK START program, the TIME, DISTANCE and CALORIES will count up when you start exercising.
- Page 20 FAN FUNCTION: To activate the fan press the fan button to turn on ,pressing the fan button will also adjust the fan speed. First Press: Second Press: Third Press: Fourth Press: STOP When adjusting the angle of the fan be sure not to over rotate. This feature is designed to tilt 25 degrees up and 25 degrees down.
-
Page 21: Height
USER HEIGHT After the USER Code has been confirmed the SPEED display will show HEIGHT or the previous setting and begin flashing. Press the UP/DOWN button to adjust the user height information, and then press ENTER to confirm. USER WEIGHT After the HEIGHT has been confirmed the TIME display will show WEIGHT or the previous setting and begin flashing. - Page 22 P 1- P 9 Program Selecting Procedure After the gender has been set up and press the “ENTER” button to confirm, the LCD will display and flash “P1”, press “UP “and “DOWN” to select. Then press the “ENTER” button to confirm and save. P1: Target time program After you have selected “P1-Target time program”...
- Page 23 P3: Target calories program After you have selected “P3- Target calories program”, the CALORIES display will show the calories setting “50”, press the “UP/DOWN” button to adjust target calories, then press “ENTER” to confirm. Press the “START” button to begin the exercise program.
-
Page 24: Time
P6: INTERVAL program LEVEL After the user has selected “P6 INTERVAL program”, The SPEED display will show “L1” Press the “UP and DOWN” button to adjust the Level from “L1” to “L8”, press the “ENTER” button to continue the program. TIME After you have set up the Level, press the “ENTER”... - Page 25 To pause the program while exercising, press the “STOP” button. Press the “STOP” button twice, the program will return to POWER ON status. At the end of the program when the target has been achieved, the computer will beep. P8: WATT control program WATT setting After the user has selected “P8 WATT control program”.
-
Page 26: Pulse
P9: Target pulse program Pulse setting After the user has selected “P9 Target pulse program”. The “PULSE” display will show and flash “157”. Press the UP/DOWN button to adjust the PULSE, after setting the PULSE, press the “ENTER” button to continue the program setting up. - Page 27 If the computer does not detect the user actual PULSE, the computer will pause the compare function and stop increasing the resistance. The LCD will show “NO PULSE”. When the computer detects the actual pulse rate has reached the minimum target workout PULSE in the “warm up” section, the resistance will stop increasing and continue at the same resistance until the 3 minute warm up is completed and then go into the Target pulse main program.
- Page 28 To pause the program while exercising, press the “STOP” button. Press the “STOP” button twice and the program will return to POWER ON. You cannot use the “UP, DOWN, START, MODE“ buttons in the “COOL DOWN ” program. Metric (KM) to English (ML) conversion The computer display can show both English and Metric information, if you want to change from the Metric to English, Please follow the below procedure: When the computer is in the POWER ON status.
- Page 29 Heart Rate diagram Age (years) You can calculate the target-heartrate for your training as follows: Maximum heartrate = 220 minus age For the different trainingtargets you should train with the following percentage of your maximum heartrate: Health/Fat Burning: 65 – 75% of your max. heartrate Fitness/Bodyshaping: 75 –...
- Page 30 Customer Service Spare Part Order: By giving the serial number of your product you can order spare parts via our technical support team on 0871 474 2614. Contact RFE INTERNATIONAL LTD DSV HOUSE MAIDSTONE RD KINGSTON MILTON KEYNES MK10 0AJ head office tel: 0044 (0) 1908 512244 head office fax: 0044 (0) 1908 512245 e-mail: info@rfeinternational.com...
- Page 31 Avant le montage et l'utilisation de votre appareil de fitness, veuillez lire attentivement les consignes de sécurité jointes aux instructions de service. ECRAN Pour pouvoir changer entre métrique et affichage anglo-saxon, veuillez lire les chapitres „Conversion de métrique à anglo-saxon ». Affichage de la taille (1) Diagramme RPM (rotation par minute)(6) Affichage de la taille de 50-250 cm ;...
- Page 32 Affichage des calories (13) Affichage de distance (14) Affichage de la distance parcourue de 0 à 99.9 km ; Affichage de consommation de calories de 0 à 999 miles. kcal. Cette fonction sert uniquement d'orientation et ne peut pas être utilisée comme évaluation médicale. Programmes (14) Affichage des programmes de P1 à...
- Page 33 POWER ON Après avoir connecté l’appareil au réseau électrique, appuyez sur la touche POWER. L’écran LCD clignote. Pour quitter le statut POWER ON, appuyez après l’utilisation de l’appareil deux fois sur la touche STOP. Démarrage RAPIDE Appuyez sur START lorsque l’ordinateur est en statut POWER ON, pour activer le programme démarrage rapide. En même temps la durée, distance, rotation par minutes et calories s'affichent de façon ascendante à...
- Page 34 Fonction du ventilateur: Pour activer le ventilateur, appuyez sur le bouton du ventilateur. En appuyant sur le bouton du ventilateur vous ajustez également la vitesse du ventilateur. Première pression: Seconde pression: Troisième press: Quatrième press: STOP Lors du réglage de l'angle du ventilateur assurez vous de ne pas trop incliner . Cette fonctionnalité est destinée à une inclinaison de 25 degrés vers le haut et de 25 degrés vers le bas.
- Page 35 Taille de l'utilisateur Après confirmation du code, l’affichage de taille dans l’écran clignote avec une valeur présélectionnée de 170cm/67 inches. Appuyez sur la touche fléchée pour régler votre taille et confirmez par ENTER. Poids d'utilisateur Après que la taille a été confirmée, l’affichage du poids dans l’écran clignote avec une valeur présélectionnée de 68kg/150lbs.
- Page 36 Réglage de programme pour P1 à P9 Après confirmation du sexe, l’écran LCD affiche P1. Appuyez sur la touche fléchée pour choisir un programme de P1 à P9 et confirmez par ENTER. P1: Objectif – Durée Si vous choisissez P1, la programmation vous indiquera la durée 32:00. Appuyez sur la touche fléchée pour régler l’objectif de durée et confirmez par ENTER.
- Page 37 P3: Objectif - calories Si vous avez choisi P3, l’écran des calories vous affiche la donnée 50. Appuyez sur la touche fléchée pour introduire votre objectif des calories et confirmez par ENTER. Appuyez STAR pour commencer l’entraînement. La touche fléchée vous permet de changer la résistance pendant l’exercice.
- Page 38 P6: Programme intervalle Niveau Si vous avez choisi P6 , l'écran de vitesse affiche « L1 ». Choisissez avec les touches fléchées entre les niveaux « L1 » à « L8 » et appuyez sur ENTER pour continuer le programme. Durée Après avoir choisi le niveau appuyer sur ENTER.
- Page 39 mode des programmes, appuyez sur ENTER et maintenez la touche pendant un moment. Lorsque le programme a compté la durée à rebours jusqu’à « 0 », une alarme sonore prolongée se fait entendre. P8 : PROGRAMME DE CONTROLE WATT Réglage des WATTS Si vous choisissez P8, l'écran des WATTS affiche «...
- Page 40 P9: Programme objectif pouls Réglage du Pouls Si vous avez choisi P9, l'écran affiche « 157 ». Choisissez avec la touche fléchée votre réglage du pouls et puis appuyez sur ENTER pour continuer le programme. Durée Après introduction du pouls objectif appuyez sur ENTER. L'écran durée indique maintenant le réglage de durée d'exercice 32:00.
- Page 41 Programme de pouls objectif (programme principal) Après que le pouls actuel a atteint le pouls objectif minimum d’entraînement et le programme WARM UP se termine, le programme principal démarre et la durée programmée compte à rebours jusqu’à « 0 ». Pendant l’exercice l’ordinateur évalue toutes les 15 secondes la fréquence cardiaque en cours.
- Page 42 Affichage fréquence cardiaque Le guidon de l’appareil est muni de détecteurs de pouls à main pour ECG. Pour afficher la fréquence cardiaque, placez vos paumes sur les détecteurs. Il est possible qu'il faille attendre quelques secondes avant que la console n'affiche votre pouls.
- Page 43 Diagramme de fréquence cardiaque Age (years) Âge (ans) Vous pouvez déterminer votre pouls objectif comme suit: Fréquence cardiaque maximale = 220 moins l’âge Pour les différents objectifs d’entraînement, vous devez vous entraîner avec les pourcentages de votre fréquence cardiaque suivants : Santé...
- Page 44 Réalisez et téléchargez votre plan d´entraînement personnel sur : www.getfit-concept.de "Le service est seulement en allemand disponible." Forum aux questions (FAQ): Si vous avez des questions sur le produit ou le montage ou si vous avez des problèmes lors de son utilisation, consultez ...
- Page 45 Gelieve voorafgaand aan de montage en het gebruik van het fitnessapparaat eerst de bijgevoegde veiligheidsaanwijzingen aandachtig te lezen. DISPLAY Hoe u van het metrieke naar het Engelse systeem kunt wisselen, leest u in het hoofdstuk “Wisselen van het metrieke naar het Engelse systeem". (2) Weergave lichaamslengte (1) RPM-diagram (rotaties per minuut) (6) Weergave van de lichaamslengte van 50-250 cm;...
- Page 46 Calorieweergave (13) Afstandsweergave (14) Weergave van het calorieverbruik van 0 tot 999 kcal. Weergaven van de afgelegde afstand van 0,0 bis 99,9 Deze functie dient als oriëntatie en is niet geschikt km; mijlen. voor medische doeleinden. Programma (14): Weergave van het programma van P1 tot P9. Toetsen en functies START-toets Druk op START om met de training te beginnen.
- Page 47 POWER ON Druk op de toets POWER nadat u het apparaat aan het stroomnet heeft aangesloten. Het LCD-scherm licht op. Om de modus POWER ON te verlaten, drukt u na gebruik twee keer op de toest STOP. Snelstart Wanneer de computer zich in de status POWER ON bevindt, drukt u op START om het snelstartprogramma te activeren. Hierbij worden tijd, afstand, rotaties per minuut en calorieën van vanaf “0”...
- Page 48 VENTILATORFUNCTIE: Om de ventilator te activeren, drukt u op de ventilatorknop om deze aan te zetten. De ventilatorsnelheid kan ook worden ingesteld met de ventilatorknop. keer drukken: keer: keer: keer: STOP Indien u de hoek van de ventilator instelt, moet u erop letten dat u deze niet te ver roteert. De maximale hoek is 25 graden, zowel naar beneden als naar boven.
- Page 49 Lengte gebruiker Nadat de gebruikerscode werd bevestigd, knipper in het display de lengteweergave met een vooraf ingestelde waarde van 170cm/67 inches. Druk op de pijltjestoetsen om de lengte in te stellen en bevestig met ENTER. Gewicht gebruiker Nadat de lengte werd bevestigd, knippert in het display de gewichtsweergave met een vooraf ingestelde waarde van 68kg/150 lbs.
- Page 50 Programma-instelling voor P1 tot P9 Nadat u het geslacht heeft bevestigd, toont het LCD-scherm P1. Druk op de pijltjestoets om een programma P1 tot P9 te kiezen en bevestig met ENTER. P1: Tijd - doelinstelling Nadat u P1 heeft gekozen, wordt de tijdsinstellingen 32:00 weergegeven. Druk op de pijltjestoets om uw doeltijd in te stellen en bevestig met ENTER.
- Page 51 P3: Calorieën – Doelinstelling Nadat u P3 heeft gekozen, wordt de calorie-instellingen 50 weergegeven. Druk op de pijltjestoets om uw doelcalorieën in te stellen en bevestig met ENTER. Druk op START om met de oefening te beginnen. U kunt de weerstand gedurende de training met de pijltjestoetsen veranderen.
- Page 52 P6: Intervalprogramma Level Als u P6 heeft gekozen, geeft het display voor de snelheid “L1” weer. Kies met de pijltjestoetsen het Level uit (van “L1” tot “L8”) en druk op ENTER om het programma te starten. Tijd Druk op ENTER nadat u het level het ingesteld. Het display voor tijd geeft nu de trainingstijd voor de oefening (32:00) weer.
- Page 53 P8: Controleprogramma WATT WATT instellen Als u P8 heeft gekozen, geeft het display WATT “120” weer. Kies met de pijltjestoetsen het WATT-niveau uit (van “20” tot “400”) en druk op ENTER om het programma te starten. U kunt het WATT-niveau gedurende de training met de pijltjestoetsen veranderen.
- Page 54 P9: Hartslagdoelprogramma Hartslaginstellingen Nadat u P9 heeft gekozen, geeft het display voor hartslag “157” weer. Met de pijltjestoetsen kunt u uw instelling voor hartslag kiezen en met ENTER start u het programma. Tijd Na het invoeren van de doelhartslag drukt u op ENTER. Het display voor tijd geeft nu de trainingstijd voor de oefening (32:00) weer.
- Page 55 Doelhartslagprogramma (hoofdprogramma) Nadat de actuele hartslag de minimale doelhartslag heeft bereikt en het WARMING-UP-programma is beëindigd, wordt het hoofdprogramma gestart en telt de gekozen tijdsinstelling af tot “0“. Tijdens de training bepaalt de computer iedere 15 seconden de huidige hartslagfrequentie. Hierbij worden weerstand, afstand en calorieën van de WARMING-UP verder opgeteld en weergegeven.
- Page 56 Weergave hartfrequentie Het apparaat heeft in het stuur EKG-hartslagsensoren. Om de hartslagfrequentie te kunnen meten, plaatst u uw handpalmen op de sensoren. Het kan een paar seconden duren tot uw hartslag wordt weergegeven. Houd uw handen op de sensoren om uw hartslag te blijven meten. Indien de weergave worden onderbroken, is het directe contact tussen uw handpalmen en de sensoren waarschijnlijk onderbroken.
- Page 57 Hartslagfrequentiediagram Age (years) Leeftijd (Jaar) U kunt uw doelhartslag op de volgende manier bepalen: Maximale hartslag = 220 min leeftijd Hieronder staat aangegeven op hoeveel procent van uw maximale hartslag u moet training voor de verschillende trainingsdoelen: Gezondheid/vetverbranding: 65-75% van uw max. hartslag Fitness/bodyshaping: 75-85% van uw max.
- Page 58 Individuele trainingsschema’s kunt u aanmaken en downloaden via: www.getfit-concept.de (Deze service is alleen in het Duits beschikbaar) Klantenservice Veelgestelde vragen (FAQ): Hebt u vragen over het product of over de montage, of heeft u problemen met de bediening, dan kunt u informatie hierover vinden onder: ...
- Page 59 Zanim przystąpisz do montażu oraz pierwszego użycia przyrządu przeczytaj uważnie wskazówki bezpieczeostwa załączone do instrukcji montażu. WYŚWIETLACZ Aby zmienid ze wskaźnika metrycznego na angielski, przeczytaj rozdział “Zmiana ze wskaźnika metrycznego na angielski“. Wskaźnik wzrostu (1) Diagram RPM (Liczba obrotów na minutę)(6) Wskaźnik wzrostu 50-250 cm;...
- Page 60 Wskaźnik kalorii (13) Wskaźnik dystansu (14) Wskaźnik spalania kalorii od 0 do 999 kcal. Wskaźnik przebytego dystansu od 0 do 99.9 km; mil. Funkcja służy jedynie orientacji i nie może byd używana Program (14) w celach medycznych. Wskaźnik programów od P1 do P9. Przyciski i funkcje START Naciśnij START, aby rozpocząd trening.
- Page 61 POWER ON Po podłączeniu przyrządu do prądu, naciśnij przycisk POWER. Wyświetlacz LCD zaświeci się. Aby wyjśd z trybu POWER ON, po użyciu przyrządu naciśnij dwukrotnie przycisk STOP. Szybki start Jeśli komputer znajduje się w trybie POWER ON, naciśnij START, aby aktywowad program szybkiego startu, który rosnąco począwszy od 0 pokazuje czas, dystans, obroty na minutę...
- Page 62 FUNKCJA WENTYLATORA: Aby włączyd wentylator, naciśnij przycisk z symbolem WENTYLATORA. Poprzez naciśnięcie tego przycisku możesz również ustawid prędkośd wentylatora. Naciśnij 1 x : Naciśnij 2 x : Naciśnij 3 x : Naciśnij 4 x : STOP Podczas ustawiania pozycji wentylatora, zwród uwagę, aby go nie przekręcid. Wentylator może byd ustawiany w zakresie 25 stopni do przodu i do tyłu.
- Page 63 Wzrost Po potwierdzeniu kodu użytkownika, na wyświetlaczu będzie migad wskaźnik wzrostu z ustawioną wartością 170cm/67 cali. Naciśnij przyciski ze strzałkami, aby ustawid swój wzrost i potwierdź przyciskając ENTER. Waga Po wprowadzeniu wzrostu, na wyświetlaczu pojawi się wskaźnik wagi z ustawioną wartością 68kg/150 lbs. Naciśnij przyciski ze strzałkami, aby ustawid swoją...
- Page 64 Ustawienie programów od P1 do P9 Po wprowadzeniu płci, wyświetlacz LCD pokaże P1. Naciśnij przycisk ze strzałką, aby wybrad program od P1 do P9 i potwierdź przyciskając ENTER. P1: Program z określonym czasem Po wybraniu P1, wskaźnik czasu wskazuje ustawienie czasu na 32:00. Naciśnij przycisk ze strzałką, aby ustawid pożądany czas treningu i potwierdź...
- Page 65 P3: Program z określoną ilością spalanych kalorii Po wybraniu P3, wskaźnik kalorii wskazuje ustawienie kalorii na 50. Naciśnij przycisk ze strzałką, aby ustawid pożądaną ilośd spalonych kalorii i potwierdź przyciskając ENTER. Naciśnij START, aby rozpocząd trening. Przyciskami ze strzałkami możesz zmienid opór podczas treningu. Ustawiona wartośd kalorii zostanie zmieniona na 0, wartośd czasu i dystansu wzrośnie.
- Page 66 P6: Program interwałowy Poziom Po wybraniu P6, wskaźnik prędkości pokazuje „L1“. Za pomocą przycisków ze strzałkami wybierz między poziomami od „L1“ do „L8“ i potwierdź przyciskając ENTER, aby pozostad w wybranym programie. Czas Po ustawieniu poziomu, naciśnij ENTER. Wyświetlacz pokazujący czas wskazuje ustawiony czas dwiczeo na 32:00. Naciśnij przycisk ze strzałką, aby ustawid wybraną...
- Page 67 P8: Program z kontrolą oporu Ustawienie oporu Po wybraniu P8, wyświetlacz oporu pokazuje „120“. Za pomocą przycisków ze strzałkami wybierz poziom oporu od „20“ do „400“ watów i naciśnij ENTER, aby kontynuowad trening w wybranym programie. Używając przycisków ze strzałkami możesz zmienid poziom oporu w watach podczas treningu. Przyrząd przestawia automatycznie opór zależnie od częstotliwości nadeptywania na pedały, aby utrzymad stały wynik.
- Page 68 P9: Program z kontrolą pulsu Ustawienia pulsu Po wybraniu P9 na wyświetlaczu pojawi się „157“. Przy pomocy klawiszy ze strzałkami, wybierz swój puls i zatwierdź go klawiszem ENTER, aby kontynuowad program. Czas Po wprowadzeniu pulsu docelowego, wciśnij ENTER. Na monitorze wyświetli się czas treningu 32:00. Klawiszem ze strzałkami określ swój czas treningu i zatwierdź...
- Page 69 Program z kontrolą pulsu (Program główny) Po osiągnięciu minimalnej wartości pulsu docelowego, kooczącego jednocześnie program „WARM UP“, rozpoczyna się program główny i czas liczony jest od początku. Podczas treningu puls obliczany jest automatycznie przez komputer, co 15 sekund. Jednocześnie na wyświetlaczu pojawiają się wartości oporu, odległości i kalorii liczone już od rozpoczęcia rozgrzewki.
- Page 70 Wykres pracy serca Przyrząd wyposażony jest sensory EKG do pomiaru pulsu przy nadgarstku. Aby dokonad pomiaru pulsu, przyłóż swoją dłoo do sensorów. Za kilka sekund powinien pojawid się twój puls na konsoli. Aby obserwowad swój puls, musisz nadal trzymad dłoo na sensorach. Jeśli wartośd twojego pulsu zniknie z konsoli, oznacza to, że sensory straciły kontakt z dłonią. Trening z kontrolą...
- Page 71 WYKRES PRACY SERCA Age (years) Wiek (lata) Swój puls docelowy możesz określid w następujący sposób: Maksymalny puls= 220 minus wiek Niżej wymienione maksymalne wartości pulsu podane w procentach ułatwią Ci organizację treningu w zależności od zamierzonego celu: Zdrowie/ spalanie tłuszczu: 65-75% Twojego maksymalnego pulsu Fitness/ trening kondycyjny 75-85% Twojego maksymalnego pulsu...
- Page 72 Ułóż i ściągnij indywidualne plany dwiczeo na naszej stronie: www.getfit-concept.de (Serwis dostępny jest tylko w języku niemieckim) Serwis Najczęściej zadawane pytania: Jeśli masz jakiekolwiek pytania dotyczące produktu bądź jego montażu, czy tez użytkowania, tu znajdziesz pomoc: Serwis Najczęściej zadawane pytania www.reebokfitness.de (Serwis dostępny jest tylko w języku niemieckim) Zamawianie części zamiennych:...
Need help?
Do you have a question about the Reebok C 7.1e and is the answer not in the manual?
Questions and answers