
Related Manuals for YellowStone 4G LTE Trail Camera

Summary of Contents for YellowStone 4G LTE Trail Camera
- Page 1 User Manual (Last Updated: February 9, 2020) Yellowstone A.I. - 4G LTE Trail Camera...
- Page 2 Welcome to the Yellowstone A.I. family. We sincerely appreciate you buying a Yellowstone AI camera and we hope you enjoy it. At Yellowstone AI, we strive to build cameras and software that are supremely user-friendly and reliable, but we know there is always room for improvement. The user experience remains at the heart of everything we do, and we welcome feedback on how we can improve.
-
Page 3: Table Of Contents
Table of Contents Activation Guide ............................ 4 Create Yellowstone AI Command Center Account ..................4 Activate Camera ............................4 Prepare Camera ............................4 Connect to the Network ..........................5 Receive Your First Image ..........................5 What’s in the Box ........................... 6 Getting to Know Your Camera ........................ -
Page 4: Activation Guide
5. Review price agreement and accept if you wish to continue 6. Submit payment information (if you are a first-time user) 7. Your Yellowstone AI Command Center account service is now active and ready to receive photos 1.3 Prepare Camera 1. -
Page 5: Connect To The Network
Yellowstone AI website 1.5 Receive Your First Image 1. Your camera should now be all set to take and send pictures to the Yellowstone AI Command Center and distributed according to your account settings 2. To send a test picture, press the ‘OK’ button while the camera is in ‘SETUP’ mode and connected to the network. -
Page 6: What's In The Box
2. What’s in the Box 4G LTE SIM Card 2x 4G Antennas 32 GB SD Card Camera Mounting Strap USB Cable Quick-Start Guide... -
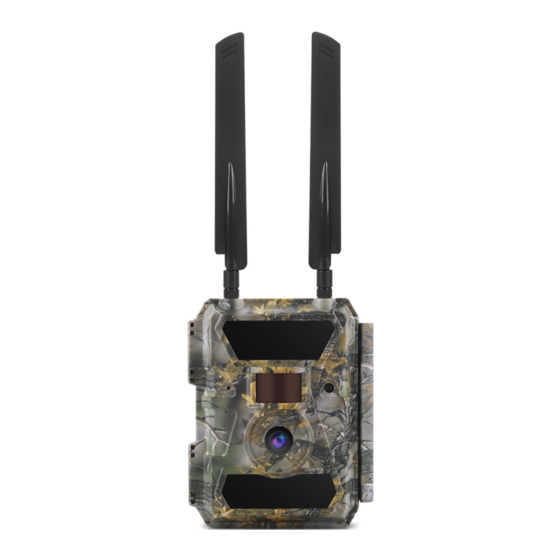
Page 7: Getting To Know Your Camera
3. Getting to Know Your Camera 3.1 Front View 4G LTE Service Antenna Port GPS Antenna Port IR LED Array (x27) PIR Sensor Indicator Light Latch Day/Night Sensor Lens IR LED Array (x30) -
Page 8: Inside View
3.2 Inside View To open camera, flip the latch on the side of the camera case SIM Card Slot LCD Screen Menu Button Power Switch (ON/OFF/SETUP) Navigation Buttons SD Card Slot USB Port 12V Input AA Battery Slots for Solar... -
Page 9: Sd Card And Image Storage
4. SD Card and Image Storage 4.1 General Information • The SD slot of the camera has a maximum capacity of 32 GB (larger SD cards use a different file transfer protocol, which will not function with your camera) • Before inserting or removing the memory card, the camera must be switched to "OFF"... -
Page 10: Viewing Images Or Videos
By default, your camera will be set to delete the oldest pictures on the card to make room for new pictures when space is needed. Your pictures will be saved in the cloud when they are sent to your Yellowstone AI Command Center, and will be viewable (in the quality by which they are sent) even after they are deleted from the SD Card. -
Page 11: Camera Settings
5. Camera Settings For a full video walkthrough about adjusting your camera’s settings, please visit the support section our website. 5.1 Adjusting Your Settings To adjust your camera’s settings 1. Open the case by flipping the latch on the side 2. -
Page 12: Settings Table (Cam)
5.2 Settings Table (Cam) Field Options Purpose Optimizing We recommend setting to ON (and naming Name of your camera - stamped on Cam ID ON/OFF (text input) your cameras) when using more than one each picture camera/location Media type(s) that you want captured and stored to your SD card. -
Page 13: Settings Table (Pir)
5.3 Settings Table (PIR) Field Options Purpose Optimizing ON - Infrared motion will trigger camera PIR Switch ON/OFF Enable/disable infrared motion sensor OFF - camera will only trigger according to timers (below) We recommend High to start; then changing to Motion threshhold that triggers your Sensitivity High/Middle/Low... -
Page 14: Settings Table (4G)
5.4 Settings Table (4G) Field Options Purpose Optimizing SIM Auto Auto/Manual Ignore - for troubleshooting only Ignore - for troubleshooting only Match Manual Setup Disabled Preconfigured Preconfigured ON/OFF Ignore - for troubleshooting only Ignore - for troubleshooting only SMTP Default/Manual/OFF Ignore - for troubleshooting only Ignore - for troubleshooting only ON/OFF... -
Page 15: Settings Table (Other)
5.5 Settings Table (Other) Other Field Options Purpose Optimizing Language [Multiple Options] Language of your camera's menus We recommend Auto - the camera will sync Date and time of your camera - used Date/Time Auto/Manual with a time server via it's cellular connection for timers and timestamps on photos If Auto doesn't work, you'll need to use Manual Date Type... -
Page 16: Camera Specifications
6. Camera Specifications Image Sensor 5 Mega Pixels Color CMOS Effective Pixels 2560x1920 Day/Night Mode IR range 65 feet IR Setting Top: 27 LED, Foot: 30 LED Memory SD Card (4GB – 32GB) Operating keys LCD Screen 2” TFT, RGB, 262k PIR distance 20m (65feet) Picture size... -
Page 17: Troubleshooting
7. Mounting Your Camera 1. Face camera north if possible - Too much sun can cause false triggers and wash out images. 2. Use high-quality batteries - either Ni-MH rechargeable, lithium, or alkaline. 3. Make sure the camera lens is clean 4.
Need help?
Do you have a question about the 4G LTE Trail Camera and is the answer not in the manual?
Questions and answers