Table of Contents
Advertisement
Quick Links
Advertisement
Table of Contents

Related Manuals for Prestel 4K-F4U3W

Summary of Contents for Prestel 4K-F4U3W
- Page 1 Auto Framing 4K EPTZ Camera Prestel 4K-F4U3W Manual User (V1.0)...
- Page 2 Attentions This manual introduces functions, installations and operations for this camera in details. Please read this manual carefully before installation and use. 1. Cautions 1.1 Avoid damage to product caused by heavy pressure, strong vibration or immersion during transportation, storage and installation. 1.2 Housing of this product is made of organic materials.
-
Page 3: Table Of Contents
Content 1.Camera Installation ..............................3 1.1 Camera Interfaces ............................. 3 1.2 Camera Operation............................. 3 2.Product Overview ..............................3 2.1 Product Introduction ............................3 2.1.1 Model ................................. 3 2.1.2 Dimension ..............................4 2.1.3 Accessory ..............................4 2.2 Main Features ..............................4 2.3 Technical Parameter ............................ -
Page 4: Camera Installation
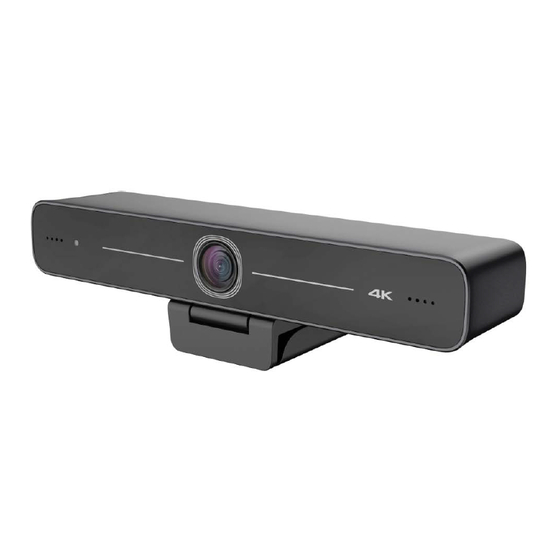
1.Camera Installation 1.1 Camera Interfaces Figure 1.1 Product Interfaces 1.Camera Lens 7.USB3.0 interface Tripod fixing hole 2.Indicator light 5.Positioning hole Built-in MIC Bracket 1.2 Camera Operation 1) Product Installation: Fix the device on LCD screen, top of computer; directly put it on desk or on tripod mounting. 2) Connect camera via USB cable to computer, video conference terminal or other USB input device, log in the video conference software and select a video device to have image output. -
Page 5: Dimension
2.2 Main Features 4K-F4U3W is a 4K ultra-high-definition ePTZ camera with a new design. With AI intelligence, it can frames according to the number of people in the scene, and the characters are in the middle. It has perfect functions and superior performance, which employs advanced ISP processing algorithms so as to provide vivid images with evenly clear brightness, strong color layering, high resolution, and fantastic color rendition. -
Page 6: Technical Parameter
Built-in MIC: Built-in two omni-directional MIC pickups; with unique noise suppression algorithm, effective pickup distance up to 6 meters. Auto Framing: Employing superior face detection algorithm to intelligently and automatically frames according to the number of people in the scene, and the characters are in the middle. Wide FOV: 83°/100°... -
Page 7: Interfaces Instruction
Communication Protocol PTZ Control Support EPTZ Hardware 2.4 GHz Intel@ Core 2 Duo or higher,2GB or higher, USB 3.0 port (USB 3.0 for 4K) Requirement Other Parameter Input Voltage Input Current 1A(max) Power 5W(max) Consumption Stored Temperature -10℃~+60℃ Stored Humidity 20%~90% Working -10℃~+50℃... -
Page 8: Application Instruction
3.Application Instruction 3.1 Remote Control 3.1.1 Keys Introduction 1.Standby Key The device enters standby mode after pressing it once, and the device re-displays the picture after pressing it again. 2.Camera Selection Select the camera address to control. 3. Number key Set or call 0-9 presets 4. - Page 9 2) When a key-combination is required, do it in sequence. For example,“ 【*】 + 【#】 + 【F1】 ”means press“ 【 *】 ”first and then press“【#】” and last press“【F1】”. 1)Camera Selection Select the camera address to control. 2)Pan/Tilt Control Up: press Down: press Left: press Right: press...
-
Page 10: Menu Introduction
Focus + (near): Press【FOCUS +】 None Focus - (far): Press【FOCUS -】 None Auto focus: not supported Manual focus: not supported 6) Camera Remote Control Address Setting 【*】+【#】+【F1】:Camera Address No.1 【*】+【#】+【F2】:Camera Address No.2 【*】+【#】+【F3】:Camera Address No.3 【*】+【#】+【F4】:Camera Address No.4 3.2 Menu Introduction 3.2.1 Main Menu Press 【MENU】... - Page 11 2) System Setting Move the pointer to the (Setup) in the Main Menu, click the【HOME】key and enter into the (System Setting) as shown below, Setup ================= Image Style Default (Auto Framing) [↑↓]Select [← →]Change Value Image Style: default / standard / clear / bright / soft can be set Intelligent zoom: on / off 3) Exposure Setting Move the pointer to EXPOSURE in the Main Menu, click the【HOME】and enter the (EXPOSURE SET) as follows:...
- Page 12 Gain limit: 0~15(only available in Auto/ Iris priority /Brightness priority mode) WDR: Off, 1~8 ShutterPriority:1/30,1/50,1/60,1/90,1/100,1/120,1/180,1/250,1/350,1/500,1/1000,1/2000,1/3000,1/4000,1/6 000, 1/10000 (only available in Manual and Shutter priority mode) Brightness: 0~23 (only available in Brightness priority mode) 4) Color Move the pointer to the (COLOR) in the Main Menu, click the【HOME】and enter the (COLOR sub menu) as follow, COLOR ================...
- Page 13 IMAGE ================ Brightness Contrast Sharpness Flip-H Flip-V B&W-Mode Color Gamma Default Low-Light Mode Close [↑↓]Select [← →]Change Value Brightness: 0~14 Contrast: 0~14 Sharpness: 0~15 Flip-H: On/Off Flip-V: On/Off B&W Mode: color, black/white Gamma: Default/0.34/0.39/0.47/0.5 Minimum Illumination: On/Off 6) Noise Reduction Move the pointer to the (NOISE REDUCTION) in the Menu, click the 【HOME】...
- Page 14 7) Version Move the pointer to the (VERSION) in the Main Menu, click the 【HOME】 and enter the (VERSION) as follow, VERSION ================= Camcra Version 1.0.0 2020-12-16 [↑↓]Select [← →]Change Value 8) Restore Default Move the pointer to the (RESTORE DEFAULT) in the Main Menu, click the【HOME】and enter the (RESTORE DEFAULT) as follow, RESTORE DEFAULT =================...
-
Page 15: Maintenance And Troubleshooting
4. Maintenance and Troubleshooting 4.1 Camera Maintenance 1) Please power off the camera and disconnect the power adapter and socket, if it’s not used for a long run. 2) Use soft cloth or tissue to clean the camera cover. 3) Wipe it with a soft, dry cloth when cleaning the camera lens. Wipe it gently with a mild detergent if needed. Do not use strong or corrosive detergents to avoid scratching the lens and affecting the video quality.
Need help?
Do you have a question about the 4K-F4U3W and is the answer not in the manual?
Questions and answers