Table of Contents
Advertisement
Quick Links
Advertisement
Table of Contents

Related Manuals for CRE I4GEN


Summary of Contents for CRE I4GEN
-
Page 2: Table Of Contents
About page ..........................29 Home page ..........................30 Supervision pages ........................31 Static configuration pages ......................32 Modification by variable number ..................... 32 i4Gen Settings ........................... 34 Language ..........................34 Theme ..........................35 Screen ..........................36 Date/Time ..........................37 Connection ........................... 38 Network .......................... -
Page 3: Introduction
TECHNICAL DOCUMENTATION Introduction Caution Safety protections Operate the product according to the correct installation steps and with great care to make sure safety and comfort using experience. Please refer to the following safety instruction guide to avoid danger of electric shock or fire. Abide by the previous safety instruction guide to use and maintain the product and the hard disk to make sure of safe operating environment. -
Page 4: User's Notice
Package Contents 1x i4Gen 1x DC-DC Adapter 9 to 36VDC input for 12VDC output 1x Power cord... -
Page 5: General Description
TECHNICAL DOCUMENTATION General Description · 10-point capacitive multi-touch · Edge-to-edge narrow bezel design and fan-less cooling system · Designed for easy wall mount, panel mount, and VESA mount installation · A true flat, easy-to-clean front surface with an edge-to-edge design ·... -
Page 6: Specifications
TECHNICAL DOCUMENTATION Specifications Display Front Bazel IP65, NEMA 4 rugged protection, Full planar metal border Display Type 10.1'' with LED backlight Brightness (cd/m²) 400 nits Display Color 16.2M Resolution 1280 x 800 @ 60Hz Viewing Angle (H/V) 170o / 170o Pixel Pitch 0.1695 x 0.1695 mm Aspect Ratio... - Page 7 TECHNICAL DOCUMENTATION I/O System Icon Name Quantity Description Press to turn on/ off the system. Power Button For user to connect compatible terminal power block DC-in Power Connector provide power supply for the system. To connect display device that support HDMI HDMI Port specification.
-
Page 8: Presentation
SCADA display i4Gen can be used as a power plant display if connected on an Ethernet HUB accessing to each controller with the Modbus TCP network. In SCADA mode the direct display of any of the controller is available and a SCADA page allows the user to change the displayed controller. -
Page 9: Installation
TECHNICAL DOCUMENTATION Installation Mechanical mounting Install i4Gen position at eye level and at brightness-less location. Frame cut-out (hxl): 160x242mm (6.3x9.5in). Chassis Fixed Parts 1. Insert corresponding edges of the fixed part into the slots until them matched.Make sure the fix part is installed in the way the photo shows, with protruding tips upwards. -
Page 10: Usb Device Fixed Parts (Optional)
TECHNICAL DOCUMENTATION USB Device Fixed Parts (Optional) 1. The USB device fixed accessories include Part-A, Part-B and 2 sets of screws of different size. 2. Align the screw hole of Part-A to corresponding screws hole from IO panel of the chassis, and then lock Part-A to the panel with the bigger screw, as the photo shows. -
Page 11: Wifi Antenna Installation (Optional)
Screw the two antenna on the antenna heads connectors Power supply By default, power supply connector is connected to the AC-DC adapter. If you want to supply your i4Gen with a battery, please disconnect the AC-DC adapter wires from the connector and connect the battery wires to the connector instead. -
Page 12: Network Connection
Network connection There are several possible connection types between the i4Gen and the controller. Direct Connection · Connect the Ethernet port (RJ45-LAN) labeled "module" of the i4Gen to the Ethernet port of the controller. Connection Via a Switch · Connect the Ethernet port (RJ45-LAN) labeled "module" of the i4Gen on one of the switch's Ethernet ports. -
Page 13: Communication
The controller network configuration can be done from the controller front panel or controller website or via CRE Config software. If the i4Gen and the controller are connected directly, the network configuration of both devices has to be compatible: ·... -
Page 14: Login/Connection
TECHNICAL DOCUMENTATION Login/Connection Press login/connection icon to open login/connection window. i4Gen uses the classic password system of the CRE Technology modules for access authorizations and parameter modification of the connected module. Level Default password Rights Menu None None Display and manual button... - Page 15 It is possible to disconnect by pressing the button When the connection to the controller is lost or a connection switch to another controller is done, the i4Gen attempts to connect or reconnect to the remote controller for several seconds and then abandons after a while.
- Page 16 TECHNICAL DOCUMENTATION During connection/re-connection attempts, the button is replaced by a button to manually cancel the attempts. A56V1_90020_D_EN...
-
Page 17: Functioning
TECHNICAL DOCUMENTATION Functioning Interface The interface of the i4Gen allows to replace the front panel of CRE Technology modules and to offer a better ergonomics in order to facilitate the supervision of our products. A56V1_90020_D_EN... - Page 18 TECHNICAL DOCUMENTATION Header TOUCH ICONS About page Fault & Alarm menu (Status when there are no faults or alarms) Supervision menu Static configuration menu Connection/Login menu Settings menu Home (Back to home page) INDICATORS Alarm: Blinking unacknowledged alarm, Static: alarm acknowledged and in progress Fault: Blinking unacknowledged fault, Static: fault acknowledged and in progress Module disconnected Module connected + password level (id: 1)
- Page 19 TECHNICAL DOCUMENTATION Content Footer All footer buttons are only available when the i4Gen is connected: TOUCH ICON AUTO mode, colored in theme color when active TEST mode, colored in theme color when active MANUAL mode, colored in theme color when active Give access to additional buttons for manual frequency/voltage control.
- Page 20 Specific information on the generator (number, engine status, power status). · Synoptic of the installation. Note: When the i4Gen is off-line, the control buttons from the footer cannot be used. The i4Gen footer is dynamic and adapts to the controller configuration: GENSYS2.0 in manual mode: control buttons are available.
-
Page 21: Graphic Objects
Composition : label + modifiable address field + value + unit This is the graphic object used in the "info" page of the i4Gen. It allows you to search for a controller variable by entering its address in the editable field and display its label, value and unit. -
Page 22: Bargraph
TECHNICAL DOCUMENTATION Bargraph This is the graphical object used for mechanical measures and whose representation of the measure in relation to a minimum and a maximum is important: Note: The slider is the value of the measurement relative to the min and max shown below the bar-graph. User configuration reminder The protection levels configured for the measurement associated with the bar graph are directly represented on the bar graph:... -
Page 23: Gauge
TECHNICAL DOCUMENTATION Gauge This is the graphic object used for electrical measures and whose representation of the measure with respect to a min and a max is important. The gauge fill part corresponds to the value of the measurement with respect to the min and max indicated below the gauge. -
Page 24: 3D Pictures
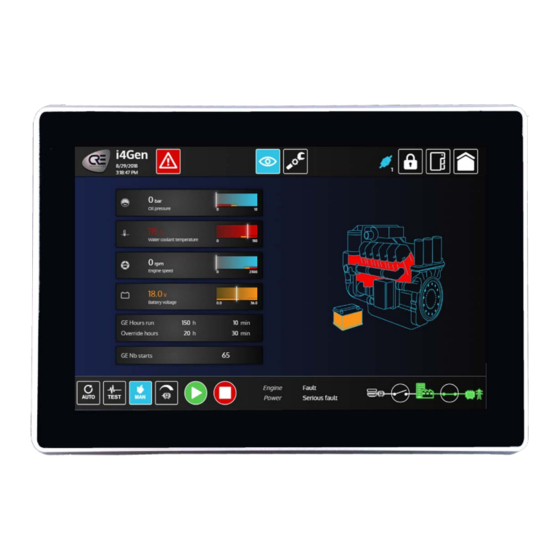
TECHNICAL DOCUMENTATION 3D pictures The pages of supervisions "Engine", "Generator" and "Mains" display 3D pictures that change according to the state of the associated protections in each of these pages. Engine Indicates the presence of a water temperature alarm/fault Indicates the presence of a battery voltage alarm/fault Indicates the presence of an oil pressure alarm/fault Indicates the presence of an engine speed alarm/fault A56V1_90020_D_EN... -
Page 25: Synchroscope
TECHNICAL DOCUMENTATION Synchroscope This is the graphic object used in the "Synchro" page of the i4Gen. It allows, during a synchronization, to visualize the phase, frequency and voltage differences between the generator and the mains/bus bar as well as the synchronization conditions. -
Page 26: Popup
TECHNICAL DOCUMENTATION P opup i4Gen can display popup windows to give information to the user. There is three type of popup : Notice : display an information message. Warning: display a warning message Error: display an error message A56V1_90020_D_EN... -
Page 27: Alarm/Fault Page
TECHNICAL DOCUMENTATION Alarm/Fault page Press alarms/faults icon to open alarms/faults page and stop the horn. This page allows you to view and acknowledge/reset controller alarms/faults when i4Gen is connected to the module. Visualization The fault alarm history is displayed as a table, from the most recent alarm/fault to older one. -
Page 28: Reset/Acknowledge
Actions on the button : · Reset: Reset alarms/faults that are no longer active. · Acknowledge: inform i4Gen that alarms/faults have been acknowledged. Alarm/fault acknowledgment status: · When alarms/faults are active and have not been acknowledged, the alarm/fault panel blinks red/orange. -
Page 29: About Page
TECHNICAL DOCUMENTATION About page Press the CRE Technology logo in the application header to display the "About" page. This page displays : 1. An i4Gen section with the software version (client and server) 2. A controller section with: · Type of controller connected to the i4Gen. -
Page 30: Home Page
TECHNICAL DOCUMENTATION Home page Press home icon to open home page. The home page is a dynamic page whose content changes according to the "power state" variable and the states of the generator and mains circuit breakers. A56V1_90020_D_EN... -
Page 31: Supervision Pages
7. Timers: Display of the controller timers. 8. Maintenance: Display of maintenance cycles of the controller (it's possible to reset the cycles to zero in password level 1). 9. Info: Display of the customizable page of the i4Gen.Variables can be displayed according to their addresses. A56V1_90020_D_EN... -
Page 32: Static Configuration Pages
Writing was successful Writing failed Writing seems to have been successful but the i4Gen could not verify the written value. In this case, you can go to the "Information" supervision page to double check if the value had been written or not. - Page 33 A "SAVE FIRMWARE CONFIG" button is available in the footer of the configuration section. This function is useful when parameters have been temporarily modified by Modbus TCP (modification of info variables from i4Gen in password level 0, modification of parameters by an external PLC...) and you want to save these modifications permanently in the controller.
-
Page 34: I4Gen Settings
TECHNICAL DOCUMENTATION i4Gen Set tings Settings part allows user to display and modify i4Gen settings. Press settings icon to open the menu that gives access to all settings pages (see image below). Language The "Language" page has two buttons (flags):... -
Page 35: Theme
TECHNICAL DOCUMENTATION Theme The "Theme" page allows you to change the theme (color) of the application corresponding to the different controllers of the CRE Technology Compact range: A56V1_90020_D_EN... -
Page 36: Screen
The "HMDI Port" section allows you to set the HDMI port of the i4Gen Display mode: when the i4Gen is connected to an external screen via an HDMI port, it is possible to duplicate the i4Gen display on the external display by pressing the "duplicate"... -
Page 37: Date/Time
The "Date/Time" page allows you to configure the i4Gen date/time, and to synchronize the controller date/time with the one of the i4Gen : 1. Date: press on the editable field to display a calendar and set up the i4Gen date. 2. Time: press on the editable field to set up the i4Gen time. -
Page 38: Connection
This parameter is used to activate/deactivate the automatic connection to a controller on i4Gen starting. By default, the i4Gen will attempt to connect to IP address 192.168.11.1. If the IP address has been modified and saved via the "preferences" page, then the i4Gen will attempt to connect to that address. - Page 39 TECHNICAL DOCUMENTATION A56V1_90020_D_EN...
- Page 40 TECHNICAL DOCUMENTATION The generator highlighted in blue and whose connection icon is closed corresponds to the controller (and therefore to the generator) that you are supervising. To switch the i4Gen connection to another controller, press the corresponding controller connection icon.
-
Page 41: Network
There are two different types of configuration: · DHCP Configuration (automatic): If the i4Gen is connected to a DHCP server, you can enable the "DHCP" setting to automatically assign an IP address to the i4Gen. ·... -
Page 42: Update
The "Update" page allows you to update the i4Gen software version: Update procedure 1. Connect a USB key containing the i4Gen update archive. Then open the "i4Gen Update" page or press the "Refresh" button to refresh the i4Gen USB device display. -
Page 43: Preferences
The block on the left side corresponds to the current user configuration. When changes are made in the settings pages, the actual user configuration is updated. This will be lost when the i4Gen restarts. The block on the right side corresponds to the saved user configuration. This configuration will be taken into account when restarting the i4Gen. -
Page 44: Dimensions
TECHNICAL DOCUMENTATION Dimensions A56V1_90020_D_EN... - Page 45 TECHNICAL DOCUMENTATION Note: Measure unit: mm A56V1_90020_D_EN...
Need help?
Do you have a question about the I4GEN and is the answer not in the manual?
Questions and answers