Table of Contents
Advertisement
Quick Links
Advertisement
Table of Contents

Related Manuals for TurboTronic airchefPro


Summary of Contents for TurboTronic airchefPro
- Page 1 ® INSTRUCTION MANUAL DIGITAL AIR FRYER OVEN TT-AF8 www.zline-world.com...
-
Page 2: Important Safeguards
® Thank you for buying airchef Pro - Digital air fryer oven by TurboTronic You will now be able to cook a wide assortment of food in a healthier manner – with little or no oil! The air fryer uses hot air, in combination with high-speed air circulation, and a top grill to prepare your dishes quickly and easily. - Page 3 safe distance from the steam and hot air and from the air outlet. And be careful of steam and hot air when opening the door of the appliance. Immediately unplug the appliance if you see dark smoke coming out of the appliance. Wait for the smoke emission to stop before opening the door of the appliance.
-
Page 4: Main Components
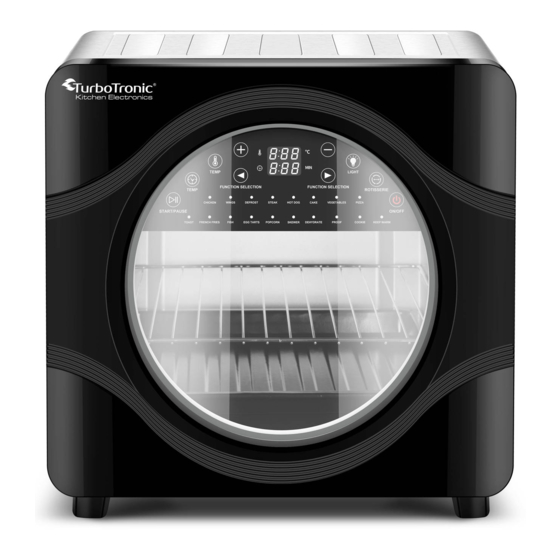
GETTING TO KNOW YOUR AIR FRYER OVEN MAIN COMPONENTS 1. Control panel 2. Touch handle 3. Glass window 4. Pull-down door 5. Anti-slip feet Oven Rack: Used for meat, bread, pizza etc. Air Fryer Basket: Use the Air Fryer Basket in conjunction with the Air Fry function to optimize your cooking results. Used for fries, wings, onion etc. -
Page 5: Technical Specifications
TECHNICAL SPECIFICATIONS Voltage Power Frequency Capacity 220~240V 1650W-1900W 50-60Hz AIRFRYER TOASTER OVEN FUNCTION REVIEW Adjustable Adjustable time Default time Default Rotisserie Program temperature range (Min) (Min) temperature (°C) function range (°C) 30-230 CHICKEN 0:01-60:00 0:30 30-230 WINGS 0:01-60:00 0:15 × 30-230 DEFROST 0:01-60:00... -
Page 6: Control Panel
CONTROL PANEL ON/OFF A. After plug in, touch to turn the Air Fryer Oven On. B. Touch to turn the Air Fryer Oven Off. C. Touch to awake the Oven from Standby mode. DISPLAY There are 2 rows in the Display Panel. The upper shows TEMPERATURE and the lower shows Time! FUNCTION SELECTION a) Press... -
Page 7: Temperature Adjustment
TEMPERATURE ADJUSTMENT a) Press , the temperature display will keep flash; b) Press to increase temperature; c) Press to decrease temperature; TIME ADJUSTMENT a) Press , the temperature display will keep flash; b) Press to increase time; c) Press to decrease time; START/PAUSE a) Press to start the selected function... - Page 8 BEFORE USING YOUR AIR FRYER TOASTER OVEN 1. Place the appliance on a stable, level, heat-resistant surface, away from anything that can be damaged by heat. Keep at least 110 mm(4.33inch) distance between the electrical outlet and the wall, furniture, etc. 2.
- Page 9 ACCESSORIES POSITIONS Oven Rack, Air frying Basket and Bake Pan Position2: Position1: TOAST DEHYDRATE DEHYDRATE Position3: TO AST position2: D EHYD RATE FRENCH FRIES BAKE CHICKEN W INGS VEGET ABLES PIZZA Accessories position4: ROAST Oven Rack Air Fryer Basket Baking Pan Rolling Cage Great for fries, roasted nuts, popcorn and other snacks.
-
Page 10: Care, Cleaning And Storage
Function A. Select function with icons B. Adjust temperature with icons Temperature adjustment range is 30-230 . the temperature will increase or decrease by 5℃ ℃ per move rapidly and continuously if you long time press on the temperature +, temperature will increase by 5℃... -
Page 11: Cleaning The Interior
Wipe the outer body with a soft, damp sponge. A non-abrasive liquid cleanser or mild spray solution may be used to avoid build-up of stains. Apply the cleanser to the sponge, not the oven’s surface, before cleaning. To clean the inner glass door, use a glass cleaner or mild detergent and a soft, damp sponge or soft plastic ... -
Page 12: Replacing The Light
REPLACING THE LIGHT ATTENTION: Be sure to unplug the Air Fryer Toaster Oven and allow it to cool completely before replacing the oven light. SPECIFICATION:25W halogen bulb 1. Rotate the light cover counterclockwise to remove it. 2. Remove the used bulb by pulling it directly. 3. -
Page 13: Troubleshooting
TROUBLESHOOTING Possible Problem Possible Cause Solution The oven does NOT work The appliance is not plugged in Make sure the oven is plugged in You have not turned on the oven Press “ON/OFF" button to power on The door is not closed properly Make sure the door is closed well Steam is coming out from the top of the You are cooking high moisture content foods... -
Page 14: Limited Warranty
TurboTronic product (or any ® of its parts) when the repair is performed by a repair person not authorized by TurboTronic 6. Products purchased, used, or operated outside Europe. Illustrations may differ from actual product.
Need help?
Do you have a question about the airchefPro and is the answer not in the manual?
Questions and answers