Table of Contents
Advertisement
Scan QR code for
SMARTCLIC App
KER-DR-0173 (L)
This SMARTCLIC® Injection Device is intended to be used for
APP-1000
USER MANUAL
Printed in Japan
P1120-2101
History
Reminders
2021-10-08
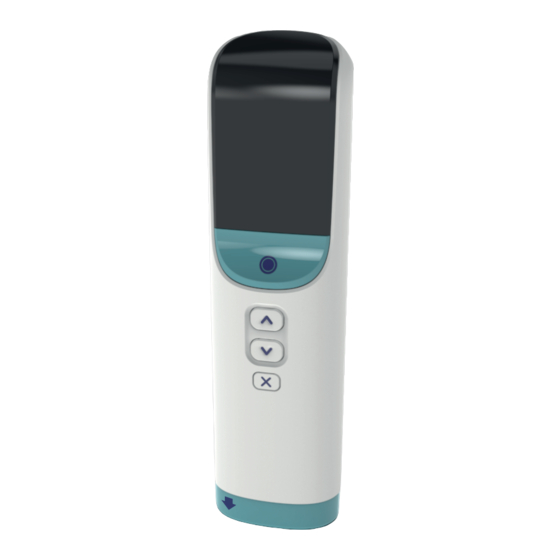
Injection Device
self-injection only for Enbrel®
EN
Battery
Injection
Customise
Bluetooth®
Indicator
speed
Before Using Your
SMARTCLIC Injection Device:
Make sure you follow the first time setup instructions
overleaf. This is to ensure you get the best experience
from your SMARTCLIC Injection Device.
Make sure you have read and understood this User
Manual before using your SMARTCLIC Injection
Device.
Unpack your SMARTCLIC Injection Device box. Make
sure you have all the correct components:
1 SMARTCLIC Injection Device
z
1 Training Cartridge
z
This User Manual in your preferred language
z
Note: If you do not have everything you need, ask
your healthcare professional.
Retain this User Manual for future reference.
Advertisement
Table of Contents

Related Manuals for Enbrel SMARTCLIC APP-1000

Summary of Contents for Enbrel SMARTCLIC APP-1000
- Page 1 Make sure you follow the first time setup instructions This SMARTCLIC® Injection Device is intended to be used for overleaf. This is to ensure you get the best experience self-injection only for Enbrel® from your SMARTCLIC Injection Device. APP-1000 Make sure you have read and understood this User Manual before using your SMARTCLIC Injection Device.
- Page 2 Your SMARTCLIC First Time Setup Injection Device To navigate the menus on your SMARTCLIC Injection Set the date and time before rst use to get the best Device and set it up for the rst time, please experience from your SMARTCLIC Injection Device’s This page is intentionally left blank.
-
Page 3: Table Of Contents
Training to Give an Injection Training Cartridge Information ........18 Holding Your Device ............20 Using Your Training Cartridge........21 Chapter 4 Using your SMARTCLIC Injection Device Giving Your Enbrel Injection........28 Chapter 5 Accessing Menu & Settings Menu Overview..............36 History ................38 Settings ................40 Injection Reminder Alarm ..........46... - Page 4 Instructional Material Chapter 1 Important Information Also refer to the Instructions for Use in your Enbrel Dose Dispenser Cartridge Carton for: Important information about your Cartridge How to inject with your Cartridge Storage and disposal of your Cartridge Enbrel Dose Dispenser Cartridge Instructions for...
-
Page 5: Important Information Intended Purpose
Device display. For details, carefully read the Error DDC. Patients are separately prescribed the DDC by Messages section in Chapter 6. healthcare professionals. Refer to the Enbrel Dose Dispenser Cartridge Instructions for Use for a full set of instructions Getting Started on how to use your Cartridges. -
Page 6: Cautions
The caps may cause choking hazard if swallowed. electromagnetic radiation. Doing so could Dispose of the Enbrel Dose Dispenser Cartridge damage your Device. cap immediately, and replace the Training Cartridge cap rmly in its original position. -
Page 7: Healthcare Professional (Hcp) Information
Advise your patient on the correct disposal methods after use. Enbrel Dose Dispenser Cartridge disposal information can be found in Chapter 2 “Dose Dispenser Cartridge Information”. Device disposal information can be found in Chapter 6 “Electronic Waste Disposal”. -
Page 8: Operating Environment
Operating Environment Storage and Cleaning When operating your Device, please make sure you Follow these storage instructions for your Device at observe the following environmental requirements. all times and when not in use. Keep your Device in its original packaging to limit exposure to dirt, Operating 5 °C to 35 °C dust, liquid and other substances. -
Page 9: Cartridges For Your Device Overview
Before use: After use: The following Cartridges can be used with your Device: Top of Training Cartridge (no medication or needle) Cartridge 25 mg Enbrel Dose Dispenser Cartridge 50 mg Enbrel Dose Dispenser Cartridge Inspection window Training 25 mg 50 mg... -
Page 10: Dose Dispenser Cartridge Information
Dose Dispenser Cartridge Storage Your Dose Dispenser Cartridge contains a single Follow these storage instructions for your Dose dose of Enbrel and must only be used with your Dispenser Cartridge at all times and when not in use. Device. Store your Cartridges in the refrigerator Only use Enbrel after you have received training between 2 °C to 8 °C (36 °F to 46 °F). -
Page 11: Training To Give An Injection
Dose Dispenser Cartridge Information Disposal Your Cartridges are for single use. Do not reuse your Cartridge with the needle cap removed or Chapter 3 your used Cartridge. Dispose of them straight away Training to Give an Injection in a suitable sharps container as instructed by your healthcare professional or pharmacist and in accordance with local health and safety laws. -
Page 12: Training Cartridge Information
Training Cartridge conditions. before you use your Enbrel Dose Dispenser Do not put your Training Cartridge in Cartridge. Do not perform the injection until the refrigerator or freezer. -
Page 13: Holding Your Device
Holding Your Device Using Your Training Cartridge Below are recommended ways of holding your Also refer to the Enbrel Dose Dispenser Device while performing an injection. Cartridge Instructions for Use. You must make sure you can see the Display. 1 Check Training Cartridge... - Page 14 Using Your Training Cartridge Using Your Training Cartridge 3 Choose and clean injection site 5 Turn on Device Always choose Push your Training Outer area of upper an area in your Cartridge rmly arms abdomen, upper straight through the Caregiver thighs or the outer Cartridge door without only...
- Page 15 Using Your Training Cartridge Using Your Training Cartridge 7 Place on skin 10 Lift off skin Place Lift & hold your Device your with the blue arrow Device away from pointing at 90 your skin. Your Device degrees towards your will display that your injection site.
-
Page 16: Using Your Smartclic Injection Device
Chapter 4 This page is intentionally left blank. Using your SMARTCLIC Injection Device... -
Page 17: Giving Your Enbrel Injection
Giving Your Enbrel Injection Giving Your Enbrel Injection Also refer to the Enbrel Dose Dispenser Check Cartridge and needle cap Cartridge Instructions for Use. Check the expiration These Instructions for Use apply for both the Dose date and medication 50 mg / 1 ml on label 25 mg and 50 mg dose Cartridges. - Page 18 Giving Your Enbrel Injection Giving Your Enbrel Injection Choose and clean injection site Turn on Device Always choose Push your Cartridge Outer area rmly straight an area in your of upper arms abdomen, upper through the Cartridge Caregiver thighs or the outer...
- Page 19 Giving Your Enbrel Injection Giving Your Enbrel Injection Injecting... Place on skin Place Hold your Device your Device with the blue arrow against your skin and wait while pointing at 90 your medication is degrees towards your injection site. injected.
-
Page 20: Accessing Menu & Settings
Giving Your Enbrel Injection Remove Cartridge Pull your Cartridge Chapter 5 straight out after your Device has partially Accessing Menu & Settings ejected it. Check your Cartridge is empty of medicine with a grey bar visible in the inspection window. If not, you may not have received your full dose. -
Page 21: Menu Overview
Menu Overview Menu Overview Turn Device On To Access Menus Available Menu Options: History ..................38 Turn on your Device Turn on your Device History Calendar............38 LCD Display History Detail..............39 Settings ..................40 Injection Speed.............40 Device Sound ..............41 Display Brightness ............42 Hold down the Injection button to turn on your Device Date &... -
Page 22: History
History History History Detail Select History to view information about your injection history. You can view your injection history as a calender or in a detailed text format. History Calendar Select Detail to view your injection history in a text format. Use the Menu up and Menu down buttons to scroll through your injection history. -
Page 23: Settings
Settings Settings Injection Speed Device Sound Select Sound to adjust the volume of the sounds your Device makes. Use the Menu up and Menu down buttons to scroll through the available Sound volume levels: High (initial setting) Select Speed to adjust the speed of your injection. - Page 24 Settings Settings Display Brightness Device Date & Time Select Brightness to adjust the brightness of the Display. Use the Menu up and Menu down buttons to scroll through the available Brightness levels: High Low (initial setting) Select the Brightness level for the Display with a short press of the Injection button.
- Page 25 Settings Settings Device Date Format Device Language Select Language to change the language displayed on your Device. Use the Menu up and Menu down buttons to scroll through the available languages. Select the Language for your Device with a short press of the Injection button.
-
Page 26: Injection Reminder Alarm
Injection Reminder Alarm Connect App Scan the QR code to learn more about the App for this Device and how to download it to your Phone or tablet. Your Device can only be connected to a phone or tablet that has the App. Connection to the App allows you to send your injection data so you can: Record and track your injection history. -
Page 27: Connect App
Connect App Connect App Sync With App Options No Smart Device Smart Device Connected Connected No Smart Device Smart Device Connected Connected Select Options to automatically transfer your Select Sync with App to transfer your injection injection information to your smart device after information to your smart device. - Page 28 Connect App Connect App Setup Setup Pair Device Forget No Smart Device Smart Device Replace Paired Pair Smart Connected Connected Smart Device Device Select Forget to disconnect your Device and smart device. If there is no smart device paired, your Device will tell you there is no smart device connected.
-
Page 29: Device Information
Connect App Device Information Troubleshooting How do I pair my phone or tablet? You will need to add a smart device. See Pair Device on page 50. How do I check if I have a paired phone or tablet? Select Forget to see if you have paired any smart devices. -
Page 30: Power O Device
Power o Device Chapter 6 Error Messages & Miscellaneous Items Select Power o from the menu options to turn your Device o . Use a short press of the Injection button to Power o your Device. -
Page 31: Error Messages
Error Messages Error Messages Indicates a risk of injury or infectious disease, Error Meaning: Action: or damage or malfunction of your Device or message: Cartridge. Please refer to the Meaning and Your Device is Contact your Action in the table. unable to eject healthcare Indicates when normal operation is not... - Page 32 Error Messages Error Messages Error Error Meaning: Action: Meaning: Action: message: message: Set the pairing again. Your Device has Click “OK” and turn communication failed to detect o the power, then If the error function has not your Cartridge. turn it on again. reappears, contact been operated your healthcare...
- Page 33 Error Messages Error Messages Error Error Meaning: Action: Meaning: Action: message: message: The inserted By clicking “OK” or An error has Your Device will Cartridge is waiting 30 seconds, occurred with eject your Cartridge. unusable. your Device will eject your Device Dispose of it right your Cartridge.
-
Page 34: Troubleshooting
Eject your Cartridge if it is inserted in your Device. potential negative e ects on human health Dispose of your Enbrel Dose and the environment which could otherwise Dispenser Cartridge. arise from inappropriate waste handling. Please... -
Page 35: Technical Information
Electronic Waste Disposal Technical Information Speci cations Information on Disposal for Users of Waste Batteries (private households) Internal power device: This device uses lithium battery. In order to 3 VDC Lithium battery Power source (included protect valuable natural resources and to 1,2-dimethoxyethane in prevent adverse e ects on human health and the this battery) - Page 36 Technical Information Technical Information Symbols Symbols Symbol Description Symbol Description SMARTCLIC Injection Device complies with requirements for the BF type Injection button applied part according to IEC 60601-1. The applied part refers to the entire device. Menu up button Consult operating instructions for use Menu down button European commission Directive 2012/19/EU related to the disposal...
- Page 37 Technical Information Technical Information Font Used For LCD Display person obtaining a copy of the Font Software, to use, study, copy, merge, embed, modify, redistribute, and sell modi ed and unmodi ed copies of the Font This Font Software is licensed under the SIL Open Font Software, subject to the following conditions: License, Version 1.1.
- Page 38 Technical Information Technical Information BSD 2-Clause License EMC Relevant Information Copyright © 2014, Kenneth MacKay. All rights SMARTCLIC Injection Device is intended for use in the home healthcare environment and has reserved. been con rmed to conform to IEC 60601-1-2:2014 “Medical electrical equipment - Part 1-2: General requirements for basic safety and essential Redistribution and use in source and binary forms,...
- Page 39 Technical Information Technical Information WARNING: Portable RF communications equipment WARNING: Use of this equipment adjacent to or (including peripherals such as antenna cables and stacked with other equipment should be avoided external antennas) should be used no closer than because it could result in improper operation. 30 cm (12 inches) to any part of your SMARTCLIC If such use is necessary, this equipment and the Injection Device.
-
Page 40: Manufacturer Information
Manufacturer Information PHC Corporation 2131-1 Minamigata, Toon, Ehime 791-0395, Japan Web: https://www.phchd.com/global/ Sponsor: P zer Australia Pty Ltd Level 17 151 Clarence Street, Sydney, NSW, 2000 Australia Original Instructions © PHC Corporation 2021...
Need help?
Do you have a question about the SMARTCLIC APP-1000 and is the answer not in the manual?
Questions and answers