
Related Manuals for GYM form SLIM FOLD

Summary of Contents for GYM form SLIM FOLD
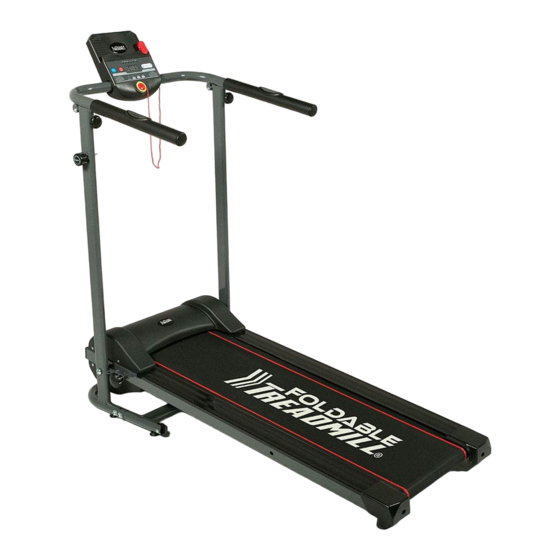
- Page 1 SLIM FOLD TREADMILL International patents pending. All imitations will be prosecuted. GYMFORM ® SLIM FOLD TREADMILL is a registered EU/CTM trade mark.
- Page 7 English Warnings any fitness program, especially in - The device makes more noise Important: Keep these case of high blood pressure, high when bearing a load than when instructions for future reference. cholesterol levels, heart disease, load free. Read all instructions in the a family history of any of the - The treadmill should not be documentation...
-
Page 8: Installing The Handlebars
4. Treadmill any other symptoms. running on the treadmill. Press the 5. Vertical bar screw - If you have not done exercise for ON/OFF button and the treadmill 6. Handlebars will gradually stop. a long time or if you have a heart 7. -
Page 9: Installing The Control Panel
speed is 6 km/h. changed on a programme, it is increased vertical bars (17) and attach them with 7. Press the ↓ button (12) to reduce the two screws (24) and nuts (25). Tighten or reduced proportionately. them with the small Allen key (15) and speed. In programme P1, the speed is set and spanner (27). Ensure that they are firmly 8. - Page 10 attaching the base extension (19). treadmill lubricant underneath heavy objects on top of it and do not 6. Slowly lower the base (3) until it is on treadmill belt by lifting the belt away wrap it around the device . Do not use the floor.
- Page 11 This warranty does not cover damages resulting from inadequate use, negligent commercial use, abnormal wear and tear, accidents or improper handling. Australia & New Zealand only This product has the benefit of certain Consumer Guarantees. These prescribed by the Australian Consumer Law &...
- Page 12 Español Advertencias se utilice. - No salte sobre el dispositivo, Importante: Guarde estas - Recomendamos que todos los puede dañar la máquina. - Para evitar riesgos, si el cable instrucciones para que le sirvan usuarios acuden a un médico como referencia en el futuro. para que lleve a cabo un examen de alimentación está...
- Page 13 que los agujeros de ventilación no la máquina. 1m = 3,28 feet están cubiertos. - No utilice el dispositivo si su - Antes de comenzar a usar la peso excede 110 kg. máquina, tiene que hacer algunos - El dispositivo ha sido diseñado ejercicios calentamiento.
- Page 14 12- Botón ↓ colocarlo en la posición correcta y fíjelo (PULSE). Si el indicador muestra la función 13- Botón ↑ mediante la tuerca del panel (8) SCAN, la pantalla mostrará la información 14- Indicadores de función (velocidad, tiempo, distancia y calorías) 15- Llave Allen pequeña IMPORTANTE: cada 5 segundos sin tener que presionar 16- Ruedas...
- Page 15 En el programa 2 se puede reducir la Sistema para plegar la máquina (Ver Centrado de la cinta: fig.4) velocidad prestablecida en cada momento IMPORTANTE: Debido a un uso continuo en un hasta 1.0 km/h pero no se puede 1- Desenrosque la tuerca de bloqueo (7). y a la presión ejercida inconscientemente aumentar 2- Suba la base en posición vertical y...
- Page 16 sin tirar del cable. No coloque peso sobre garantía contra defectos de fabricación el cable, no lo enrolle en el dispositivo para sujeta a los evitar su ruptura, no use el dispositivo si plazos de tiempo estipulados por la el cable o el enchufe hacen una buena legislación vigente en cada país.
- Page 17 Français Avertissements - Ne laissez jamais l’appareil sans une utilisation indue de l’appareil. Important conservez surveillance lorsqu’il est branché. - Ne tirez jamais sur le câble. instructions pour pouvoir les Débranchez-le source - Ne sautez pas sur l’appareil ; consulter ultérieurement. d’alimentation lorsqu’il n’est pas vous risqueriez de l’endommager.
- Page 18 orifices de ventilation ne sont pas - Les enfants doivent toujours être obstrués. surveillés pour s’assurer qu’ils ne jouent pas avec l’appareil. - Faites quelques exercices d’échauffement avant - N’utilisez pas l’appareil si vous commencer à utiliser l’appareil. pesez plus de 110 kg. Commencez exercices - Cet appareil est conçu pour un...
- Page 19 toujours que la base (3) est bien fixée aux 15- Petite clé Allen appuyer sur le bouton. 16- Roues tubes verticaux (17). Pour cela, utilisez la 9. Pour déterminer votre rythme molette de verrouillage (7) (voir fig. 3). 17- Tubes verticaux cardiaque, sélectionnez l’option PULSE 18- Base métallique sur le panneau de commande, posez une 19- Rallonge de la base Mode d’emploi : main sur chacun des deux capteurs de...
- Page 20 Dans le programme P3, vous pouvez à tout 3- Fixez la base (3) et les tubes verticaux inconsciemment par les jambes, le tapis moment réduire la vitesse prédéfinie de 1 (17) à l’aide de la molette du tube vertical peut se décaler d’un côté. Le cas échéant, km/h, mais ne pouvez pas l’augmenter.
- Page 21 poids sur le câble et ne l’enroulez pas Garantie : autour de l’appareil ; vous risqueriez de Ce produit est couvert par une garantie l’endommager. N’utilisez pas l’appareil si contre les défauts de fabrication, dont la le courant ne passe pas convenablement durée dépend de la législation en vigueur dans le câble ou la fiche.
- Page 22 Deutsch Warnhinweise Nichtbenutzung vom Netzteil. technischen Kundendienst oder Wichtig: Bewahren diese - Wir empfehlen allen Benutzern, vor qualifizierten Fachkräften ersetzt Gebrauchsanweisung zur späteren dem Start eines Fitnessprogramms werden, um jegliche Gefahr zu Verwendung auf. beim Arzt eine vollständige vermeiden. Lesen Sie vor der Montage körperliche Untersuchung - WARNHINWEIS! Das System...
- Page 23 kg beträgt. - Führen Sie vor der Benutzung des - Das Gerät wurde für Geräts Aufwärmübungen durch. Starten Sie das Training langsam Einzelnutzung konzipiert. Schäden und steigern Sie die Intensität durch eine unangemessene schrittweise. Nutzung sind von der Garantie - Die Maschine darf pro Sitzung nur ausgeschlossen.
- Page 24 14- Funktionsanzeigen ANBRINGUNG DER KONSOLE (siehe Abb. auf dem Display angezeigt. Bei jedem Betätigen des Knopfs wechselt die Anzeige 15- Kleiner Inbusschlüssel 10. Das Bedienfeld (1) anheben, um es in die und zeigt jeweils Geschwindigkeit (SPEED), 16- Rollen korrekte Position zu bringen. Dann mit der 17- Senkrechte Rohre Zeit (TIME), Entfernung (DIST), verbrannte Bedienfeldmutter (8) fixieren.
- Page 25 oder erhöhen. Verändert das Programm die 5. Vor dem Befestigen der Sockelerweiterung Schmutzansammlungen verhindern. (19) Metallsockel (18) Achten Sie vor dem Start auf sauberes Geschwindigkeit automatisch, erfolgt die eingesteckten Schutzteile aus Kunststoff Schuhwerk. Zum Reinigen des Bandes Erhöhung bzw. Verringerung entsprechend. entfernen. Seife und ein feuchtes Tuch verwenden. Im Programm P1 kann der Benutzer, Keine Lösungsmittel verwenden.
- Page 26 (15) zunächst die linke Schraube und dann die ENTSORGUNG rechte Schraube um eine Vierteldrehung im Das Symbol eines auf Rollen stehenden Uhrzeigersinn anziehen. Den Hauptschalter Containers, durchgestrichen erneut einschalten und das Band mit einer ist, bedeutet, dass Sie sich über die Geschwindigkeit von 6 km/h laufen lassen. geltenden Bestimmungen zur örtlichen Auf dem Band laufen.
- Page 27 Italiano Avvertenze dalla fonte di alimentazione danneggiato questo dovrà essere Importante: Conservare queste quando non è in uso. sostituito dal produttore, da un centro di assistenza tecnica istruzioni per future consultazioni. - Prima di iniziare qualsiasi Prima installare questo programma fitness, autorizzato personale...
- Page 28 - Prima di iniziare a usare - Non utilizzare il dispositivo se il l’apparecchio, è necessario fare proprio peso supera i 110 kg. alcuni esercizi di riscaldamento. - Questo dispositivo è stato Iniziare gli esercizi lentamente progettato per l’uso individuale. aumentare gradualmente Qualsiasi...
- Page 29 IMPORTANTE: 15- Chiave Allen piccola premere alcun tasto. 11. Prima di utilizzare il tapis roulant, 16- Ruote 9. Per conoscere la propria frequenza assicurarsi che la base (3) sia ben fissata 17- Tubi verticali cardiaca, scegliere l’opzione PULSE ai tubi verticali (17). A tal fine, stringere il 18- Base in metallo sul panello di controllo, posizionare e dado di bloccaggio (7). (Vedi fig. 3) 19- Prolunga base premere con le mani su ciascuno dei...
- Page 30 4- Rimuovere i 2 dadi del manubrio motivo, sarà necessario tornare a km/h, ma non può essere aumentata. (26). centrarlo, stringendo le viti del nastro Nel programma P3 è possibile sempre (29) con la chiave Allen piccola fornita ridurre la velocità preimpostata di 1 5- Sollevare il manubrio (6) in modo in dotazione (15), vedi fig. 5: km/h, ma non può...
- Page 31 se il cavo o la spina non si collegano Garantia de qualidade: correttamente. Este produto está coberto por uma NOTA: Il nastro non deve essere troppo garantia contra defeitos de fabrico teso, in quanto, essendo l’apparecchio sujeita aos prazos estipulados pela in funzione, potrebbe danneggiarlo e legislação em vigor em cada país.
- Page 32 Português Advertências a ser utilizado. alimentação estiver danificado Importante: Guarde estas - Recomendamos todos deverá ser substituído pelo instruções para consulta futura. os utilizadores consultem um fabricante, pelo serviço técnico Leia todas as instruções na médico para que faça um exame autorizado pessoal documentação entregue com...
- Page 33 a máquina, deve fazer alguns que qualquer avaria ocasionada exercícios aquecimento. por uma utilização inadequada Inicie os exercícios lentamente não estará coberta de garantia. aumente intensidade - Certifique-se de que o aparelho gradualmente. está numa superfície plana. Não - A máquina apenas poderá ser utilize roupa muito larga durante utilizada por uma pessoa em a utilização para evitar fricções...
- Page 34 14- Indicadores de função 10. Levante o painel de controlo (1) para o para visualizar a velocidade (SPEED), o colocar na posição correta e fixe-o com a porca 15- Chave Allen pequena tempo (TIME), a distância (DIST), as calorias 16- Rodas do painel (8). queimadas (CAL) e o pulso (PULSE). Se o 17- Tubos verticais indicador mostrar a função SCAN, o ecrã...
- Page 35 bem fixada. pode aumentar ou diminuir a velocidade 1,0 km/h. Centrar a passadeira: Sistema para dobrar a máquina (ver fig. 4) No programa P2 é possível diminuir a IMPORTANTE: Devido a uma utilização velocidade predefinida em cada momento em 1- Desenrosque a porca de bloqueio (7). contínua e à...
- Page 36 a rutura. Não utilize o aparelho se o cabo ou a Garantia de qualidade: ficha elétrica não fizerem uma boa conexão. Este produto está coberto por uma NOTA: A passadeira não deve estar demasiado garantia contra defeitos de fabrico sujeita tensa, pois, se o aparelho estiver a funcionar, aos prazos estipulados pela legislação pode ficar danificado e fazer ruído.
- Page 37 Nederlands Waarschuwingen komen zonder toezicht van een verantwoordelijk voor schade Belangrijk: bewaar deze volwassene. veroorzaakt door een verkeerd instructies voor toekomstig - Laat toestel nooit gebruik van het toestel. gebruik. onbeheerd achter als het op het - Trek nooit aan het netsnoer. stroomnet is aangesloten.
- Page 38 stroomnet voordat u met het kinderen om er zeker van te zijn schoonmaken begint. dat ze niet met het toestel spelen. - Gebruik het toestel niet als u - Als u het toestel op een vloerkleed gebruikt, zorg er dan meer dan 110 kg weegt.
- Page 39 13- Toets ↑ in de juiste stand te brengen en zet het calorieën (CAL) en de hartslag (PULSE) 14- Functie-indicatoren vast met de draaiknop van het paneel (8). weergegeven. Als de indicator op de 15- Kleine inbussleutel SCAN-functie staat, geeft het scherm 16- Wielen BELANGRIJK: om de 5 seconden achtereenvolgens de...
- Page 40 en wordt deze automatisch toegewezen, 6- Laat het onderstel (3) langzaam zakken • De loopband is in de fabriek gesmeerd maar de gebruiker kan de snelheid met tot het op de grond ligt. met een antistatisch smeermiddel. 1,0 km/u verhogen of verlagen. 7- Draai de vergrendelknop (7) aan tot •...
- Page 41 - Als het toestel voor langere tijd niet wordt bevatten gevaarlijke stoffen die een gebruikt, bewaar het dan op een schone, zeer schadelijk effect op het milieu of droge plaats en vermijd blootstelling aan de volksgezondheid hebben en dienen stof. op een passende wijze gerecycleerd te - Raak de aan/uit-schakelaar of het worden.
- Page 44 Distributed in UK by Best Direct (International) Ltd SUITES 17 & 18, RIVERSIDE HOUSE LOWER SOUTHEND ROAD WICKFORD, ESSEX SS11 8BB UK...
Need help?
Do you have a question about the SLIM FOLD and is the answer not in the manual?
Questions and answers