Table of Contents
Advertisement
Quick Links
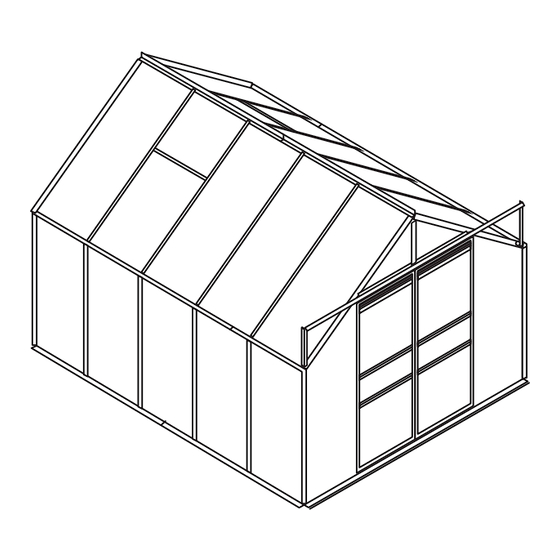
8' x 10' GREENHOUSE
Visit our website at: http://www.harborfreight.com
Read this material before using this product.
Failure to do so can result in serious injury.
SaVe thiS manual.
©
Copyright
2006 by Harbor Freight Tools
any artwork contained herein may be reproduced in any shape or form without the
express written consent of Harbor Freight Tools. Diagrams within this manual may
not be drawn proportionally. Due to continuing improvements, actual product may
differ slightly from the product described herein. Tools required for assembly and
service may not be included.
For technical questions or replacement parts, please call 1-800-444-3353.
Revised manual 10h
WitH tWO VENtS
ASSEmbly iNStRUctiONS
All rights reserved. No portion of this manual or
®
.
93920
Advertisement
Table of Contents

Related Manuals for Harbor Freight Tools 93920


Summary of Contents for Harbor Freight Tools 93920
-
Page 1: Save This Manual
2006 by Harbor Freight Tools any artwork contained herein may be reproduced in any shape or form without the express written consent of Harbor Freight Tools. Diagrams within this manual may not be drawn proportionally. Due to continuing improvements, actual product may differ slightly from the product described herein. -
Page 2: Table Of Contents
If any parts are missing or broken, please call Harbor Freight Tools at the number shown on the cover of this manual as soon as possible. For technical questions, please call 1-800-444-3353. SKU 93920 contents UNPAcKiNG... -
Page 3: Specifications
If there is any doubt, do not attempt to assemble this product. USE EyE PROtEctiON. assembling this product. ANSI-approved safety impact eye goggles are available from Harbor Freight Tools. DO NOt OVERREAcH. tripping, falling, back injury, etcetera. StAy AlERt. - Page 4 Replace or repair damaged or worn parts immediately. REPlAcEmENt PARtS AND AccESSORiES: replacement parts. Only use accessories intended for use with this product. Ap- proved accessories are available from Harbor Freight Tools. mAiNtAiN tHiS PRODUct WitH cARE. better performance. mAiNtENANcE: For your safety, service and maintenance should be performed regularly by a qualified technician.
-
Page 5: Base Assembly
(not provided). The gravel should reach up to about below the lip of the base. For technical questions, please call 1-800-444-3353. SKU 93920 bASE ASSEmbly ” deep. The floor of the hole must be level and square. -
Page 6: Frame Assembly
Attach one Corner Stud (1) on the outside of each corner using two Bolts. As shown above: 1) slide a Hold Down Connector For technical questions, please call 1-800-444-3353. SKU 93920 FRAmE ASSEmbly Front Floor... - Page 7 Attach a Side Ceiling Plate Ass’y (20) flat against the of two Corner Studs (1). Make sure that the gutter on the Side Ceiling Plate is oriented correctly, see Figure A inset. For technical questions, please call 1-800-444-3353. SKU 93920 Figure A inside Page 7...
-
Page 8: Assembling The Roof Frame
Right and Front-Left Crown Beams (2, 3). Attach the Front-Center Top Stud (13) to the center of the Top Doorway Beam (14). For technical questions, please call 1-800-444-3353. SKU 93920 inside of the two Corner Brackets (1) that are over Assembling the Roof Frame... -
Page 9: Assembling The Studs And Braces
Attach the Rear-Left, Rear-Right, and Rear-Center Studs (8, 9, & 10) to the outside of the Rear Floor Plate (16) and Rear Brace (23). Slide a Hold-Down Connector For technical questions, please call 1-800-444-3353. SKU 93920 Figure c Page 9... - Page 10 Make the bottom connections using a Long Bolt (60) for later assembly of the Front Diagonal Braces (24). Slide a Hold-Down Connector (44) under the base and over For technical questions, please call 1-800-444-3353. SKU 93920 left Doorway Stud (6)
- Page 11 Place the Gutter End Caps (69) onto the ends of the Side Ceiling Plates (20a, 20b) oriented with a gap in the bottom to allow water to drain out of the gutters. For technical questions, please call 1-800-444-3353. SKU 93920 Page 11...
-
Page 12: Assembling The Roof Studs And Braces
Window Support Beam (36). At this time, verify that the Door Rail (28) is oriented correctly, with the rounded edge facing up – see number 4 on page 7. For technical questions, please call 1-800-444-3353. SKU 93920 11*^ 11*^ Figure D... -
Page 13: Assembling The Window
Attach an Inner Door Frame (27b) to the other side of the Center Door Frames (31) in the same way. For technical questions, please call 1-800-444-3353. SKU 93920 Assembling the Window Assembling the Doors 15a/ down. - Page 14 Door Rail (28) to prevent the doors from sliding off the rails. Attach the Right and Left Rail End Caps (70,71) onto the ends of the Door Rails. For technical questions, please call 1-800-444-3353. SKU 93920 PANE Side view...
-
Page 15: Installing The Transparent Panels
Swing the center portion of the Clip up against the panel. Two edges of the Clip swing under the edge of the panel and the center edge holds the panel in place. For technical questions, please call 1-800-444-3353. SKU 93920 15a/15b Page 15... -
Page 16: Panel Installation Diagram
For technical questions, please call 1-800-444-3353. SKU 93920 Panel installation Diagram # = Panel clip (67) location Page 16... -
Page 17: Inspection, Maintenance, And Cleaning
ALL RISK AND LIABILITY ARISING OUT OF HIS OR HER REPAIRS TO THE ORIGINAL PRODUCT OR REPLACEMENT PARTS THERETO, OR ARISING OUT OF HIS OR HER INSTALLATION OF RE- PLACEMENT PARTS THERETO. For technical questions, please call 1-800-444-3353. SKU 93920 inspect the general condition of the Greenhouse. Check for Page 17... -
Page 18: Parts List
7’ 9” Side Floor Plate A 4’ 10” Side Floor Plate B 5’ 2” Door Slide 1’ 2” Support For technical questions, please call 1-800-444-3353. SKU 93920 PARtS liSt Q’ty PARt 4’ 4’ DEScRiPtiON Side Ceiling Plate 2’ 10” Side Ceiling Plate 7’... - Page 19 1’ 11” x Front Top Panel 1’ 4” Note: Some parts are listed and shown for illustration purposes only and are not available individually as replacement parts. For technical questions, please call 1-800-444-3353. SKU 93920 PARtS liSt (continued) Q’ty PARt 8’ 8’...
Need help?
Do you have a question about the 93920 and is the answer not in the manual?
Questions and answers