Chapters
Table of Contents

Summary of Contents for Falcon Inrico T368
- Page 1 T368 USER GUIDE MANUAL DEL USUARIO Lea atentamente este manual de instrucciones antes de su uso Please read this instruction book carefully before using and keep this with care. www.inricosolutions.com...
- Page 2 Eliminación de residuos. Directiva 2012/19/UE Información sobre eliminación de residuos de equipos eléctricos y electrónicos (WEEE). Este símbolo en el producto significa que los productos eléctricos y electrónicos utilizados no deben mezclarse con residuos domésticos. Para un tratamiento, recu- peración y reciclado adecuados, lleve este producto a puntos de recogida designados donde se aceptará...
-
Page 3: Table Of Contents
CONTENIDO Desembalaje y verificación ............. 4 Precauciones ................5 Cuidado de la batería ............. 6 Cargue completamente la batería antes del uso inicial ..... 6 Almacene adecuadamente las baterías ........6 Características de la batería de litio ......... 6 Carga de la batería de litio ............6 Descripción general de la radio .......... -
Page 4: Desembalaje Y Verificación
Desembalaje y verificación Desempaque y saque el dispositivo y todos los accesorios. con cuidado y asegúrese de haber obtenido todas las listas antes de desechar la caja de cartón. Si falta algún artículo o se ha dañado durante el transporte, comuníquese con nuestros distribuidores. -
Page 5: Precauciones
Precauciones • No sobrecargue la batería Deje de cargar si no se puede cargar por completo dentro del tiempo requerido. Es probable que la batería se sobre- caliente, eche humo, explote o se incendie repentinamente debido a un proceso de carga anormal. •... -
Page 6: Cuidado De La Batería
Cuidado de la batería • Cargue completamente la batería antes del uso inicial A. Conserve la vida útil de la batería apagando el dispositivo y quitando las baterías cuando no se esté utilizando y no se espera que se utilice durante períodos prolongados. B. -
Page 7: Descripción General De La Radio
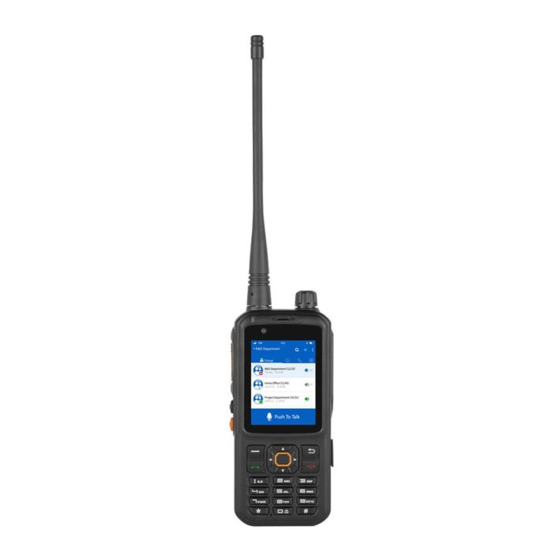
Descripción general de la radio Botón PTT 12 Micrófono Reproductor de voz 13 Antena Conmutador PoC / DMR 14 Conector auricular Indicador 15 Rosca conector M6 Mando volumen 16 Conexión USB Receptor 17 Clip cinturón Cámara frontal 18 Pasador cinta colgar Display 19 Micro cancelador ruido Menu / OK... - Page 8 PTT: presione el botón PTT para transmitir; suelte para recibir. Botón lateral F1: presione brevemente para reproducir la grabación. Botón lateral F2: mantenga presionado durante 3 segundos para SOS, presione PTT para salir. Presione brevemente para cambiar entre el modo DMR y el modo PoC. Mando de volumen: Gire el mando de control de volumen en el sentido de las agujas del reloj para aumentar el volumen.
-
Page 9: Instalación De Accesorios
Instalación de accesorios 1. Insertar tarjeta SIM y MicroSD... - Page 10 2. Montaje de la antena Coloque la antena en el receptáculo y gírela en el sentido de las agujas del reloj hasta que quede ajustada para brindar la mejor protección contra el agua y el polvo. Gire la antena en sentido antihorario para quitarla.
- Page 11 3. Montaje del clip cinturón Alinee los orificios del clip con los de la radio y fíjelos con dos tornillos. Afloje los tornillos para quitar el clip de cinturón. 4. Montaje de la batería Alinee los orificios del clip con los de la radio y fíjelos con dos tornillos.
- Page 12 (d) Cierre la tapa de la batería, cierre el pestillo y presiónelo hasta que encaje en su lugar.
-
Page 13: Carga De La Batería
5. Montaje del auricular Alinee y conecte el conector M del auricular y apriete los tornillos. 6. Carga de la batería Conecte la radio y el cargador según se muestra a continuación... -
Page 14: Funciones Básicas
Funciones básicas 1. Encendido y apagado de la radio • Encendido: mantenga presionado el botón de encendido durante 3 segundos y se pondrá en marcha. • Apagado: mantenga presionado el botón de encendido duran- te 3 segundos. Si el dispositivo se está cargando, los indicado- res estarán en rojo y mostrarán el nivel actual de la batería. - Page 15 (b) Si no puede hablar, confirme si el control de encendido está encendido, lo que se muestra de la siguiente manera: (c) Programe la frecuencia como se muestra a continuación: (d) Cambie el modo DMR y PoC de la siguiente manera (si usa nuestra solución).
-
Page 16: Indicador De Estado
(e) Actualización del modo DMR, siga los pasos a continuación: Indicador estado LED indicador Estado Comentario Potencia inferior Intermitente 3 s. Rojo intermitente al 15% Transmitiendo Rojo fijo Se está encendiendo En espera normal Intermitente 5 s. Verde intermitente Recibiendo Verde fijo Totalmente cargado... -
Page 17: Conexión De Red
Conexión a la red 1. Conexión WIFI 2. Conexión Red Móvil Abra “Settings”, toque “SIM cards”, seleccione tarjeta SIM que desee para conectarse. -
Page 18: Gestión De Aplicaciones
Gestión de aplicaciones 1. Instalar aplicaciones Use un PC para transferir el archivo APK al dispositivo si desea instalar la APP. A continuación acceda al administrador de archivos del terminal para instalar. 2. Desinstalar aplicaciones Seleccione ‘Settings’ >> Apps >> Confirme la App a desinstalar >>... -
Page 19: Borrar Datos De La Aplicación O Caché
3. Borrar datos de la aplicación o caché Seleccione ‘Settings’ >> ‘Apps’ >> Confirme la APP >> ‘CLEAR DATA’ y ‘CLEAR CACHE’ 4. Deje de ejecutar la aplicación no sistemática Seleccione ‘Settings’ >> ‘Apps’ >> Confirme la APP >> ‘FORCE STOP’... - Page 20 Problema Soluciones La batería no está bien instalada - Vuelva a instalar la batería No se pone en La batería está descargada marcha - Cargue o reemplace la batería La batería hace mal contacto por suciedad o daño - Limpie los contactos o reemplace la batería Demasiadas APPs en marcha Terminal colgado - Fuerce el cierre del algunas APPs o reinicie el terminal...
-
Page 21: Especificaciónes
Especificaciones Hardware S.O. Android 7.1 GSM: B2/B3/B5/B8 WCDMA: B1/B2/B5/B8 Frecuencias TDD-LTE: B38/B39/B40/B41 FDD-LTE: B1/B3/B5/B7/B8/B20/B28a/B28b Dual-SIM (microSIM) Soporte red WIFI, BT 4.0, GPS-AGPS MTK6739VAe Memoria 1GB(RAM)+ 8GB(ROM) Tensión 3.8V nominal Display 2.4 “, 240*320 pixels Cámara frontal:2.0MP Cámara Cámara trasera:13.0MP Batería 6000 mAh Frecuencias 440 ~ 470 MHz... - Page 22 DECLARACION UE DE CONFORMIDAD FALCON RADIO & ACCESSORIES SUPPLY, S.L. CIF: B-60565314. C/ Vallespir, nº 13. Polígono Industrial Fontsanta. 08970 San Joan Despí - Barcelona (ESPAÑA). Tel: (+34) 934 579 710 - www.telecomfalcon.com Descripción del producto: Equipo: TERMINAL PORTATIL PoC, GSM, 3G, 4G/LTE Y DMR CON DISPLAY DE 2,4”...
- Page 23 CERTIFICADO DE GARANTÍA FALCON RADIO & A.S., S.L. CIF: B-60565314 C/ Vallespir, nº 13. Polígono Industrial Fontsanta. 08970 Sant Joan Despí. Barcelona (España). Tfno: +34 93 457 97 10. www.telecomfalcon.com Marca del aparato: Modelo: Nº serie: Nombre del comprador: Dirección:...
- Page 25 T368 USER GUIDE Please read this instruction book carefully before using and keep this with care. www.inricosolutions.com...
- Page 26 Waste disposal. Directive 2012/19 / EU nformation on waste disposal of electrical and electronic equipment (WEEE). This symbol on the product means that the electrical and electronic products used must not be mixed with household waste. For proper treatment, recovery and recycling, take this product to designated collection po- ints where it will be accepted for free.
- Page 27 CONTENTS Unpacking and Device Checking ..........4 Handling Precautions .............. 5 Battery Care ................6 Fully Charge Battery Before Initial Use ........6 Properly Store Batteries ............. 6 Features of Lithium Battery ............6 Lithium Battery Charging ............6 Radio Overview ..............7 Accessories Installation ............
-
Page 28: Unpacking And Device Checking
Unpacking and Device Checking Please unbox and take out the device and all accessories carefully, and ensure all lists have been gotten before discarding the cardboard box. If any items are lost or damaged in transit, please contact with our distributors. Items Number Handset... -
Page 29: Handling Precautions
Handling Precautions ※ Do not overcharge the battery Please stop charging if it can’t be fully charge within required time. The battery probably overheats, smokes, bursts or suddenly be on fire due to abnormal charging process. ※ Do not discard battery in a fire, microwave or high pressure container. -
Page 30: Battery Care
Battery Care ※ Fully Charge Battery Before Initial Use a. Do preserve battery life by switching off a device and removing the batteries when it's not being used, and is not expected to be used for extended periods of time. b. -
Page 31: Radio Overview
Radio Overview PTT Button Voice Playback Antenna PoC/DMR Switching Earpiece Jack Indicator M6 Screw Hole Volume Knob USB Interface Receiver Belt Clip Front Camera Hang Rope Display Noise-cancelling MIC Menu/OK Rear Camera Back/Home Flash Light Keypad Battery Lock... - Page 32 PTT: Press the PTT button to transmit; release to receive. Side Button F1: Short press to playback the recording. Side Button F2: Long press for 3 seconds for SOS, press PTT to exit. Short press to switch between DMR mode and PoC mode.
-
Page 33: Accessories Installation
Accessories Installation 1. Insert SIM card and MicroSD... -
Page 34: Attaching The Antenna
2. Attaching the Antenna Set the antenna in the receptacle and turn clockwise until snug to provide best protection against water and dust. Turn the antenna anticlockwise to remove it. (Note: Do not hang key-chain or something else on the antenna, or it'll damage the antenna and affect signal strength.) -
Page 35: Attaching The Belt Clip
3. Attaching the Belt Clip Align the holes on the clip and radios, and fixed with two crews. Loosen the scres to remove the belt clip. 4. Attaching the Battery (a) Take out the battery cover buckle. (b) Align the battery with the rails on the back of the radio. (c) Press the battery firmly, make sure the electrical connection touch with the bottom, and slide upwards until the latch snaps into place. - Page 36 (d) Close the battery cover, flip the latch close and press it until it locks in place.
-
Page 37: Attaching The Earphone
5. Attaching the Earphone Align and connect the M connector earphone, and lock the crews. 6. Charging Connect the radio and charger according to the direction shown as below. -
Page 38: Basic Functions
Basic Functions 1. Powering Up and Powering Off the Radio • Power On: Long press the power button for 3 seconds and the program will start. • Power Off: Long press the power button for 3 seconds. If the device is on charging, indicators will be in red and display the current battery level. - Page 39 (b) If you cannot talk, please confirm if the power control is turned on which has shown as following. (c) Program frequency as below. (d) Switch DMR and PoC mode as following(if use our solution). If it shows non-DMR, press the orange side button to switch to DMR mode.
-
Page 40: Status Indicators
(e) DMR mode upgrading, follow steps as below. Status Indicators LED Indicator Working Status Remark Blinking Red Low power less than 15% Flash 3S/time Radio is transmitting. Solid Red Radio is powering up Normal standby Flash 5S/time Blinking Green Radio is receiving. Solid Green Fully charged... -
Page 41: Network Connecting
Network Connecting 1. WIFI Connecting English 2. Cellular Network Connecting Open “Settings”, tap on ‘SIM cards’, select the slot that you need to connect. -
Page 42: Application Management
Application Management 1. Install Applications Using PC to transfer the APK file to the device if you want to install the APP, access terminal file manager to install. 2. Uninstall Applications Select “Settings” → Apps → Confirm the APP to remove→ UNINSTALL... -
Page 43: Clear Application Data Or Cache
3. Clear Application Data or Cache Select “Settings” → Apps → Confirm the APP required→ FORCE STOP 4. Stop Running Non-systematic APP Select “Settings” → Apps → Confirm the APP required→ FORCE STOP Basic Troubleshooting If your device shows following problem during operating, please check the instruction as below. - Page 44 Problems Solutions The battery maybe incorrectly installed. - Re-attaching the battery. Unable to The battery maybe out of power. Power On - Charge or replace the battery. The battery may be in poor contact due to dirty or damage. - Clean the electrical contact or replace it. Too much APPS on processing.
-
Page 45: Specification
Specifications Hardware S.O. Android 7.1 GSM: B2/B3/B5/B8 WCDMA: B1/B2/B5/B8 Frequencies TDD-LTE: B38/B39/B40/B41 FDD-LTE: B1/B3/B5/B7/B8/B20/B28a/B28b Dual-SIM (microSIM) Network WIFI, BT 4.0, GPS-AGPS support MTK6739VAe Memory 1GB(RAM)+ 8GB(ROM) Working 3.8V Voltage Display 2.4 “, 240*320 pixels Cámara frontal:2.0MP Camera Cámara trasera:13.0MP Battery 6000 mAh Frequencies 440 ~ 470 MHz... -
Page 46: Declaration Of Conformity
EU DECLARATION OF CONFORMITY FALCON RADIO & ACCESSORIES SUPPLY, S.L. ID no.: B-60565314. C/ Vallespir, nº 13. Polígono Industrial Fontsanta. 08970 San Joan Despí - Barcelona (SPAIN). Phone no.: (+34) 934 579 710 - Fax no.: (+34) 934 578 869 - www.telecomfalcon.com... - Page 47 CERTIFICATE OF GUARANTEE FALCON RADIO & A.S., S.L. CIF: B-60565314 C/ Vallespir, nº 13. Polígono Industrial Fontsanta. 08970 Sant Joan Despí. Barcelona (España). Tfno: +34 93 457 97 10. www.telecomfalcon.com Appliance Brand: Model: Serial no: Buyer's name: Address: Seal and dealer’s name:...
Need help?
Do you have a question about the Inrico T368 and is the answer not in the manual?
Questions and answers