Table of Contents
Advertisement
Available languages
Available languages
Quick Links
Advertisement
Table of Contents

Summary of Contents for NEOiD STUDIO 4
- Page 1 S T U D I O 4 MANUAL DE OPERAÇÕES...
- Page 2 NEO i D SELECIONE SEU IDIOMA ELIGE TU IDIOMA I SELECT YOUR LANGUAGE PORTUGUES ESPANOL ENGLISH...
- Page 3 SOBRE NÓS A NEOiD foi criada para resolver um grande problema, onde o custo e benefício sempre foram extremos contrários. Desde o ínicio, nosso time compartilha a dor dos nossos clientes, por isso sempre tentamos trazer tecnologia de qualidade e de baixo custo.
- Page 4 UTILIZANDO O PRODUTO COM SEGURANÇA Antes de utilizar este switcher, leia abaixo os avisos que fornecem informações importantes sobre o funcionamento adequado da unidade. Além disso, para garantir que você tenha uma boa compreensão de cada recurso do seu novo aparelho, leia abaixo o manual.
- Page 5 Não remova tampas, painéis, capas de proteção ou circuitos de acesso com energia aplicada ao aparelho! Desligue a energia e desconecte o cabo de alimentação antes da remoção. A manutenção interna/ajuste do aparelho só deve ser realizada por pessoal qualificado. Desligue a unidade se ocorrer uma anormalidade ou mau funcionamento.
-
Page 6: Visão Geral Do Produto
VISÃO GERAL DO PRODUTO A Studio 4+ é feita de metal micro projetada com um aparelho de vídeo multiformato HDMI/DP de 4 canais que permite troca de vídeo, mixagem de áudio e diferentes efeitos de conversão. Detecção automática de sinal de entrada, saída PGM, compatível com uma maior variedade de equipamentos. - Page 7 INTERFACE ENTRADAS DEFINIÇÕES DA ENTRADA DVI...
- Page 8 ESPECIFICAÇÕES...
-
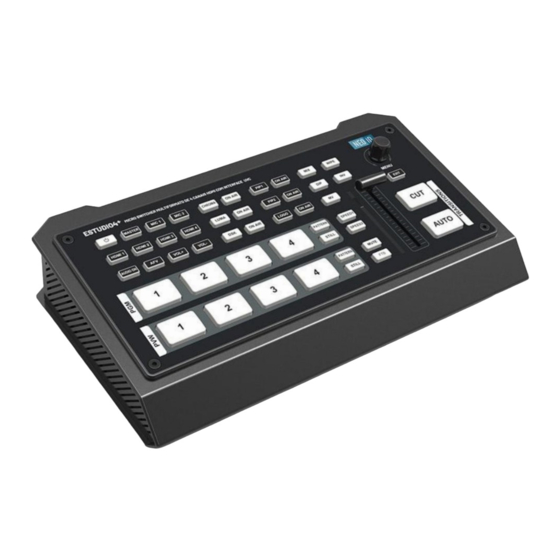
Page 9: Painel De Controle Frontal
PAINEL DE CONTROLE FRONTAL FUNÇÃO DOS BOTÕES... -
Page 10: Instruções De Operação
INSTRUÇÕES DE OPERAÇÃO SAÍDA MULTIVIEW O Multiview inclui PGM (Programa), PVW (Pré-visualização), 4 fontes de sinal HDMI, menu, relógio e exibição de status da tecla Function, Still, UVC e temperatura de trabalho. CAPTURA USB A saída USB de vídeo é baseada no padrão UVC (classe de vídeo USB) e UAC (classe de áudio USB). - Page 11 CONFIGURAÇÕES DO MENU FORMATO PGM E SAÍDA MULTIVIEW O formato de saída PGM do aparelho de vídeo pode ser definido a partir do menu ou do botão F1 (consulte a parte 4). Existem 1080P 50/60/30/25/24Hz,1080I 50/60Hz selecionáveis para saída PGM. A saída Multiview está...
- Page 12 MODO AVF Pressione o botão AFV para ativar o modo "áudio segue vídeo". No modo Follow, o áudio vem do áudio incorporado da fonte do programa de vídeo. Você pode controlar o volume de áudio ajustando o botão VOL- e VOL+. MODO PIP Quando pressionar PIP, haverá...
- Page 13 CONFIGURAÇÃO PRINCIPAL DO MENU...
-
Page 14: Configurações Do Sistema
Quando o menu STATUS não estiver selecionado, pressione o botão MENU para entrar diretamente no Menu Principal. Quando o menu STATUS for selecionado, ajuste o item selecionado para o topo e pressione o botão PARA CIMA para sair e deixar de ser selecionado. -
Page 15: Configurações De Rede
CONFIGURAÇÕES DE REDE Rede Existem dois métodos para adquirir o IP: Dinâmico (IP configurado por roteador) e Estático (Ip definido manualmente). Selecione o método desejado no menu. A configuração padrão é Dinâmica. Dinâmico: Conectando o aparelho de vídeo com um roteador com recursos DHCP, então ele obterá... - Page 16 Conecte o aparelho de vídeo a um PC via porta LAN e baixe um software de definição de tempo do site oficial da NEOID. Abra o software e clique em Digitalizar para pesquisar e conectar o dispositivo, então o tempo do...
- Page 17 S T U D I O 4 MANUAL DEL OPERADOR...
- Page 18 En el pasado, las herramientas que existían para estos propósitos eran costosas o ineficaces y complicadas. El equipo de NEOiD sabía que, junto a nuestros socios y el feedback de nuestros clientes, podíamos crear tecnología de calidad que fuera accesible para todos.
-
Page 19: Advertencias Y Precauciones
UTILIZAR LA UNIDAD DE FORMA SEGURA Antes de usar esta unidad, lea las siguientes advertencias y precauciones que brindan información importante sobre el funcionamiento correcto de la unidad. Además, para asegurarse de que ha adquirido una buena comprensión de todas las características de su nueva unidad, lea el siguiente manual. -
Page 20: Visión General
Desconecte todo antes de mover la unidad. VISIÓN GENERAL El Studio 4 es una carcasa metálica de microdiseño con un conmutador de video multiformato HDMI / DP de 4 canales que permite la conmutación de video, la mezcla de audio y diferentes efectos de conversión. - Page 21 INTERFAZ DEFINICIONES DE ENTRADA DVI...
- Page 22 ESPECIFICACIÓN...
- Page 23 PANEL DE CONTROL DELANTERO FUNCIÓN DE BOTÓN...
-
Page 24: Instrucción De Operación
INSTRUCCIÓN DE OPERACIÓN DISEÑO DE SALIDA DE VISTA MÚLTIPLE La vista múltiple incluye PGM (programa), PVW (vista previa), 4 fuentes de señal HDMI, menú, reloj y visualización de estado de la tecla de función, imagen fija, UVC y temperatura de trabajo. CAPTURA USB La salida USB del conmutador de vídeo se basa en el estándar UVC (clase de vídeo USB) y UAC (clase de audio USB). -
Page 25: Configuración Del Menú
CONFIGURACIÓN DEL MENÚ FORMATO DE SALIDA PGM Y MULTIVISTA El formato de salida PGM del conmutador de video se puede configurar desde el menú o el botón F1 (consulte la parte 4). Hay 1080P 50/60/30/25 / 24Hz, 1080I 50 / 60Hz seleccionables para salidas PGM. - Page 26 MODO AVF Presione el botón AFV para habilitar el modo de seguimiento de audio y video. En el modo Seguir, el audio proviene del audio incrustado de la fuente de video del programa. Puede controlar el volumen de audio ajustando el botón VOL- y VOL + . MODO PIP Cuando presione PIP, aparecerá...
-
Page 27: Configuración Del Menú Principal
CONFIGURACIÓN DEL MENÚ PRINCIPAL... -
Page 28: Ajustes Del Sistema
Cuando el menú ESTADO no está seleccionado, presione el botón MENÚ para ingresar directamente al Menú principal. Cuando se selecciona el menú ESTADO, ajuste el elemento seleccionado en la parte superior y presione el botón ARRIBA para salir y dejar de estar seleccionado. -
Page 29: Configuración De Red
CONFIGURACIÓN DE RED Hay dos métodos para adquirir la IP: dinámica (IP configurada por el enrutador) y estática (configura la IP libremente por ti mismo). Seleccione el método que necesita en el menú. La configuración predeterminada es Dinámica. Dinámica: Al conectar el conmutador de video con un enrutador con funciones DHCP, automáticamente obtendrá... -
Page 30: Información Del Dispositivo
Conecte el conmutador de video a una PC a través del puerto LAN y descargue un software de configuración de tiempo del sitio web oficial de NEOID. Abra el software y haga clic en Escanear para buscar y conectar el dispositivo, luego la hora del reloj se cambiará a la misma... - Page 31 S T U D I O 4 OPERATOR'S MANUAL...
- Page 32 ABOUT US NEOiD was created to solve a big problem, where the cost and benefit have always been opposite extremes. Since the beginning, our team shared the pain of our customers, which is why we always try to bring low-cost but high quality technology.
-
Page 33: Using The Unit Safely
USING THE UNIT SAFELY Before using this unit, please read below warning and precautions which provide important information concerning the proper operation of the unit. Besides, to assure that you have gained a good grasp of every feature of your new unit, read below manual. This manual should be saved and kept on hand for further convenient reference. - Page 34 OVERVIEW The Studio 4 is a micro-designed metal case with a 4-channel HDMI/DP multi-format video Switcher that allows video switching, audio mixing, and different conversion effects. Input signal automatic detection, PGM output can be scaled, compatible with a variety of equipment, more flexible. USB output can be directly connected to a computer.
- Page 35 INTERFACE TALLY PIN DEFINITION...
-
Page 36: Specification
SPECIFICATION... -
Page 37: Front Control Panel
FRONT CONTROL PANEL BUTTON FUNCTION... - Page 38 OPERATION INSTRUCTION MULTIVIEW OUTPUT LAYOUT The Multiview includes PGM (Program), PVW (Preview), 4 HDMI signal sources, menu, clock, and status display of Function key, Still, UVC, and working temperature. USB CAPTURE The video switcher’s USB output is based on UVC (USB video class) and UAC (USB audio class) standard.
-
Page 39: Menu Setting
MENU SETTING PGM AND MULTIVIEW OUT FORMAT The video switcher’s PGM output format can be set from menu or F1 button (refer to part 4). There are 1080P 50/60/30/25/24Hz, 1080I 50/60Hz selectable for PGM outputs. The Multiview output is following PGM at 1080P 50/60Hz format. AUDIO SETTINGS This video switcher is coming with 1 channel L/R analog audio input &... -
Page 40: Pip Mode
MODO AVF Press AFV button to enable the audio-follow-video mode. Under Follow mode the audio is coming from the embedded audio of Program video source. You can control the audio volume by adjusting the button VOL- and VOL+.. PIP MODE When press PIP, there will be a small image display on the top left corner of PVW window as below image. -
Page 41: Main Menu Setting
MAIN MENU SETTING... -
Page 42: System Settings
When STATUS menu is not selected, press the MENU button to enter the Main Menu directly. When the STATUS menu is selected, adjust the selected item to the top, and press UP button to exit and become unselected. Press MENU button to enter the Main Menu. -
Page 43: Network Settings
NETWORK SETTINGS Network There are two methods to acquire the IP: Dynamic (IP configured by router) and Static (set IP freely by yourself). Select the method you need by menu. The default setting is Dynamic. Dynamic: Connecting the video switcher with a router with DHCP features, then it will auto obtain an IP address automatically. -
Page 44: Device Info
TIME SETTING Connect video switcher to a PC via LAN port and download a time setting software from the NEOID official website. Open the software and click Scan to search and connect the device, then the clock time will be...
Need help?
Do you have a question about the STUDIO 4 and is the answer not in the manual?
Questions and answers