Table of Contents
Advertisement
Quick Links
Advertisement
Table of Contents

Summary of Contents for JS Products REDLEG 65313
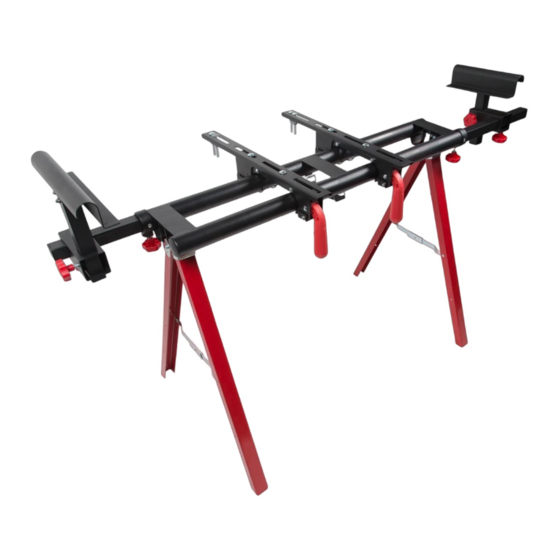
- Page 1 PRODUCT MANUAL 60” MITER SAW WORKSTATION MODEL #65313...
-
Page 2: General Safety Instructions For Power Tools
GENERAL SAFETY INSTRUCTIONS FOR POWER TOOLS 1. Know your power tool. Read and understand the Operator’s Manual and observe the warning and instruction labels affixed to the tool. 2. Keep work area clean and dry. 3. Keep children away. 4. Never leave tools unattended. 5. - Page 3 SAFETY INSTRUCTIONS FOR MITER SAW STANDS 1. Use caution when folding or unfolding legs to limit any finger pinch points. 2. Place stand on a flat or level surface to keep from rocking or tipping. 3. Make sure that Rapid Clamp Tool Mounts are properly locked into place before using your tool. Do not exceed the rated capacity onthe Miter Saw Stand (400 lb).
-
Page 4: Parts List
PARTS LIST Part # Description Miter Saw Stand Rapid Clamp Tool Mount Mounting Rail Material Support and Stop Material Support Receiver M8*35 Knob M8*25 Knob M8*55 Carriage Bolt M8*20 Carriage Bolt M8 Nut M8*60 Carriage Bolt #8 Washer Spring Washer M5*40 Bolt M5 Nut... -
Page 5: Preparing The Stand
ASSEMBLY INSTRUCTIONS Make sure you read and understand all instructiuons before attempting to assemble. Save and keep for future reference. PREPARING THE STAND 1. Lay the stand’s surface down on the floor with the folded legs facing upward. 2. Unfasten the Leg Lock from the main body. 3. - Page 6 ASSEMBLING AND INSTALLING MATERIAL WORK SUPPORTS AND STOPS 1. Place Material Work Support and Stop (Part #4) over the end of the support shaft until the pre-drilled holes are aligned. 2. Slide a M5*40 Bolt (Part #14) through the holes in the Material Work Support and Stop until they extend M5*40 Bolt through the other side.
- Page 7 ASSEMBLING YOUR RAPID CLAMP TOOL MOUNTS Mounting Rail 1. Attach a Mounting Rail (Part #3) to the top of a Rapid Clamp Tool Mount (Part #2) using two M8*20 Carriage Bolts (Part #9), ensuring the bolt heads are up. Only hand tighten at this point. 2.
- Page 8 ATTACHING YOUR MITER SAW OR OTHER BENCH TOP POWER TOOL Various bench top tools can be used with your REDLEG™ 60” Miter Saw Workstation by attaching them to the Rapid Tool Clamp Mounts. Always position the saw to achieve maximum balance and stability.
- Page 9 MOUNTING THE MITER SAW TO THE STAND 1. Lift the saw and tool mount assembly, allowing the assembly to tilt slightly towards your body. 2. While still tilted towards you, hook the front edge of the tool mount assembly onto the front rail of the stand.
- Page 10 TOOL MOUNT ADJUSTMENT SCREW Most tool mounts are designed to fit snugly over the workstation rails. With the locking levers in the lowered (locked) position, you should not be able to remove the saw from the Mounting Beams of your workstation. If your power tool can be removed when the levers are locked, the tool mount adjustment screws on the Rapid Clamp Tool Mounts need to be tightened.
-
Page 11: Transporting And Storing
TO REMOVE SAW FROM STAND 1. Raise the locking levers to unlock the saw and mounts. 2. Unsnap the J-Lock ™ Clips from around the mouting beams to allow your tool to separate from your REDLEG™ 60" Miter Saw Station. 3. - Page 12 LIFETIME LIMITED WARRANT Y JS PRODUCTS | 6445 MONTESSOURI STREET | LAS VEGAS, NV 89113 800.255.7011 | FAX: 775.898.8773...
Need help?
Do you have a question about the REDLEG 65313 and is the answer not in the manual?
Questions and answers