
Summary of Contents for ACS Tech80 SB1391
- Page 1 SB1391 Single-Axis Universal Motion Control Module Hardware and Setup Guide Document part no. TM-01391-000 Document revision no. 1.14...
- Page 2 Document revision no. 1.14 (December 2001) Document part no. TM-01391-000 COPYRIGHT Copyright © 1999 - 2001 ACS-Tech80 Ltd. Changes are periodically made to the information contained in this guide. The changes are published in release notes and will be incorporated into future revisions of this guide. No part of this guide may be reproduced in any form, without permission in writing from ACS-Tech80.
- Page 3 SB1391, supply must be suitably European Approved. 1-13 Dec./00 4.3.1.1.3 Warning added for control supply: If using secondary circuit or DC direct to supply the SB1391, supply must be suitably European Approved. 1-13 Dec./00 4.4.5 Warning added for I/O supply: If using secondary circuit or DC direct to supply the SB1391, supply must be suitably European Approved.
- Page 4 R EC E NT C H AN G E S T O T H I S G UI D E Ver. Date Section Change 1-13 Jan./01 5.3.2 Screen shots updated & new debugger disable function added 1-13 Jan./01 All 16-bit, RS-232, Stand-Alone, and all ACS-Tech80 SB….. 1-13 Feb./01 4.4.6 Maximum PEG delay &...
-
Page 5: Table Of Contents
CO NT E NT S I II CONTENTS FIGURES TABLES PREFACE XIII INTRODUCTION 1.1. ACS-T 80 M BOUT OTION ONTROL ODULES SAFETY AND EMC GUIDELINES 2.1. UL C OMPLIANCE ECTION 2.2. ENERAL AFETY UIDELINES 2.3. (EMC) G ENERAL IRING AND LECTROMAGNETIC OMPATIBILITY UIDELINES... - Page 6 C O NT E NT S 4.2. IRING IAGRAM 4.3. OWER ONNECTORS 4.4. 4-14 ONTROL ONNECTORS 4.5. 4-32 NDICATORS WITCHES ISPLAY OINTS WORKING WITH THE CONTROL UNIT 5.1. ETTING TARTED 5.2. DJUSTING THE 5.3. ACSPL P ACS D 5-45 ROGRAMMING WITH EBUGGER 5.4.
- Page 7 CO NT E NT S VECTOR CONTROL AND MOTORS 8.1. DC B (AC S /AC S ECTOR ONTROL FOR RUSHLESS ERVO YNCHRONOUS 8.2. AC I HEN TO SE AN NDUCTION OTOR WARRANTY INDEX SB 1 39 1 H a rdw ar e a n d Set up G ui de Do cu me n t r ev is io n n o .
- Page 8 FIGURE 2-2 Shielded Cable......................2-4 FIGURE 2-3 Improved Shielding ....................2-5 FIGURE 2-4 Case shielding (top of control module) ..............2-5 FIGURE 4-1 SB1391 mounting dimensions................4-2 FIGURE 4-2 Wiring diagram....................... 4-4 FIGURE 4-3 Wire stripping dimension for terminal block connections ........4-5 FIGURE 4-4 Power supplies and suggested use of line filter............
- Page 9 VI II F IG U R E S FIGURE 4-18 Internal 5Vdc supply connection for encoder and Hall ........4-21 FIGURE 4-19 External 5Vdc supply connection for encoder and Hall ........4-21 FIGURE 4-20 Resolver connection ..................4-23 FIGURE 4-21 Switch connection for temperature protection............4-23 FIGURE 4-22 Jumpers for selecting I/O supply source and for selecting input type ....4-25 FIGURE 4-23 Jumper 12 for digital input-type selection ............4-28 FIGURE 4-24 Input port interface .....................4-29...
- Page 10 FIG U R E S FIGURE 5-23 Amplifier parameters..................5-24 FIGURE 5-24 Selecting the motor type..................5-25 FIGURE 5-25 Motor/feedback parameters................5-26 FIGURE 5-26 Protection parameters ..................5-27 FIGURE 5-27 Feedback verification step.................. 5-29 FIGURE 5-28 Current loop adjustment step................5-30 FIGURE 5-29 Initial current loop profile ..................
- Page 11 FIG UR E S FIGURE 5-58 Opening the Trace window.................5-62 FIGURE 5-59 Trace window .....................5-62 FIGURE 5-60 Program execution and trace messages ..............5-63 FIGURE 5-61 Saving and loading control unit memory contents ..........5-65 FIGURE 5-62 ACS Saver ......................5-66 FIGURE 5-63 ACS Loader ......................5-67 FIGURE 6-1 Control algorithm ....................6-6 FIGURE 6-2 Plant (motor + load) model..................6-7 FIGURE 6-3 Commutation and power amplifier stage..............6-8...
- Page 12 T AB L E S TABLES TABLE 2-1 Topics covered in this chapter ................. 2-1 TABLE 2-2 UL Compliance Label for SB1391 ................2-2 TABLE 2-3 External, user replaceable fuse for Regen Termination Resistor......2-2 TABLE 4-1 Topics covered in this chapter ................. 4-1 TABLE 4-2 Minimum recommended clearances ................
- Page 13 XI I T AB L E S TABLE 4-19 Encoder 2 connection pins ...................4-24 TABLE 4-20 Digital input/output supply selection ..............4-25 TABLE 4-21 Input/output connection pins................4-26 TABLE 4-22 HSSI + PEG connection pins ................4-31 TABLE 4-23 Indicator LEDs..................... 4-33 TABLE 4-24 DIP switches ......................4-34 TABLE 4-25 Current test points ....................4-35 TABLE 5-1 Topics covered in this chapter..................5-1 TABLE 5-2 Resources for more information about topics covered in this chapter .....5-3...
-
Page 14: Preface
XI II PREFACE The SB1391 Hardware and Setup Guide describes how to mount, connect, tune, and operate the SB1391 motion control module. Regarding operation, only an introduction to the ACS-Tech80, programming language, ACSPL, is provided. For a detailed description of ACSPL, refer to the ACSPL Software Guide. - Page 15 3- 6 F E AT U R E S & S P EC IF IC AT IO N S Guide Outline Chapter INTRODUCTION. Introduction to the control module. Chapter 2 SAFETY AND EMC GUIDELINES. Basic precautions and UL requirements. Chapter 3 FEATURES &...
-
Page 16: Introduction
(30A). The bus voltage range is 120Vdc up to 370Vdc (= AC input x 1.41). The SB1391 supports encoder (+ Hall) or resolver (12-bit resolution) as primary feedback and encoder as secondary feedback or master. In addition to dedicated safety inputs, it has eight isolated inputs, eight isolated outputs, an analog input, and an analog output. -
Page 17: Safety And Emc Guidelines
S AF ET Y AN D EM C G UI DE L I N E S 2- 1 2. SAFETY AND EMC GUIDELINES TABLE 2-1 Topics covered in this chapter Topic Description UL® Compliance Section 508c compliance requirements General Electrical Safety Guidelines End-user installed protective devices and safety precautions General wiring and electromagnetic... - Page 18 2- 2 S AF ET Y AN D EM C G U ID E L I NE S TABLE 2-2 UL Compliance Label for SB1391 SB1391 Model Input 85-265Vac 85–265Vac 5-265Vac Voltage (50/60 Hz, 1θ) (50/60 Hz, 1θ) (50/60 Hz, 1θ) 6.54A (rms)
-
Page 19: General Safetyg
S AF ET Y AN D EM C G UI DE L I N E S 2- 3 Section 54.5: Not incorporating over-speed protection Warning Facilities for over-speed protection are not provided in the control unit. Therefore, when facilities for over-speed protection are required for the end- product, they will have to be provided separately by the end-user. -
Page 20: General Wiring Ande
2- 4 S AF ET Y AN D EM C G U ID E L I NE S 2.2.4. Power Supply and Motor Cable Ground The power supply cable and the motor cable must have a ground wire that is connected to the protective earth terminal located on the motor and power connectors. - Page 21 S AF ET Y AN D EM C G UI DE L I N E S 2- 5 2.3.2. Cable Lengths Use short cables as much as possible, and route cables as far from other EMI sources as possible. 2.3.3. Shielding To reduce EMI radiation, do the following: •...
-
Page 22: Features & Specifications
F E AT U R E S & S P E CIF IC AT IO N S 3 - 1 3. FEATURES & SPECIFICATIONS 3.1. Main Features 3.1.1. Fully Programmable Stand-Alone and Host-Interfaced Operation • Easy to program using ACSPL, a powerful high level language common to all ACS-Tech80 SB control modules •... - Page 23 3- 2 F E AT U R E S & S P EC IF IC AT IO N S 3.1.2. Special Features for Demanding Applications 3.1.2.1. Master/Slave This mode is characterized by its following accuracy, superimposed move capability, ability to switch “on-the-fly”...
- Page 24 F E AT U R E S & S P E CIF IC AT IO N S 3 - 3 3.1.5. Comprehensive Safety, Diagnostics, and Protection • Programmable automatic routine for each fault, error, and exception • Real-time data collection of one or two variables, programmable sampling rate up to 1kHz. •...
-
Page 25: Product Specifications
3- 4 F E AT U R E S & S P EC IF IC AT IO N S 3.2. Product Specifications 3.2.1. Position Control 3.2.2. Velocity Control: Sampling Rate: 20kHz Sampling Rate: 20kHz Control Algorithms: Pgain, acceleration Control Algorithm: feed-forward, automatic velocity feed- PI + second order low pass filter forward, anti-reset windup... - Page 26 F E AT U R E S & S P E CIF IC AT IO N S 3 - 5 3.2.5. 3.2.8. Dimensions Safety Inputs: Size: H 272mm x W 106.5mm x D 168mm Left limit, right limit, E-stop (H 10.7” x W 4.2” x D 6.6” General Purpose Inputs: Eight General Purpose Outputs: Eight, 50mA/output, maximum total...
-
Page 27: Mounting And Wiring
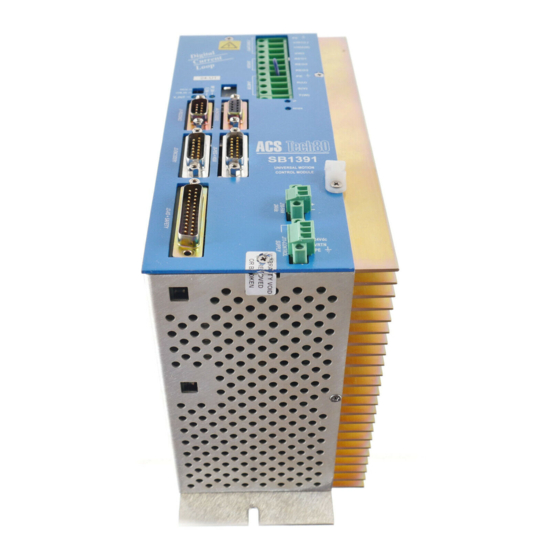
M O UNT ING AN D W I RI NG 4- 1 4. MOUNTING AND WIRING TABLE 4-1 Topics covered in this chapter Topic Description Mounting Mounting guidelines, operating temperatures, front and side view of the control unit, dimensions, and recommended clearances Wiring diagram For quick understanding of the control unit connections Power connections... - Page 28 For information about the fan supply connection, refer to Section 4.3.4, "Fan 24Vdc Connector." FIGURE 4-1 SB1391 mounting dimensions Warning The SB1391 must be enclosed or incorporated into an end-product in accordance with the EN 60204-1 standard (latest version) for electrical shock, environmental (IP), and earthing requirements.
-
Page 29: Wiring Diagram
M O UNT ING AN D W I RI NG 4- 3 TABLE 4-2 Minimum recommended clearances Location Clearance Each side 10 mm (A in FIGURE 4-1) Top and bottom 15 mm (B in FIGURE 4-1). 4.2. Wiring Diagram Note Connection to any other equipment (e.g., for supply, communications, data processing, etc.) must be only to either Class III Type equipment or to equipment that is approved for an applicable Low Voltage Directive standard. - Page 30 M O UNT ING AND W I RI NG FIGURE 4-2 Wiring diagram SB 1 39 1 H a rd w ar e a n d Set up G ui d e Do cu me n t r ev is io n n o . 1. 1 4...
-
Page 31: Power Connectors
M O UNT ING AN D W I RI NG 4- 5 4.3. Power Connectors Warning Do not turn on the power while making connections. Doing so could result in severe bodily injury or damage to the unit. TABLE 4-3 Power connectors Power Connectors Drive Supply Control... - Page 32 DO NOT use 380/400 Vac supply. It will destroy the unit! Warning If the SB1391 is intended to be used with a secondary supply circuit, the supply must be a suitably European Approved power supply. The Drive Supply connector is a terminal block connector (accepts wires directly).
- Page 33 M O UNT ING AN D W I RI NG 4- 7 Therefore standard external breakers are recommended for drive supply. Ratings are in TABLE 4-4. TABLE 4-4 Single-phase drive supply current level Model Input current at Circuit breaker current nominal load [A rating [A SB1391A...
- Page 34 M O UNT ING AND W I RI NG If a single-phase line filter from a different manufacturer is used, it should have a circuit similar to Corcom line filters shown in the following figures. FIGURE 4-5 Electrical schematic of 12A, and 16A line filter for single-phase FIGURE 4-6 Electrical schematic of 25A line filter for single-phase Suitable three-phase line filters available from Corcom...
- Page 35 M O UNT ING AN D W I RI NG 4- 9 FIGURE 4-8 Electrical schematic of 12A and 16A line filter for three-phase 4.3.1.1.2. Drive Supply Fuses There are three internal fuses for drive supply protection and one internal fuse for VP bus circuit protection.
- Page 36 MC 1,5/3-STF-3,5. Warning If the SB1391 is intended to be used with a secondary supply circuit or DC supply, the supply must be a suitably European Approved supply. Use 22 to 18 AWG wire for the Control Supply connector.
- Page 37 M O UNT ING AN D W I RI NG 4- 1 1 Warning It is important to record the motor phase connection order. If the motor or controller is replaced, make the connection in the same order. Otherwise the motor will not function properly and a new commutation setup will be necessary.
- Page 38 4-1 2 M O UNT ING AN D W IR ING FIGURE 4-11 Single-phase (DC brush) motor connection 4.3.3. Regen Connector (J8) The Regen connector is a terminal block connector (accepts wires directly). Use 16 to 14 AWG wire for the Regen connector. TABLE 4-11 Regen Connector Description REG1...
- Page 39 M O UNT ING AN D W I RI NG 4- 1 3 A 26Ω, 600 W external regeneration resistor is available from ACS-Tech80. The part number is SB-SHUNT. FIGURE 4-12 Regeneration resistor - external and internal To connect the external resistor, do the following: ♦...
-
Page 40: Control Connectors
4-1 4 M O UNT ING AN D W IR ING TABLE 4-12 Fuse replacement procedure Step Name Power off the control module. Remove fuse holder (threaded cap located on top of the control module). Remove old fuse from fuse holder. Old fuse can be discarded. Insert new fuse into fuse holder. - Page 41 M O UNT ING AN D W I RI NG 4- 1 5 Use 24 to 20 AWG wire with the control connectors. 4.4.1. RS-232/422 Connector (J1) The serial connector is D-type, 9 pin, male. TABLE 4-14 Serial connector pins Name Description SHIELD...
- Page 42 4-1 6 M O UNT ING AN D W IR ING Control Module RS-422/485 Shield FIGURE 4-14 RS-422/485 connection 4.4.1.1. Partial Communications Shutdown To prevent unauthorized interference with the operation of the controller, turn on the COM_SD DIP switch on the front panel of the control module. Warning For CAN communication, COM_SD must be OFF.
- Page 43 M O UNT ING AN D W I RI NG 4- 1 7 FIGURE 4-15 CAN bus 4.4.2.1. CAN Connection Troubleshooting If a fault occurs with the CAN communication, the CAN indicator lights turns red. Proceed as follows: TABLE 4-16 CAN connection troubleshooting Possible Cause Corrective Action 1.
- Page 44 4-1 8 M O UNT ING AN D W IR ING 4.4.3. Encoder 1 Connector (J2) The Encoder 1+Hall / Resolver connector is D-type, 15 pin, male. Warning Facilities for overspeed protection are not provided in the control unit. Therefore, when facilities for overspeed protection are required for the end- product, they will have to be provided separately by the end-user.
- Page 45 M O UNT ING AN D W I RI NG 4- 1 9 FIGURE 4-16 Encoder interface Each encoder feedback interface (primary and master) accepts three-channel, differential, TTL level signals. The input buffer is built around 26LS32 line receivers. It is recommended to use encoders with built-in line drivers, AM26LS31 or similar. 4.4.3.2.
- Page 46 4-2 0 M O UNT ING AN D W IR ING FIGURE 4-17 Hall sensors connection 4.4.3.3. Supply for Encoder and Hall The encoder and the Hall sensors can be powered by the on-board +5L (5V). The total current consumption must not exceed 0.75A. If the total +5L current consumption (all encoders + Hall) exceeds 0.75A, then an external supply must be used.
- Page 47 M O UNT ING AN D W I RI NG 4- 2 1 FIGURE 4-18 Internal 5Vdc supply connection for encoder and Hall FIGURE 4-19 External 5Vdc supply connection for encoder and Hall SB 1 39 1 H a rdw ar e a n d Set up G ui de Do cu me n t r ev is io n n o .
- Page 48 4-2 2 M O UNT ING AN D W IR ING 4.4.3.4. Resolver Feedback TABLE 4-18 Resolver connection pins Name Description Not used Resolver Cos Resolver Cos L Resolver Sin Resolver Sin L Not used Not used Not used Resolver reference AGND (analog ground) for resolver reference MTMPR A return for temperature sensor.
- Page 49 M O UNT ING AN D W I RI NG 4- 2 3 Resolver / Encoder 1 CosL CosL CosL SinL SinL SinL Agnd Shield Screen Control Resolver Unit FIGURE 4-20 Resolver connection 4.4.3.5. Motor Temperature A normally closed switch should be connected between the MTMP pin 15 and the MTMPR pin 11.
- Page 50 4-2 4 M O UNT ING AN D W IR ING 4.4.4. Encoder 2 Connector (J4) The Encoder 2 connector is D-type, 9-pin, female. Warning Facilities for overspeed protection are not provided in the control unit. Therefore, when facilities for overspeed protection are required for the end- product, they will have to be provided separately by the end-user.
- Page 51 5Vdc (non-isolated). The source of the I/O supply is jumper-configured (see table below). Warning If the SB1391 is intended to be used with a secondary supply circuit or DC supply, the supply must be a suitably European Approved power supply.
- Page 52 4-2 6 M O UNT ING AN D W IR ING Input supply source Output supply source JP5 on JP6 on JP21 JP22 pins pins on pins on pins External 5Vdc/24Vdc 2 -3 1 - 2 2 -3 1 - 2 Internal 5Vdc (non- isolated) Internal 5Vdc (non-...
- Page 53 M O UNT ING AN D W I RI NG 4- 2 7 Name Description A_OUT Analog output, ±10Vdc. Can be programmed to represent XD4 (analog output) (±511) or for monitoring motion variables. For more information see Chapter 6, "Hardware Interface Parameters." AIN- Analog inverted input.
- Page 54 4-2 8 M O UNT ING AN D W IR ING FIGURE 4-23 Jumper 12 for digital input-type selection SB 1 39 1 H a rdw ar e a n d Set up G u i d e Do cu me n t r ev is io n n o . 1. 1 4...
- Page 55 M O UNT ING AN D W I RI NG 4- 2 9 FIGURE 4-24 Input port interface 4.4.5.2. Digital Outputs There are 8 non-dedicated, isolated outputs. An external supply must be connected between the V_SUPPLY and V_RETURN pins. External supply range: 5Vdc (±10%) or 24Vdc (±20%). All the output circuits are protected by an internal automatic fuse.
- Page 56 4-3 0 M O UNT ING AN D W IR ING FIGURE 4-25 Output port interface 4.4.5.3. Analog Input There is one differential analog input, which also acts as joystick input. The voltage range of the analog input is ±10V. The potentiometer output must be connected to AIN1+. AIN1- must be connected to the supply ground pin (FIGURE 4-26).
- Page 57 M O UNT ING AN D W I RI NG 4- 3 1 4.4.6. HSSI + PEG Connector (J5) The optional HSSI + PEG connector is D type, 15 pin, male The PEG option must be specified in the product order. Maximum PEG delay<0.2µsec Minimum Pulse width>100nsec The high-speed serial interface (HSSI) can serve as a general purpose means for adding external...
-
Page 58: Indicators , Switches , D
4-3 2 M O UNT ING AN D W IR ING Pin Name Description S_DATA1- HSSI data 1 input (inverted) X_STA- X status output (inverted) Not connected X_PEG- X PEG output (inverted) Not connected FIGURE 4-27 PEG outputs and corresponding digital outputs 4.5. - Page 59 M O UNT ING AN D W I RI NG 4- 3 3 TABLE 4-23 Indicator LEDs Description and function On: 24Vdc (user-supplied) for the outputs is present. V_OUT Off: 24V is either not connected or the internal automatic fuse is off because of overload.
- Page 60 4-3 4 M O UNT ING AN D W IR ING During control unit startup, the 7-segment display goes on (i.e., displays an "8") for a few seconds to show it is functioning properly and then goes off. For information about programming the 7-segment display, to display system and ACSPL program messages, refer to Chapter 7, "HARDWARE INTERFACE PARAMETERS."...
- Page 61 M O UNT ING AN D W I RI NG 4- 3 5 TABLE 4-25 Current test points Test point A_OUT Analog output with respect to GND. ±10V. Ground for analog input. Phase S current sensing. The scale factor is 8V per Ipeak. Phase T current sensing.
-
Page 62: Working With The Control Unit
W O RK ING W IT H T HE CO NT RO L U NIT 5- 1 5. WORKING WITH THE CONTROL UNIT TABLE 5-1 Topics covered in this chapter Topic Description Getting started Equipment requirements, power on, installing the ACS software tools for Windows Adjusting the unit An overview of using ACS Adjuster to setup and tune the control... - Page 63 W O RK ING W I T H T HE CO NT ROL UN IT Related Action Documentation Setup & tune Install Tools controller Chapter 4, "Working with the Control Unit" Check communication Communication? & settings Chapter 5, "Fine Tuning the Control Loops Update motor New amp...
-
Page 64: Getting Started
W O RK ING W IT H T HE CO NT RO L U NIT 5- 3 TABLE 5-2 Resources for more information about topics covered in this chapter Required information Documentation resource Fine tuning the module's control loops. Chapter 5, "Adjusting the Control Loops"... - Page 65 W O RK ING W I T H T HE CO NT ROL UN IT Warning It is recommended when activating the motor for the first time to disconnect it from external loads and verify that the area is clear of any object that might be hit by the moving motor.
-
Page 66: Adjusting The Unit
W O RK ING W IT H T HE CO NT RO L U NIT 5- 5 Action Effect of action The following ACS software tools will be added to the Insert disk 1 of the ACS Tools program group. Saver/Loader in the PC disk •... - Page 67 W O RK ING W I T H T HE CO NT ROL UN IT Step Description order point to point move. adjustment Polishing Optimize acceleration feed forward and AC induction motor control parameters. Review View all the results of the previous steps. Edit as necessary. Review parameters 5.2.1.
- Page 68 W O RK ING W IT H T HE CO NT RO L U NIT 5- 7 sync with the application database (on the PC). If the control module is shut off during an adjustment session and the data was not saved to the module's nonvolatile memory, that synchronization will be lost and the adjustment session must be repeated.
- Page 69 W O RK ING W I T H T HE CO NT ROL UN IT 5.2.3. Establishing Communication After ACS Adjuster starts up, it attempts to communicate with the control unit. If it succeeds, the Communication parameter in the Adjuster status bar will read ON, as in FIGURE 5-3. Controller Communication Motor...
- Page 70 W O RK ING W IT H T HE CO NT RO L U NIT 5- 9 FIGURE 5-4 "Communication error" message If there is a communications error, verify that the communication parameters are set correctly by doing the following (does not apply for CAN bus): Action Effect of action Clicking Communication on...
- Page 71 5- 1 0 W O R KI NG W IT H T HE C O NT RO L U NIT Action Effect of action If still not successful, then If communication is successful, as indicated in the reopen the Communications status bar, the process is complete.
- Page 72 W O RK ING W IT H T HE CO NT RO L U NIT 5- 1 1 5.2.4. Adding an Amplifier to the Adjuster Database ACS Adjuster maintains two databases, one for amplifiers and one for motors. Adjuster accesses the databases during the adjustment process (for the Amplifier parameters and Motor/feedback parameters steps, which are described later).
- Page 73 5- 1 2 W O R KI NG W IT H T HE C O NT RO L U NIT FIGURE 5-8 "Create a new amplifier database" message Action Effect of action Click OK in the message box This creates a new amplifier database, which includes and save the amplifier database copies of all the ACS-Tech80 amplifier definitions in with a new name.
- Page 74 W O RK ING W IT H T HE CO NT RO L U NIT 5- 1 3 Either use the arrow keys to move the selection . . . click here. point here and then press Enter, or . . . FIGURE 5-10 Opening the amplifier list Action Effect of action...
- Page 75 5- 1 4 W O R KI NG W IT H T HE C O NT RO L U NIT FIGURE 5-11 Amplifier specification (varies by type) Action Edit the fields based on the manufacturer's specifications. The fields displayed depend on the amplifier type.
- Page 76 W O RK ING W IT H T HE CO NT RO L U NIT 5- 1 5 Enable signal External Polarity of amplifier's enable signal amplifier Commutation External Controller - the commutation is done by the control unit. The amplifier control unit generates a two-phase current reference.
- Page 77 5- 1 6 W O R KI NG W IT H T HE C O NT RO L U NIT FIGURE 5-12 Add motor command FIGURE 5-13 "Create a new motor database" message Action Effect of action Click OK in the message box This creates a new motor database and opens the and save the motor database with Motor database (create new item) dialog box...
- Page 78 W O RK ING W IT H T HE CO NT RO L U NIT 5- 1 7 FIGURE 5-14 Add new motor item dialog box Action Effect of action Enter the name of the motor and The new motor record dialog box opens with the new click OK.
- Page 79 5- 1 8 W O R KI NG W IT H T HE C O NT RO L U NIT Action Effect of action Open the Type list by either The list of motor types opens, as shown in FIGURE moving the selection point with 5-16.
- Page 80 W O RK ING W IT H T HE CO NT RO L U NIT 5- 1 9 Action Edit the fields based on the manufacturer's specification. The specific fields depend on the motor type selection. The fields are described in TABLE 5-6. Warning Failure to specify correct values for critical fields such as Nominal current, could result in damage to the motor.
- Page 81 5- 2 0 W O R KI NG W IT H T HE C O NT RO L U NIT Field Motor type Description Peak Maximum current for acceleration/deceleration. Can be derived from Tp/Kt (Tp is peak torque and Kt is torque constant). current Stall current Maximum continuous current allowed during a stall.
- Page 82 W O RK ING W IT H T HE CO NT RO L U NIT 5- 2 1 Field Motor type Description Dual loop When improved velocity and position loop bandwidth is required, two encoders can be used. Dual loop control is described in Section 6.9, "Dual Loop Control."...
- Page 83 5- 2 2 W O R KI NG W IT H T HE C O NT RO L U NIT Action Effect of action From the Adjust menu, select the Adjuster displays a warning that some of the values in axis to adjust, for example, Axis X the control unit RAM may change (FIGURE 5-19).
- Page 84 W O RK ING W IT H T HE CO NT RO L U NIT 5- 2 3 5.2.7. Step 1 - Amplifier FIGURE 5-21 Amplifier parameters step The first adjustment step, defining the amplifier parameters, is similar to adding an amplifier to the database, which was explained in Section 5.2.4, "Adding an Amplifier to the Adjuster Database".
- Page 85 5- 2 4 W O R KI NG W IT H T HE C O NT RO L U NIT Click here to open list. FIGURE 5-22 Selecting the amplifier type Action Effect of action Select an amplifier from the list by The parameters for the selected amplifier are displayed, clicking on it once and pressing as shown in FIGURE 5-23.
- Page 86 W O RK ING W IT H T HE CO NT RO L U NIT 5- 2 5 Action Effect of action The Amplifier parameters dialog box closes. Click the OK button Warning Failure to select the amplifier parameters correctly can result in damage to the motor.
- Page 87 5- 2 6 W O R KI NG W IT H T HE C O NT RO L U NIT FIGURE 5-25 Motor/feedback parameters Action Effect of action Edit the motor information. The fields are explained in Section 5.2.5, "Adding a Motor to the Adjuster Database".
- Page 88 W O RK ING W IT H T HE CO NT RO L U NIT 5- 2 7 Current level (CL) Torque limit when not moving (TL) Torque limit when moving (TO) Error limit-except during acceleration/deceleration (ER) Error limit during acceleration/deceleration.
- Page 89 5- 2 8 W O R KI NG W IT H T HE C O NT RO L U NIT TABLE 5-7 Detailed guidelines for calculating protective parameters Parameter Description CL sets the limit for the actual RMS current of the motor. When the RMS Current level (CL) current exceeds that limit, the amplifier is disabled, generating error...
- Page 90 W O RK ING W IT H T HE CO NT RO L U NIT 5- 2 9 Action Effect of action Click OK. The Protection parameters dialog box closes. 5.2.10. Step 4 - Feedback FIGURE 5-27 Feedback verification step Action Effect of action Select 4.
- Page 91 5- 3 0 W O R KI NG W IT H T HE C O NT RO L U NIT • Confirm that the proper feedback sensor type has been selected during the Motor Adjustment step • The following wire swaps may be necessary to match encoder and Hall direction: •...
- Page 92 W O RK ING W IT H T HE CO NT RO L U NIT 5- 3 1 Action Effect of action Click the Go button in the Current A waveform of the current response to a step loop adjustment dialog box. command appears in the window.
- Page 93 5- 3 2 W O R KI NG W IT H T HE C O NT RO L U NIT Action Effect of action FIGURE 5-30 Final current loop profile Click OK. The Current loop adjustment dialog box and the ACScope window close.
- Page 94 W O RK ING W IT H T HE CO NT RO L U NIT 5- 3 3 Caution Avoid setting the Current parameter outside the range 10% to 30%. 5.2.12. Step 6 - Commutation FIGURE 5-31 Commutation adjustment step Warning During commutation, the motor physically moves.
- Page 95 5- 3 4 W O R KI NG W IT H T HE C O NT RO L U NIT FIGURE 5-32 Commutation preferences dialog box Action Effect of action Select the following check boxes: - Find index - Trace two indexes - Search direction: Positive - Maximum search distance: Two rotations...
- Page 96 W O RK ING W IT H T HE CO NT RO L U NIT 5- 3 5 Action Effect of action FIGURE 5-33 Prompt to write parameters to nonvolatile memory Click OK. The values of the control unit's parameters are saved to the control unit's nonvolatile memory.
- Page 97 5- 3 6 W O R KI NG W IT H T HE C O NT RO L U NIT Action Effect of action FIGURE 5-34 Adjustment in progress FIGURE 5-35 Successful completion of commutation Click OK. The Commutation adjustment dialog box closes. Warning Commutation adjustment MUST complete successfully.
- Page 98 W O RK ING W IT H T HE CO NT RO L U NIT 5- 3 7 5.2.13. Step 7 - Velocity Loop FIGURE 5-36 Velocity loop adjustment step Action Effect of action 1. Select 7. Velocity loop The Velocity loop adjustment dialog box and adjustment and click Step.
- Page 99 5- 3 8 W O R KI NG W IT H T HE C O NT RO L U NIT FIGURE 5-37 Motion parameters (for velocity loop) Action Effect of action 3. Change the Period to 600msec. The Motion parameters dialog box closes. Click OK.
- Page 100 W O RK ING W IT H T HE CO NT RO L U NIT 5- 3 9 Action Effect of action Set the Integrator Gain (D7) to 200. Increase/decrease the Velocity A typical step profile for the velocity loop is shown Gain (D8) until a good step in FIGURE 5-38.
- Page 101 5- 4 0 W O R KI NG W IT H T HE C O NT RO L U NIT Action Effect of action Select 8. Position loop The Position loop adjustment dialog box and the adjustment and click Step. ACScope window open (FIGURE 5-39).
- Page 102 W O RK ING W IT H T HE CO NT RO L U NIT 5- 4 1 FIGURE 5-41 Typical velocity profile FIGURE 5-42 Typical position error profile SB 1 39 1 H a rdw ar e a n d Set up G ui de Do cu me n t r ev is io n n o .
- Page 103 5- 4 2 W O R KI NG W IT H T HE C O NT RO L U NIT Action Effect of action Increase/decrease the Gain (GA) Typical velocity and position error profiles for the until a good response profile is position loop are shown in FIGURE 5-41 and achieved.
- Page 104 W O RK ING W IT H T HE CO NT RO L U NIT 5- 4 3 5.2.16. Step 10 - Reviewing Parameters FIGURE 5-43 Review parameters step This is the last stage of the adjustment session. The parameter values set during the adjustment session (steps 1 through 9) are accessible here.
- Page 105 5- 4 4 W O R KI NG W IT H T HE C O NT RO L U NIT Click on field to open it for editing FIGURE 5-44 Editing parameters Action Effect of action When done click OK. The Review parameters dialog box closes.
-
Page 106: Acspl Programming With
W O RK ING W IT H T HE CO NT RO L U NIT 5- 4 5 Action Effect of action Click Yes Adjuster performs the actions stated and the Axis Adjustment dialog box closes. On the Application menu, click The Application is written to the PC hard disk. - Page 107 5- 4 6 W O R KI NG W IT H T HE C O NT RO L U NIT • Program mode: A program (sequence of commands) is stored in the control module's nonvolatile memory for later execution. ACS Debugger is a comprehensive ACSPL development environment. It enables both direct mode and program mode operation.
- Page 108 W O RK ING W IT H T HE CO NT RO L U NIT 5- 4 7 Controller Firmware Communication type version status FIGURE 5-47 Debugger status bar - successful communication with control unit Action Effect of action Once communication is The Debugger's Terminal window comes up.
- Page 109 5- 4 8 W O R KI NG W IT H T HE C O NT RO L U NIT FIGURE 5-48 Opening the Debugger terminal FIGURE 5-49 Debugger terminal SB 1 39 1 H a rdw ar e a n d Set up G u i d e Do cu me n t r ev is io n n o .
-
Page 110: Direct Mode
W O RK ING W IT H T HE CO NT RO L U NIT 5- 4 9 Action Effect of action Click the Enable Direct The Terminal is ready to use for programming the control unit using direct mode (FIGURE 5-50). Communication tool button FIGURE 5-50 Direct mode prompt 5.3.3. - Page 111 5- 5 0 W O R KI NG W IT H T HE C O NT RO L U NIT 5.4.1. Point to Point Move FIGURE 5-51 Point to point move Type in the following command sequence, as shown in FIGURE 5-51. The motor will move to the specified point.
- Page 112 W O RK ING W IT H T HE CO NT RO L U NIT 5- 5 1 Command` Meaning Effect of command mnemonic Set X axis Linear Specify the linear deceleration. SXLD50000<cr> Deceleration to 50000 Set Initiate Set initiate communication to 3. SIC3<cr>...
- Page 113 5- 5 2 W O R KI NG W IT H T HE C O NT RO L U NIT Command mnemonic Meaning Effect of command Set X axis Wait Define a dwell between moves SXWT500 Time to 500 (in msec). Set X axis Relative Set a Relative Position move of SXRP50000<cr>...
- Page 114 W O RK ING W IT H T HE CO NT RO L U NIT 5- 5 3 Command mnemonic Meaning Effect of command Begin X axis Issue a Begin command. BX<cr> The motor will run through the 5 point with a 0.5-second delay between the moves.
- Page 115 5- 5 4 W O R KI NG W IT H T HE C O NT RO L U NIT 5.4.5. Manual Control Using a Joystick Attach a joystick to the analog input. Command mnemonic Meaning Effect of command Set X axis Motor Enable the amplifier.
-
Page 116: Program Mode
W O RK ING W IT H T HE CO NT RO L U NIT 5- 5 5 5.5. Program Mode Further information More detailed information about ACSPL programming is contained in ACSPL Software Guide. This section shows how to use ACS Debugger to: ♦... - Page 117 5- 5 6 W O R KI NG W IT H T HE C O NT RO L U NIT 5.5.1. Point to Point Move Program In the following example the motor should make a point to point move and display simple diagnostic messages in the terminal window.
- Page 118 W O RK ING W IT H T HE CO NT RO L U NIT 5- 5 7 FIGURE 5-54 File window Action Effect of action ♦ Type in the program below, The lines are displayed on the editor as they are pressing ENTER after each line.
- Page 119 5- 5 8 W O R KI NG W IT H T HE C O NT RO L U NIT Command mnemonic Meaning Effect of command Display . . . Display message in disp " moving OK.." Program messages window. End if …...
- Page 120 W O RK ING W IT H T HE CO NT RO L U NIT 5- 5 9 FIGURE 5-55 Program for point to point move 5.5.2. Loading a Program to the Control unit Action Effect of action Click the Write Program to The program is loaded to the control unit RAM.
- Page 121 5- 6 0 W O R KI NG W IT H T HE C O NT RO L U NIT FIGURE 5-56 Program window shows the program in control unit RAM 5.5.3. Execution Modes: Fast and Trace The ACSPL program can be run from Debugger in either of two modes: Fast or Trace. In Fast mode, execution continues until one of the following conditions occurs: •...
- Page 122 W O RK ING W IT H T HE CO NT RO L U NIT 5- 6 1 FIGURE 5-57 Trace mode program execution The execution mode is selected from the Program window toolbar. Fast mode is the default. Action Effect of action 1.
- Page 123 5- 6 2 W O R KI NG W IT H T HE C O NT RO L U NIT FIGURE 5-58 Opening the Trace window FIGURE 5-59 Trace window SB 1 39 1 H a rdw ar e a n d Set up G u i d e Do cu me n t r ev is io n n o .
- Page 124 W O RK ING W IT H T HE CO NT RO L U NIT 5- 6 3 Action Effect of action 2. Click the Run program button The program execution can be seen in the Program window and the program status in the Trace window (FIGURE 5-60).
- Page 125 5- 6 4 W O R KI NG W IT H T HE C O NT RO L U NIT Command Meaning Effect of command mnemonic Let X axis Linear Set the velocity. let XLV=50000 Velocity be 01 exec BX Execute Begin X Begin moving.
-
Page 126: Saving And Loadingc
W O RK ING W IT H T HE CO NT RO L U NIT 5- 6 5 5.6. Saving and Loading Control Unit Memory ACS Saver saves a control unit's memory contents (including the adjustment values, programming, program results, etc.) to a PC file. ACS Loader loads that file to another control unit, ensuring that the two control units operate identically. - Page 127 5- 6 6 W O R KI NG W IT H T HE C O NT RO L U NIT 5.6.1. Saving Control Unit Memory Contents FIGURE 5-62 ACS Saver Action Effect of action Connect the PC communications channel to the control unit. From the Windows Start menu, point The ACS Saver window opens (FIGURE 5- to the ACS Tools program group and...
- Page 128 W O RK ING W IT H T HE CO NT RO L U NIT 5- 6 7 5.6.2. Loading Control Unit Memory FIGURE 5-63 ACS Loader Action Effect of action Connect the PC communications channel to the target control unit. From the Windows Start menu, point The ACS Loader window opens (FIGURE to the ACS Tools program group and...
-
Page 129: Tuning The Control Loops
T UNING T H E CONT R O L LOO P S 6- 1 6. TUNING THE CONTROL LOOPS TABLE 6-1 Topics covered in this chapter Topic Description About D and K arrays Description of the controller's D and K arrays of parameters Control loop block Diagrams of the control loop algorithms diagrams... -
Page 130: Aboutd Andk Arrays
T UN ING T HE CONT ROL LOO P S Block diagrams of the control loops are followed by descriptions and fine tuning instructions. Slip constant optimization and polishing are also covered. 6.1. About D And K Arrays Some of the control unit parameters are assigned mnemonics, for example, GA (Gain) and GF (Gain Factor). - Page 131 T UNING T H E CONT R O L LOO P S 6- 3 Element Function Programmable parameter. K5 = 0: Sets the velocity loop output to DA. Enables open loop operation: When GA is set to zero (which zeroes the position error (PE)), the DA parameter is used to command the motor.
-
Page 132: Control Loop Blockd
T UN ING T HE CONT ROL LOO P S Mnemonic Meaning Effect Comment Set, for the X axis, the Restores the protection. For the number (##) use 3. SXQP##<cr> value of the QDSPL the value displayed in step parameter to the 1 (QP's original value). - Page 133 T UNING T H E CONT R O L LOO P S 6- 5 Note The diagrams in this section are for general description purposes only. SB 1 39 1 H a rdw ar e a n d Set up G ui de Do cu me n t r ev is io n n o .
- Page 134 T UN ING T HE CONT ROL LOO P S ( AF ) Key: S - Laplace transformer in time domain: Acceleration feed forward D22 - Velocity scaling factor (gain) *** DA - Bias input **D22 System and control parameters are indicated in Courier font . Velocity feed forward For example: ( DP ) and D22 .
- Page 135 T UNING T H E CONT R O L LOO P S 6- 7 Key: · * - Total inertia (motor + reflected load) [kg Torque disturbance Motor acceleration Motor velocity Motor position (rad/sec (rad/sec) (rad) Current Integrator Integrator 1 command Torque constant...
- Page 136 T UN ING T HE CONT ROL LOO P S Commutation stage Amplifier stage Motor Vbus terminal Current filter Pulse width D3, D4 modulation (Fig. 1-4) C U R R E N T L O O P sin (CP) (current command) Sin (CP + 120º) Motor phase T current...
- Page 137 T UNING T H E CONT R O L LOO P S 6- 9 command (% of nominal amplifier current) Back EMF Current to motor Vbus Current command +/-K4 1638 Key: - Motor resistance [Ohm] L - Motor inductance [Henry] - Peak current [A] FIGURE 6-4 Current loop and filter SB 1 39 1 H a rd w ar e a n d Set u p G u i d e...
- Page 138 6-1 0 T UNI NG T H E CO NT ROL LOO P S *DA is a % of the maximum velocity required for the application command Velocity feed forward ω ω ω Current Low pass filter command D23, D24, D25 Velocity command Integrator...
-
Page 139: Current Loop
T UNING T H E CONT R O L LOO P S 6- 11 6.3. Current Loop The current control algorithm consists of a proportional-integral (PI) filter, set by the following parameters: Proportional gain (P). Maximum value is 20,000. Integral gain (I). Maximum value is 12,000. The integrator bandwidth is equal to D3/20 [Hz]. - Page 140 6-1 2 T UNI NG T H E CO NT ROL LOO P S FIGURE 6-7 Current loop response after first Gain (D4) adjustment (step 4). 4. Increase/decrease D4 by increments of about 20% until the response is similar to that shown in FIGURE 6-8.
- Page 141 T UNING T H E CONT R O L LOO P S 6- 13 FIGURE 6-8 Current loop response after second Gain (D4) adjustment. 5. Start increasing the Integrator Gain (D3) by increments of 1000 till there is a larger overshoot of about 10% as shown in FIGURE 6-9.
-
Page 142: Commutation
6-1 4 T UNI NG T H E CO NT ROL LOO P S 6. Generally, the Current (% of max) can be left at 10%. When the amplifier is relatively oversized for the motor, the Current (% of max) can be set lower than 10%. Alternately, if the amplifier is undersized, the Current (% of max) can be set higher than 10%. -
Page 143: Velocity Loop
T UNING T H E CONT R O L LOO P S 6- 15 The number of poles is incorrect. ♦ 1. Open the current position display either by opening step 4, Feedback verification or by opening the View menu and clicking Current Position. Turn the motor manually until the Hall reading (HA) is 0. - Page 144 6-1 6 T UNI NG T H E CO NT ROL LOO P S ω ω ω ω ω ω ω ω A = 1+1.4* ω ω ω ω D23 = ( * (2 ω ω ω ω D24 = (1+0.7* D25 = ω...
- Page 145 T UNING T H E CONT R O L LOO P S 6- 17 20 log (amplitude) (dB) 20 dB Frequency [Hz] D7/2 D7/20 FIGURE 6-10 Velocity proportional-integral filter Bode diagram 6.5.2.1. Friction Compensation The FN (Friction Number) parameter sets the initial value of the integrator in the velocity loop (range is 0 to 255).
-
Page 146: Position Loop
6-1 8 T UNI NG T H E CO NT ROL LOO P S Action 7. Change D9 (Integrator Limit), until the overshoot is about 10%. A good velocity loop response is shown in FIGURE 6-11. 8. Click OK to complete the Velocity loop adjustment step. Note The Velocity loop adjustment step is also affected by the values of the D5, D6, and D10 parameters. - Page 147 T UNING T H E CONT R O L LOO P S 6- 19 Note It is recommended that the bandwidth of the position loop (f ) be (Integrato Gain) approximately equal to 6.6.1. Position Loop Tuning Action 1. Click the Motion button to open the Motion parameters dialog box as shown in FIGURE 6-12.
- Page 148 6-2 0 T UNI NG T H E CO NT ROL LOO P S Select Velocity (Scope CH1). Set the Gain Factor (GF) to 0 and Gain (GA) to 1. Increase GA until an overshoot becomes noticeable. Select Position Error (Scope CH1). Increase/decrease GA in order to minimize the position error.
-
Page 149: Slip Constanto
T UNING T H E CONT R O L LOO P S 6- 21 FIGURE 6-14 Position loop error response 6.7. Slip Constant Optimization (For induction motors only.) The purpose of setting SK (Slip Constant) is to improve the orientation between the magnetic field in the air gap and the current induced into the rotor. -
Page 150: Polishing
6-2 2 T UNI NG T H E CO NT ROL LOO P S Velocity [counts/msec] Error [counts] 1200 Velocity 1000 SK=100, to low SK =600 still too low SK=1000, optimal SK -200 Time [msec] FIGURE 6-15 Position error for various SK values 6.8. - Page 151 T UNING T H E CONT R O L LOO P S 6- 23 FIGURE 6-16 Position error profile when AF=0 FIGURE 6-17 Position error profile when AF=500 Action ♦ Increase AF until the error is minimized. (If AF is too large, the error may be excessive, causing more motor noise.) SB 1 39 1 H a rdw ar e a n d Set up G ui de Do cu me n t r ev is io n n o .
-
Page 152: Dual Loop Control
6-2 4 T UNI NG T H E CO NT ROL LOO P S 6.8.2. Optimizing Torque At High Speed - Phase Advance For DC brushless (AC servo/AC synchronous) motor only. The phase advance feature improves the torque-velocity characteristics at high speed. At high speed, the actual current lags behind the command. - Page 153 T UNING T H E CONT R O L LOO P S 6- 25 In a dual loop application two encoders are used, one mounted on the motor axis and the other on the load. (The load encoder can be linear for a linear stage application or rotary for a rotary load application).
- Page 154 6-2 6 T UNI NG T H E CO NT ROL LOO P S CURRENT or VEL COMMAND 1 for velocity 2 for current Load du/dt Velocity FF DA Command Torque Disturbance POS 1 V_FF Current Current GA*2 Command Command Velocity Command Current Profile...
- Page 155 T UNING T H E CONT R O L LOO P S 6- 27 6.9.1. Dual Loop Control - Implementation Encoder 1 (ENC1), which is mounted on the motor axis, is used to close the velocity loop (and also, in the case of a brushless motor, for software commutation). Encoder 2 (ENC2), which is mounted on the load (the position that is being controlled) is used to closed the position loop.
- Page 156 6-2 8 T UNI NG T H E CO NT ROL LOO P S 6.9.2. Adjusting the Dual Loop ♦ 1. Start to adjust the system with $CU = 2 or $Cu = 3 in single loop. ♦ 2. Set $CU bit 2 to 1 ($CU = 6 or $CU = 7) and go directly to position loop adjustment.
-
Page 157: Hardware Interface Parameters
H AR DW AR E I NT ERF ACE P AR AM ET E R S 7- 1 7. HARDWARE INTERFACE PARAMETERS This chapter summarizes ACSPL parameters relating to the hardware interface. The interface itself is described in Section 4.4, "Control Connectors." TABLE 7-1 Topics covered in this chapter Topic Description... -
Page 158: Serial Communications
7- 2 H AR D W AR E I NT ERF AC E P AR AM ET ER S 7.1. Serial Communications 7.1.1. Changing the RS-232/422/485 Communication Baud Rate TABLE 7-2 Changing the baud rate Mnemonic Meaning Result SBR57600<cr> Set the baud rate to 57600. Changes the baud rate to 57600. - Page 159 H AR DW AR E I NT ERF ACE P AR AM ET E R S 7- 3 Note Shielding connections will vary according to the installation. FIGURE 7-1 Multiple drop connections for RS-232 SB 1 39 1 H a rd w ar e a n d Set u p G u i d e Do cu me n t r ev is ion n o .
- Page 160 7- 4 H AR D W AR E I NT ERF AC E P AR AM ET ER S 7.1.3. Multiple Drop Configuration for RS-422/485 The multiple drop configuration for RS-422/485 connections is similar to that for RS-232. Connect the following pins in parallel: •...
-
Page 161: Can Communications
H AR DW AR E I NT ERF ACE P AR AM ET E R S 7- 5 7.2. CAN Communications Note For CAN communication, the COM_SD switch (on the control unit's front panel) must be OFF. 7.2.1. CAN Rotary Switch The CAN interface has two parameters: •... - Page 162 7- 6 H AR D W AR E I NT ERF AC E P AR AM ET ER S TABLE 7-3 CAN rotary switch positions and associated modes Pos. Mode Description The internal CAN interface attempts to establish communication with the controller. This process can take several seconds.
- Page 163 H AR DW AR E I NT ERF ACE P AR AM ET E R S 7- 7 Pos. Mode Description RS-232/422 Program CAN firmware via RS-232/422. Procedure: ♦ 1. Power off the unit (wait until the MP_ON LED goes off). ♦...
- Page 164 7- 8 H AR D W AR E I NT ERF AC E P AR AM ET ER S Pos. Mode Description Same as position 0, except that parameter NI is read from EEPROM and parameter CR is set to 50k. Same as position 0, except that parameter NI is read from EEPROM and parameter CR is set to 20k.
-
Page 165: Encoder 1 And Encoder
H AR DW AR E I NT ERF ACE P AR AM ET E R S 7- 9 Examples: Set CAN Node ID to 60: SNI60<cr> Report CAN Node ID: RNI<cr> displays result: Can Node ID 60 7.3. Encoder 1 and Encoder 2 Warning Facilities for overspeed protection are not provided in the control unit. - Page 166 7-1 0 H AR D W AR E INT E RF AC E P AR AM E T ER S 7.5.1. Digital Inputs The unit includes eight general-purpose inputs (in addition to safety inputs). Input 6 can serve as a registration input.
- Page 167 H AR DW AR E I NT ERF ACE P AR AM ET E R S 7- 1 1 • Early Ready • Interpolation Complete. TABLE 7-4 Predefined motion state functions for digital outputs Motion state Description B/E Motion Indicates when the axis is in motion ("ON") or not in motion ("OFF"). X: output 5.
- Page 168 7-1 2 H AR D W AR E INT E RF AC E P AR AM E T ER S 7.5.4. Analog Output There is one ten bit analog output available - A_OUT. Its value is controlled by the XD4 axis parameter.
- Page 169 H AR DW AR E I NT ERF ACE P AR AM ET E R S 7- 1 3 7.5.4.2. Monitoring Velocity Profile The output voltage as a function of the actual velocity (AV) in counts/seconds is: × × × The velocity scale factor depends on the value of D22.
- Page 170 V ECT OR CO NT ROL AND M O T O RS 8- 1 8. VECTOR CONTROL AND MOTORS 8.1. Vector Control for DC Brushless (AC Servo/AC Synchronous) All ACS-Tech80 digital control modules use the Vector Control method to "convert" a simple low cost DC brushless(AC servo/AC synchronous) motor, equipped with position feedback device, into a high performance servo motor.
- Page 171 V ECT OR CO N T ROL AN D M O T O RS Velocity and acceleration feed forwards = FC Amplifier Coordinate 2 Phase to Position Velocity Changer 3 Phase filter filter ω f(CP Encoder counts FIGURE 8-1 Vector control SB 1 39 1 H a rd w ar e a n d Set up G ui d e Do cu me n t r ev is io n n o .
- Page 172 V ECT OR CO NT ROL AND M O T O RS 8- 3 8.1.1. What is Vector Control? In any electrical motor, to generate torque requires a magnetic field and a current that is perpendicular to it (FIGURE 8-2). The generated torque is related to the vector multiplication of these two vectors.
- Page 173 V ECT OR CO N T ROL AN D M O T O RS FIGURE 8-4 Model of induction motor in synchronously rotating reference frame - Direct axis component, analogous to the field current of the DC motor. (The Field Current - FC parameter controls the magnitude of I - Quadrature axis component, analogous to the armature (torque generating) current of the DC motor.
- Page 174 V ECT OR CO NT ROL AND M O T O RS 8- 5 If a high performance servo system is required, but not the high dynamic characteristics of a DC brushless (AC servo/AC synchronous) motor. When the inertia of the load is much higher than the inertia of the motor (and it may be difficult to match the inertia of the load to the inertia of the motor).
- Page 175 W AR R ANT Y 9- 1 9. WARRANTY ACS-Tech80 warrants that its products are free from defects in materials and workmanship under normal use during the warranty period. The warranty period is one (1) year from receipt by the end user.
- Page 176 IN DE X INDEX digital inputs, 7-10 digital outputs, 7-10 7-segment display, 4-33 direct mode, 5-49 encoder, 7-9 AC induction motor Hall sensors, 7-9 derating, 8-5 point to point, 5-56 slip constant optimization, 6-21 point to point move, 5-56 when to use, 8-4 RS-232, 7-2 AC induction motors, 4-11, 8-1 RS-422, 7-2...
- Page 177 IN D EX ACSPL, 7-12 Fan 24Vdc, 4-14 test point, 4-35 HSSI/PEG, 4-31 I/O + Safety, 4-24 Motor, 4-10 B/E motion state, 7-11 power, 4-5 brush motors, 4-12 Regen, 4-12 brushless motors, 4-11, 8-1 RS-232/422, 4-15 constant velocity, 5-53 cables control length, 2-5 dual loop, 6-24...
- Page 178 IN DE X digital inputs, 7-10 25, 5-28 digital outputs 27, 5-28 ACSPL, 7-10 error, following, 6-1, 6-22 DIP Switch COM_SD, 4-34 Fan 24Vdc PROG., 4-34 Connector, 4-14 DIP switches, 4-34 FEATURES, 3-1 direct mode, 5-49 feedback display encoder, 4-18 7-segment, 4-33 Hall sensors, 4-19 seven-segment, 4-33...
- Page 179 IN D EX connector, 4-24 motion digital inputs, 4-27 by joystick, 5-54 digital outputs, 4-29 monitoring, 7-12 I/O + Safety motion state connector, 4-24 B/E, 7-11 I/O, V_SUPPLY, 4-27, 4-29 Early Ready, 7-11 incremental encoder feedback, 4-18 Interpolation, 7-11 induction motors, 4-11, 8-1 Ready, 7-11 input Motor...
- Page 180 IN DE X digital, 4-29 Protective Earth, 4-11 Protective Earth., 4-7 parameters CL, 5-28 Ready motion state, 7-11 EA, 5-28 Regen ER, 5-28 connector, 4-12 TL, 5-28 regeneration resistor fuse, 4-13 TO, 5-28 regeneration, external, 4-13 PEG, 4-31 repetitive point to point move, 5-51 Peg Mask (PM) parameter, 7-11 resolver, 4-22 phase advance, 6-24...
- Page 181 IN D EX serial communications, 7-2 three-phase motors, 4-11, 8-1 ACSPL, 7-2 TL parameter, 5-28 seven-segment display, 4-33 TO parameter, 5-28 shielding, 2-5 torque cables, 2-4 optimizing, 6-24 Shutdown torque limit, 5-28 communications, 4-16 Torque limit (TO) parameter, 5-28 shutting down Torque limit low (TL) parameter, 5-28 communications, 4-16 torque optimization...
- Page 182 ERRATA Page Comments SB 1 39 1 H a rd w ar e a n d Set u p G ui de Do cu me nt r ev is io n n o. 1. 1 4...
Need help?
Do you have a question about the SB1391 and is the answer not in the manual?
Questions and answers