Advertisement
Quick Links
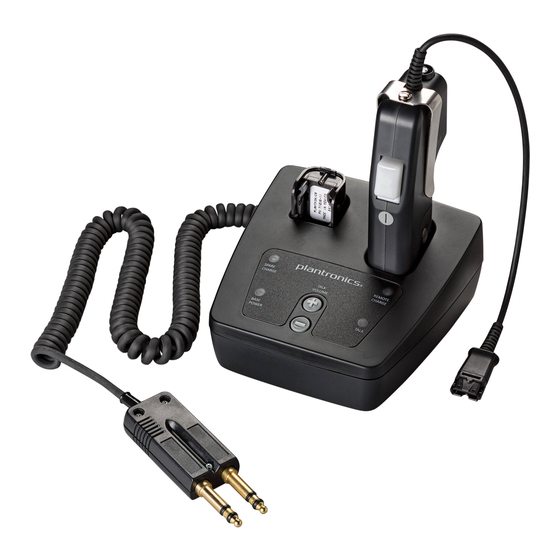
COMPONENTS OF MODEL CA12CD-S/A
Audio Link
LED button
Listen
Fine-Adjust
Switch
Quick Disconnect™
Battery
for Headset
Pack
See Note 3.1
REMOTE UNIT
All manuals and user guides at all-guides.com
USER GUIDE
CA12CD-S/A
Model
. . . . . . . . . . . . . . . . . . . . . . . . . . . . . . . . . . . . . . . . . . . . . . . . . . . . . . . . . . . . . . . .
Push-to-Talk Headset Amplifier
SPARE
REMOTE
CHARGE
TALK
CHARGE
VOLUME
BASE
TALK
POWER
Setup and operation
Charging well for
spare battery pack
Plug Console
Push-to-
AC adapter
Interface Cable
Talk
in here
button
Subscription
button
BACK VIEW OF BASE UNIT 1.1, 1.2
1.1 Plug the modular connector on the Console Interface Cable into the
modular jack on the back of the Base. Plug the other end into your
console.
1.2 Plug the AC adapter into a wall outlet, and plug the
power connector into the back of the Base. The
Base Power LED will turn on.
Momentary/
1.3 Slide the battery pack onto the Remote and snap it
locking PTT
into place without forcing it. The CA12CD-S/A will
selector
take a few seconds to select the most reliable radio
Spare
(not shown;
channel, and then it will start to blink its Audio Link
battery pack
see Fig. 1.7 and
LED at once per second, to indicate that it is ready
Charge LED
Note 4.1)
to use.
(orange)
1.4 For first-time use, press the Audio Link button to
turn the audio link off, and place the Remote into its
Base Unit power
charging well to charge the attached battery pack.
LED (green)
1.5 Place the spare battery pack into its charging well.
1.6 The Charge LEDs will flash until the battery packs
are fully charged, at which time the LEDs will
stop flashing and remain on. (It is okay to use the
Remote after only one hour of charging time if
desired.)
1.7 Press the PTT Button on the Remote to key up your
Plug AC
Adapter
in here
Console
Interface Cable
SPARE
REMOTE
CHARGE
TALK
CHARGE
VOLUME
BASE
TALK
POWER
Talk Volume
buttons
(fine-adjust) See
Note 4.1
BOTTOM VIEW
OF BASE UNIT
BASE UNIT
1.3
Installing the battery pack
Audio Link
LED button
Listen
Fine-Adjust
Switch
Quick Disconnect™
Battery
for Headset
Pack
See Note 3.1
REMOTE UNIT
Performance tips
2.1 Careful setting of the audio levels, both in your
console and in the CA12CD-S/A, is essential for
quality and avoiding echo. Please see the separ
Settings Guide for the CA12CD-S/A, for detaile
2.2 Operating other radio devices, such as DECT co
in the same frequency band as the CA12CD-S/A
Charging well for
number of units that can be operated at one tim
remote unit
reducing their maximum range. The CA12CD-S/
DECT frequency band (1.88 to 1.90 GHz).
Remote Unit
2.3 User density and range can vary widely due to s
Battery Charge LED
building layout and whether other devices are o
(orange)
same frequency band as the CA12CD-S/A.
PTT LED
In low-density installations (e.g., 5 units placed
Talk
(green)
range can be greater than 100 feet. In high-den
Coarse-Adjust
(e.g., 30 units placed 18 inches apart), the rang
Switch
as little as 10 feet. In general, it is best to place
from each other as possible.
2.4 Keep mobile phones at least 3 feet from both th
Remote when the Remote is not near the Base.
Remote are near each other, mobile phones can
feet, but should never be placed right next to th
2.5 Remove the battery pack and power cord from
to allow more radio spectrum for active units. T
important where large numbers of them are in
Listen
Coarse-Adjust
Switch
Battery charging
and management
COMPO
Push-to-
Talk
button
Mom
locki
selec
(not
see F
Note
Advertisement

Related Manuals for Plantronics CA12CD-S


Summary of Contents for Plantronics CA12CD-S
- Page 1 Interface Cable 2.1 Careful setting of the audio levels, both in your Audio Link Plug Console Push-to- console and in the CA12CD-S/A, is essential for LED button AC adapter Interface Cable Talk quality and avoiding echo. Please see the separ...
- Page 2 2.1 Careful setting of the audio levels, both in your communications Plug Console in a process called s console and in the CA12CD-S/A, is essential for getting good audio Interface Cable subscribe them as f quality and avoiding echo. Please see the separate sheet, Audio in here 4.1 Press and hold t...
- Page 3 Audio Link LED will go out for a few seconds and then begin to 10 feet apart), the Adjust Switch of Base steps. flash once per second, indicating that your CA12CD-S/A is now nsity installations ready to use. ge could decrease to ATTENTION:...
- Page 4 1) Flashes once per second while the IMPORTANT SAF 9. Never push objects of any kind into this product through Base Unit to 1.90 GHz for Europe and some other regions) as the CA12CD-S/A. he audio link between the 2 ea.) for each battery is charging.