Advertisement
Quick Links
IIODEL NO.
HL518
Trademarks, design patents and copyrights are used with the approval of the
owner AUDI AG by Jiaxing Harley Baby Car Co., Limited.
心 W
CHOKING
Not for children under 3 years.
卒
Screws contain
hazardous sharp points or
sharp edges. Adult assembly
required.
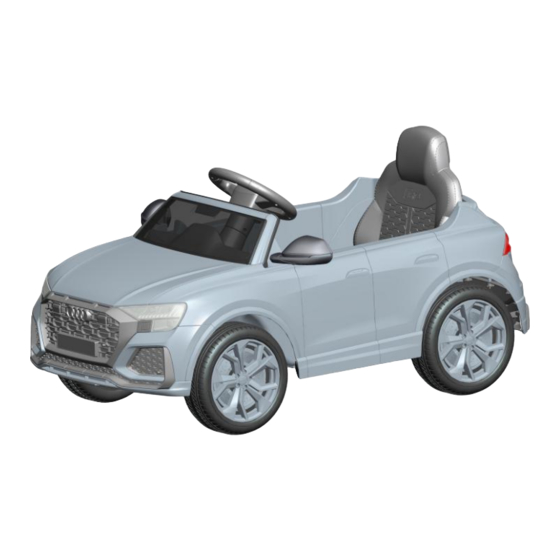
Audi RS Q8
OWNER'S
MANUAL
Please
『ead entire manual before starting assembly.
Keep this manual along with your purchase receipt
for future reference.
&
AR
N
ING
:
H
AZA
RD
-Small parts.
T
o must
CA
UTION
To reduce the risk of injury, adult supervision
potentially
is required. Never use on road ways, near
motor vehicles, on or near st
steps, swimming pools or other bodies of
water. Always wear shoes, and never allow
more than one什der.
EN
AGES 3+
WARNING:
be assembled by adult before use.
心WARNING
p inclines or
的
Advertisement

Subscribe to Our Youtube Channel
Summary of Contents for Moebelix Audi RS Q8
- Page 1 AGES 3+ IIODEL NO. HL518 Audi RS Q8 OWNER'S MANUAL Please 『ead entire manual before starting assembly. Keep this manual along with your purchase receipt for future reference. Trademarks, design patents and copyrights are used with the approval of the owner AUDI AG by Jiaxing Harley Baby Car Co., Limited.
- Page 2 IMPORTANT You must charge your battery for 12 hours before you use your vehicle for the first time. Remember to... ✓ Charge the battery immediately after each use. ✓ Charge the battery at least once a month during storage, even if the vehicle has not been used. The battery will be permanently damaged and void your warranty if you fail to follow the instructions.
- Page 3 厂 To Prevent Serious Injuries Safe D iving Rules 「 • This product is intended for use by ch师en ages • ADULT SUPERVISION REQUIRED. 3 and up, and is not intended for children under 3 MAKE SURE CHILDREN KNOW AND FOLLOW THESE RULES FOR SAFE years of age due to lack of ability to operate safely.
-
Page 4: Electrical Hazard
ELECTRICAL HAZARD About Thermal Fuses • Your 6/12 volt battery is equipped with a built-in thermal fuse. The thermal fuse is a self-resetting safety device which automatically trips and shuts down operation of the vehicle if the vehicle is ove什oaded or the driving conditions too severe. - Page 5 心 CAUTION • Make sure the brand, voltage and frequen勺of the charger are in accordance with the wall outlet. • Non-rechargeable batteries are not to be recharged. • Batteries are to be inserted with the correct polarity. • Make sure the charger connector is matching with •...
-
Page 6: Battery Care And Disposal
Battery Care and Disposal D isp o sa l � Care • If a battery leak develops, avoid contact with the • Your battery is a sealed lead-acid batter leaking acid and place the dam勾ed battery in a It musl be recycled or disposed of it in an plastics sealed bag. - Page 7 • Please identify all parts before assembly and save all packaging material until assembly is completed to ensure that no parts are discarded. • Metal parts have been coated with lubricant for protection during shipment. Wipe all metal parts with a paper towel to remove any excess lubricant.
- Page 8 Assembly :are should be taken ·;n· unpacking and assembli rts, including the battery, or help in the assemb Step 1 Step 2 Insert the side bracket under the side Insert the rear bracket under the rear body and fasten with 5 screws. body and fasten with 9 screws.
- Page 9 Step 5 Step 6 "Snap" the wheel cover into the right Insert the windshield to the slots place, Repeat the process for the on the main body. other three wheels. Step 7 Step 8 Insert the side mirror into the right Plug connectors, place the steering place as picture shown, untill you wheel onto the turning shaft and...
-
Page 10: Operating Your Vehicle
Operating Your Vehicle Power switch Switch button ON and OFF Forward Push the shifter in upward position and press the accelerator slowly. Reverse Push the shifter in downward position and press the accelerator slowly. Low speed Vehicle has been pre-set to operate at low speed (1.5 mph( 3 kmh maximum). - Page 11 ¶ ¤Î Ú¥/h=2 ¦5 $' 5Gû“- K' Š «' &èj² ' ED ! ¹’' °-' L' ' Ý î, º ; ' ÷ ú *' .#' B##' 0d ‚' ' • ' 7'6' £ !"' ! Ò' ' > ) å...
- Page 12 厂 Problem Possible Cause Solution Undercharged battery A new batt叨should have been charged缸at least 12 hours before using the vehicle for the first time. After that, It must be recharge the battery缸at least 8-1 O hours after each use Never charge longer than 24 hour Check all connectors;...
- Page 13 Troubleshootin g +/C0'CH/CZ M &'+Z 179G'1/Z 6BZ N(9Z 1:Z 1//G19Z &*Z ++Z N ':BZ91J/Z C&Z -1CZ /Z ++Z 5//C1T C1Z -*Z BJ9Z C&RZ 9Z C'$&CZ 1C19Z 19Z +!,Z BO(C&Z -$Z 1/CCZ R1J:Z A'Z /C9W '$/1B'B /Z :7'9Z &/Z C&Z X+9D2; N(9Z 1:Z 1//G19Z &*Z ++Z N ':BZ91J/Z C&Z -1CV /...
- Page 14 Parts Diagram Note: Some parts shown are assemled to the both sides of the vehicle NO. Part Quantity NO. Part Quantity NO. Part Quantity 1. Front Bumper 8. Rear Drive Assembly 2pcs 15. Main Body Front Steering Assembly 1pc 9. Wheel Cover 4pcs 16.
Need help?
Do you have a question about the Audi RS Q8 and is the answer not in the manual?
Questions and answers