Advertisement
Quick Links
Advertisement

Related Manuals for Blue Ridge FORT DRUM

Summary of Contents for Blue Ridge FORT DRUM
- Page 1 Ft Drum Instructions_Ft Drum Instructions 4/12/12 9:10 PM Page 1...
- Page 2 Ft Drum Instructions_Ft Drum Instructions 4/12/12 9:10 PM Page 2 Photo-etch Resin Parts Gun Barrels B1 4ea PE-01 1ea R1 1ea R13 2ea R19 2ea R2 1ea R14 2ea R20 2ea B2 4ea PE-02 1ea R3 1ea R15 1ea R21 1ea B3 2ea R4 2ea R10 1ea...
-
Page 3: Main Structure
Ft Drum Instructions_Ft Drum Instructions 4/12/12 9:10 PM Page 3 1. Main Structure Pads grey for visibility only Paint: Concrete Paint: Concrete 2. Dock Paint: Wood Brown PE17 Paint: Grey PE16 Paint: Grey 3. Sally Port Paint: Grey Paint: Concrete Paint: Grey Paint: Grey PE14... - Page 4 Ft Drum Instructions_Ft Drum Instructions 4/12/12 9:10 PM Page 4 4. Deck Vents Vents are to protrude from deck by 1/8 inch. Paint: All Vents Silver PE15 Paint: Grey PE11 Paint: Silver PE12 Paint: Wood Paint: Silver...
- Page 5 Ft Drum Instructions_Ft Drum Instructions 4/12/12 9:10 PM Page 5 5. Deck Railings Paint: All Railings Grey PE04 PE01 PE03 PE04 PE02 Paint: All Railings Grey PE07 PE06 PE05 PE06 PE07 PE05...
- Page 6 Ft Drum Instructions_Ft Drum Instructions 4/12/12 9:10 PM Page 6 Paint: All Railings Grey PE09 Note: If you do not plan to add tool shed, re- place part PE10 with PE10a PE10 PE08 6. Tool Shed Front Paint: Grey PE21 Paint: Silver Paint: Wood Paint: Grey...
-
Page 7: Radio Shack
Ft Drum Instructions_Ft Drum Instructions 4/12/12 9:11 PM Page 7 Back Paint: Silver Paint: Grey Paint: Grey PE21 Paint: Grey 7. Radio Shack Back Front Paint: Silver Paint: Silver Paint: Wood Paint: Grey Paint: Grey 8. Projector Booth Back Paint: Silver Front Paint: Silver PE38... -
Page 8: Water Tanks
10. Water Tanks Paint: Body Wood Straps Black Note: During Fort Drum’s active duty career, in addition to the fresh water storage carried inside the fort, there was anywhere from 1 to 2 fresh water tanks on the deck. These tanks were located towards the rear of the fort. -
Page 9: Right Side
Ft Drum Instructions_Ft Drum Instructions 4/12/12 9:11 PM Page 9 11. Hoist Room Front Back Paint: Silver Paint: Silver Paint: Silver PE44 Paint: Grey Paint: Grey Paint: Grey Paint: Grey Paint: Wood 12. Barracks Right Side Paint: Silver Paint: Grey Paint: Grey Paint: Grey PE23... - Page 10 Ft Drum Instructions_Ft Drum Instructions 4/12/12 9:11 PM Page 10 Right Side Paint: Silver Paint: Grey PE22 Paint: Grey PE106 PE23 Paint: Wood PE22 Paint: Grey Paint: Grey Paint: Grey Paint: Silver PE27 PE24 Paint: Grey Note: Repeat this procedure for both PE28 front &...
- Page 11 Ft Drum Instructions_Ft Drum Instructions 4/12/12 9:11 PM Page 11 Paint: Silver Paint: Silver Back Porch Front Porch 13. 3 Inch AA Guns Paint: Grey Paint: Grey Note: Make 2ea 15. 6 Inch Secondary Guns PE20 PE18 PE19 Paint: Grey Paint: Grey Paint: Grey Note: Repeat for both...
- Page 12 Ft Drum Instructions_Ft Drum Instructions 4/12/12 9:11 PM Page 12 16. Derrick Base Mast Paint: Grey Paint: Grey PE36/37 Paint: Grey PE35 Paint: Grey Paint: Grey PE34 PE34 Paint: Grey PE35 Note: Parts 36 & 37 are sand- wiched together to form a single PE38 part.
- Page 13 Ft Drum Instructions_Ft Drum Instructions 4/12/12 9:11 PM Page 13 Supports Mast Top Paint: Grey Note: Do not glue sup- Note: Orientation of the parts: Paint: Grey ports to top of mast. PE48 PE48 - Top PE51 PE49 - Bottom PE47 - Left Side PE46 - Right Side Paint: Grey...
- Page 14 Ft Drum Instructions_Ft Drum Instructions 4/12/12 9:11 PM Page 14 17. Derrick Placement Hoist Bldg. Line from Derrick top. .005 wire or fishing line (not included) Paint: Grey PE54 x 4 Make 4ea PE67. Space them evenly PE55 on PE68 & glue. Place PE68 on-top to form a pulley sandwich.
- Page 15 Ft Drum Instructions_Ft Drum Instructions 4/12/12 9:11 PM Page 15 Completed Crane Assembly This is the Cage Mast looking from front to rear. Note the positions of the ladders as you build the structure. This is what they should 18. Cage Mast look like when finished.
- Page 16 Ft Drum Instructions_Ft Drum Instructions 4/12/12 9:11 PM Page 16 Note: How to make the Cage Webbing fit together perfectly. Layout the part on a flat surface. Using a dowel, gently begin rolling back and forth across the part. Once you begin the rolling, apply gentle pressure downward until the part begins to curl.
- Page 17 Ft Drum Instructions_Ft Drum Instructions 4/12/12 9:11 PM Page 17 Make Platform by gluing Paint: Grey - slats Wood Paint: Grey Paint: Grey - slats Wood PE73 & PE74 together with PE73 / PE74 PE73 / PE74 PE75 all relief on the outside. PE72 Paint: Grey PE71...
- Page 18 Ft Drum Instructions_Ft Drum Instructions 4/12/12 9:11 PM Page 18 19. Yardarms Paint: Grey PE82 Paint: Grey PE77 Ladder PE83 Paint: Grey PE84 Repeat Assembly for port & starboard sides. PE81 Paint: Grey Paint: Grey PE85 Forward 20. Cage Mast Placement .005 wire or fishing line (not included) Cast Mast Pad...
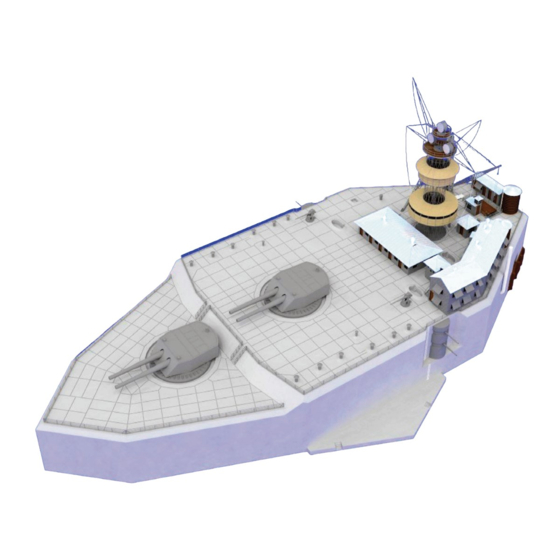
- Page 19 Ft Drum Instructions_Ft Drum Instructions 4/12/12 9:11 PM Page 19 21. Building Placement Hoist Bldg. Tool Shed Officer’s Quarters Radio Shack Projector Booth Water Towers Barracks 22. Weapons Placement 6 Inch Secondary Guns 14 Inch Main Guns 3 Inch AA Guns 6 Inch Secondary Guns...
- Page 20 Ft Drum Instructions_Ft Drum Instructions 4/12/12 9:11 PM Page 20 Top View Completed Model Ft Drum 1940 Side View Stern View Bow View...
Need help?
Do you have a question about the FORT DRUM and is the answer not in the manual?
Questions and answers