Centrodyne S700 Quick Installation Manual
Hide thumbs
Also See for S700:
- Installation, operation, & programming manual (16 pages) ,
- Quick start manual (7 pages)
Table of Contents
Advertisement
Quick Links
The S700 taximeter should be installed using the S700 Installation Drawing (below) as a guideline (see Legal Notice and
Disclaimer below). After installation of the S700 has been completed, meter calibration and rate programming need to be
performed. Typically, the rates are pre-programmed at the factory prior to shipping. All meters when first installed should be
calibrated over a measured mile.
NOTE: All S700 taximeters are equipped with Electronic Sealing of the Installation (ESI).
ESI requires the meter to be electronically matched to the vehicle bracket. This feature
prevents the meter from going HIRED when the meter and bracket are not matched. A
blinking HIRED legend indicates that the meter and bracket are not matched.
** Once your meter has been wired into the vehicle, perform the following steps, in order, to get up and running fast.
Step 1: Entering Program Mode
1. If not already done, remove the seal plate from the front right side of the meter by unscrewing the seal screw completely.
Put the plate and screw somewhere safe so as not to lose them.
2. Using a pen or small screwdriver, move SW7 (Red programming slide switch) to the left position. Either a 0 or a 6 will be
blinking in the RATE window (Small right-most display on the meter). If a 0 is blinking, proceed to Step 3. If a 6 is
blinking, proceed to Step 2.
Step 2: Entering The Passowrd
1. If a 6 is blinking in the RATE window, then your meter programming is protected by a password. If you purchased your
meter directly from Centrodyne your password should be printed on your invoice. If you purchased from an authorized
dealer you will have to contact them for the password.
2. Press SW6 and 000000 is displayed in the FARE window.
3. Press SW6 again and the right-most 0 will begin to blink.
4. Press SW4 repeatedly to change the blinking digit to the value you want.
5. Once you are satisfied with the value of the blinking digit, use SW2 to select the next digit to the left for editing.
6. Repeat 4. and 5. above until the correct password is displayed in the FARE window. Press SW6 to enter the password.
If you have entered the correct password, the meter will display a blinking 0 in the RATE window. This indicates that the
meter is now unlocked for programming. Go to Step 3.
38 N MAIN ST SUITE 101, ST ALBANS, VT 05478, 802--857-5479, support@centrodyne.com
S700 Quick Installation Guide
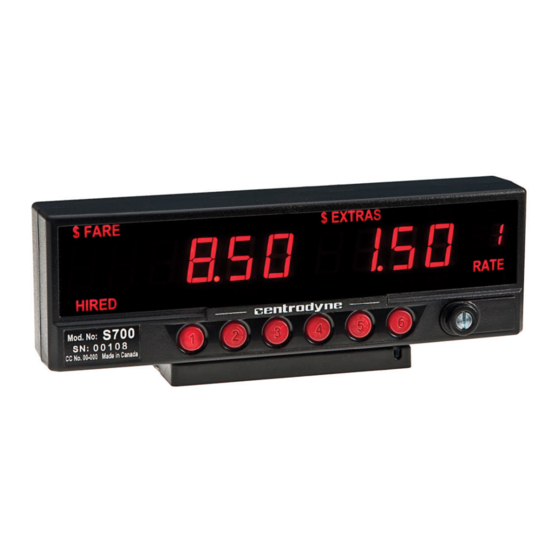
Switches and Displays on the S700
Advertisement
Table of Contents

Subscribe to Our Youtube Channel
Related Manuals for Centrodyne S700


Summary of Contents for Centrodyne S700
- Page 1 S700 Quick Installation Guide The S700 taximeter should be installed using the S700 Installation Drawing (below) as a guideline (see Legal Notice and Disclaimer below). After installation of the S700 has been completed, meter calibration and rate programming need to be performed.
- Page 2 10. Press SW2 to move one digit to the left. That digit will begin to blink. 11. Repeat 9. and 10. above until the desired Flag Drop is displayed in the Fare window. 38 N MAIN ST SUITE 101, ST ALBANS, VT 05478, 802--857-5479, support@centrodyne.com...
- Page 3 3. Place the Installation seal plate into position as indicated in the Figure 2 below. Secure with a seal screw. Do not over- tighten as you may crack the plastic. 4. Your meter is now ready to use. 38 N MAIN ST SUITE 101, ST ALBANS, VT 05478, 802--857-5479, support@centrodyne.com...
- Page 4 Centrodyne further disclaims any liability and damages (including without limitation any consequential, special, incidental, punitive, or exemplary damages) arising out of the calibration, installation, or use of the meter. In no event will Centrodyne be liable for any claim arising out of the calibration, installation, or use of the meter, whether in contract, tort (including negligence and product liability), or under any other theory of liability.
- Page 5 CAUTION: Always check with the vehicle manufacturer before making any electrical connections to the Taximeter. Follow the manufacturer directions to ensure a reliable and safe installation. Figure 1 38 N MAIN ST SUITE 101, ST ALBANS, VT 05478, 802--857-5479, support@centrodyne.com...
- Page 6 Extras to the Fare amount for a period of 5 seconds. To end the trip, press switch 1 (SW1) and the meter will return to Vacant. Figure 3 (800)655-5575 or (800)679-9939 38 N MAIN ST SUITE 101, ST ALBANS, VT 05478, 802--857-5479, support@centrodyne.com...
Need help?
Do you have a question about the S700 and is the answer not in the manual?
Questions and answers