
Summary of Contents for Saxon AA 4A
- Page 1 4A Intelligent Battery Charger Manual Please read the following safety and operating instructions carefully Suitable for 12.8V lithium and 6V and 12V lead-acid-batteries, e.g. WET, GEL-, VRLA-, AGM-batteries between 1.2-120Ah capacity AA0725...
-
Page 2: Important Safety Instructions
• This product is not a toy and should not be used as such • This product is designed for domestic use and is not a commercial product • AA/Saxon Brands disclaims any liability for damage arising from misuse of this product • Some vehicle manufacturers may have special requirements before charging the vehicle´s battery. - Page 3 Type of Batteries This charger is intended to be used only on 12.8V Lithium batteries and 6V & 12V Lead Acid Batteries, e.g. WET, Gel, AGM, VRLA-Batteries. Do not try to charge unsupported types of batteries like NiCd or non-rechargeable batteries. Follow the recommendations of your battery´s manufacturer.
-
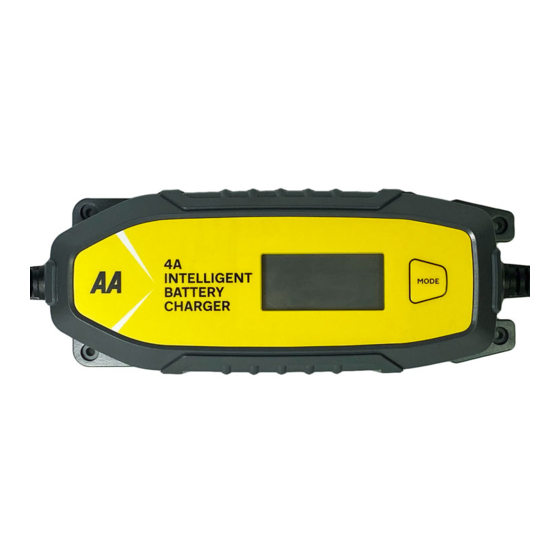
Page 4: Technical Description
Technical Description A. Battery charger IBC4000(B)/AA0725 B. Charging cables (red (+ positive) and black (- negative) ring terminals C. Charging cables (red (+ positive) and black (- negative) crocodile clips D. Mains power cable 240V E. Click & charge connector MODE-button G. - Page 5 8 Stages of Charging With the microprocessor-controlled charging steps of your AA Intelligent Battery Charger, you are able to recharge your battery to almost 100 % of its original capacity. To ensure that your battery is kept in an optimum condition, your Charger can be attached permanently even for long periods.
-
Page 6: Operation
Operation Please read carefully before using the device This system is intended to be used only with 6V & 12V Lead Acid Batteries, e.g. Wet, Gel, AGM and 12.8V 4-cells LiFePO4. This charger is suitable to charge… • 6V batteries with a capacity of 12 - 120Ah •... -
Page 7: Item Description
Charging Your AA Intelligent Battery Charger can easily be configured to charge many different types of batteries. The following recommendations should, however, only be seen as guidelines. Note: Depending on the condition of the battery, the charger adapts the charging currents to ensure optimum charging of the battery. - Page 8 FROST-Mode: If ambient temperatures are very low, a higher voltage is recom- mended to charge a battery. The FROST-Mode has to be selected in combination with the above mentioned charging modes and will increase the charging voltage as follows: FROST-Mode + Motorcycle-Mode: increased charging voltage: 14.7V FROST-Mode + Car-Mode: increased charging voltage: 14.7V FROST-Mode + 6V-Mode:increased charging voltage: 7.4V Do not use this setting for maintenance charging when tempera-...
- Page 9 Not Connected: This symbol flashes if no battery is connected or the connection is interrupted. Check the connection and reattach the charging cables. Battery-level: This symbol will flash during the charging process. The bars indicate the progress: 1 bar (20%), 2 bars (40%), 3 bars (60%), 4 bars (80%), 5 bars (90%) If the symbol stops flashing, the battery is considered as fully charged and the charger will switch automatically to “Maintenance / Trickle charging”...
- Page 10 3. Settings are made by pressing the “MODE-button” one step at a time. Releasing the button when the required mode is reached will make your selection and start the charging process Stopping the Charging Process Charging can be stopped at any time by disconnecting the power supply cord. After Charging 1.
-
Page 11: Technical Specifications
Technical Specifications This model may be operated in EU countries. Suitable Batteries Voltages 6V & 12V & 12.8V 6V & 12V Lead Acid Batteries, e.g. Wet, Gel, AGM and 12.8V 4-cells LiFePO4. Suitable Battery 6V : 12 - 120Ah capacity Types and Battery 12V : 1.2 - 12Ah capacity... - Page 12 Pictures are for illustration purpose only, Please retain packaging for future reference. The AA and the AA logo are registered trademarks of the Automobile Association Limited and are used under license. All rights reserved. Produces and distributes this product RG17 0DX | saxon-brands.com...
Need help?
Do you have a question about the AA 4A and is the answer not in the manual?
Questions and answers
does the charger arrive ready to use or does it need charging and should the screen light up
The Saxon AA 4A charger arrives ready to use and does not need to be charged. The digital display should light up when connected to the mains power.
This answer is automatically generated