
Summary of Contents for Centron Technologies CM735
- Page 1 USER’S MANUAL BLOOD COLLECTION MIXER Model CM735 No. CAT.CM73522Ce Centron Technologies Corporation 319-25 Sadang-4-dong, Dongjak-ku Seoul, Korea 156-823 Tel. +82-2.522.7807 Fax +82-2.522.7806...
-
Page 2: Table Of Contents
Table of Contents Page Important Notes 1. Scope 1-1. Features 1-2. Accessories 2. Specifications 3. Views and Locations 3-1. Top View 3-2. Rear View 3-3. Control Panel 3-4. LCD Display Panel 3-5. Tube Clamp Module 3-6. Battery Charger and Adaptor 4. -
Page 3: Important Notes
Important Notes Power Source The Blood Collection Mixer model CM735 is operated by either a battery pack or an AC power adaptor. Caution Do not put excessive weight on or push the tray downward in a forceful manner. (This avoids damage to the weight-sensitive device under the tray.) Do not place weights over 2 Kg on the tray. -
Page 4: Scope
1. Scope 1-1. Features • The Blood Collection Mixer CM735 provides efficient mixing of the blood with the anticoagulant in the blood bags. • It is a lightweight mobile unit with maximum portability. • The panel display indicates the net volume of blood collected in the blood bag. It automatically closes the tube clamp when the collected volume reaches the preset selected figure. - Page 5 (A large battery charger, model BC162, which charges 6 battery packs same time, is available for purchase from your distributor. With this charger, one pack among 6 is recharged fast in 3 hours, and other 5 packs in 10 hours.) It takes about 10 hours to recharge a pack from exhausted level to fully charged level.
-
Page 6: Accessories
1-2. Accessories included with each unit The Blood Collection Mixer CM735 includes the items shown below. (Quantity - 1 each) Collection Mixer Base Collection/Weighing Tray Battery Pack Battery Charger Unit AC Power Adaptor And, Carrying/Transportation Case User's Manual CM73522UMC.0112... -
Page 7: Specifications
Specifications a. Collection volume display ; 0 ~ 999 ml, with 1 ml increments b. Total weight display ; 0 ~ 999 grams, with 1 gram increments c. Elapsed time display ; 0 ~ 19 min 59 sec d. Target volume set (1) Range ;... -
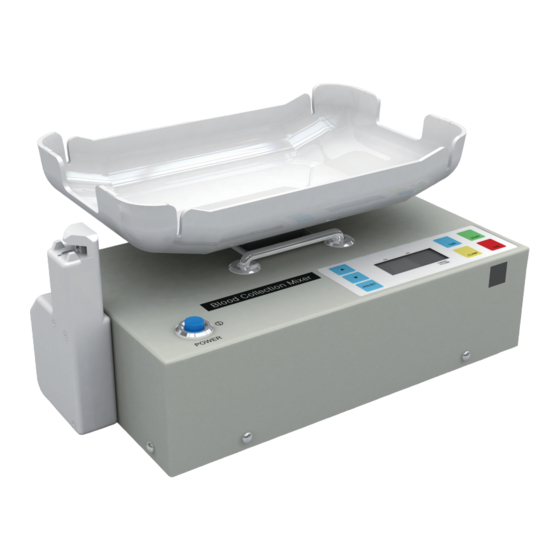
Page 8: Views And Locations
3. Views and Locations 3-1. Top View (1) Control Panel (2) LCD Display Panel (3) Power Switch (4) Tube Clamp Module (now mounted at left side) (5) Tray (6) Handle (7) Weight Calibration Hole (8) Tray Leveling Screw (9) Clamp Module Connection Hole (10) LED lamp CM73522UMC.0112... -
Page 9: Rear View
3-2. Rear View (1) Battery Pack (2) Battery Compartment Door (3) Power Adaptor Inlet (4) Tray (5) Tray Mount (6) Handle (7) Tube Clamp Module CM73522UMC.0112... -
Page 10: Control Panel
3-3. Control Panel (1) [ ] Switch START (2) [ ] Switch (3) [ ] Switch TIME (4) [ ] Switch CLAMP (5) LCD Display Panel (6) [ ] Switch (7) [ ] Switch DOWN (8) [ ] Switch PRESET CM73522UMC.0112... -
Page 11: Lcd Display Panel
3-4. LCD Display Panel (1) Main Display (Volume/Weight) (2) Preset Target Volume Display (3) Low Battery Indicator (4) [ALARM] Indicator (5) [TIME] Indicator (6) [BLEED] Indicator (7) [END] Indicator (8) [ML] Indicator (9) [GRAM] Indicator CM73522UMC.0112... -
Page 12: Tube Clamp Module
3-5. Tube Clamp Module (1) Tube Clamp (2) Guide Pin (3) Connection Plug (4) Mounting Screws CM73522UMC.0112... -
Page 13: Battery Charger And Adaptor
3-6. Battery Charger and Adaptor (1) Battery Charger Unit (2) Adaptor Inlet (3) Charging Indicator Lamp (4) AC Power Adaptor (5) Output Plug (6) AC Cord Plug CM73522UMC.0112... -
Page 14: Functional Descriptions
4. Functional Descriptions [The figure in Section 3-1. Top View] (1) Control Panel - has seven control switches and an LCD display panel. (2) LCD Display Panel - is a custom-designed display panel on which all information is shown. (3) Power Switch - turns the power on and off. (4) Tube Clamp Module - is detachable, it can be mounted at either the left or right side of the tray. - Page 15 (6) [ ] Switch - increases the preset target volume by 5 ml each time pressed. (7) [ ] Switch - decreases the preset target volume by 5 ml each time pressed. DOWN (8) [ ] Switch - recalls one of the numbers that were factory-set. If the preset PRESET numbers are 450 and 500 ml, the target volume displayed toggles as 500 - 450 - 500 - 450 - ...
- Page 16 [The figure in Section 3-6. Battery Charger and Adaptor] (1) Battery Charger Unit - is a power supply source to recharge the battery pack. The Output Plug (5) of the AC Power Adaptor (4) is plugged in the Adaptor Inlet (2). (3) Charging Indicator Lamp - is on during recharging.
-
Page 17: How To Use Equipment
5. How to Use Equipment 5-1. Preparation before Use (1) Open carrying bag and unpack mixer, tray, battery and AC adaptor. (2) Insert battery pack into the compartment and close the door. To operate the equipment by AC power, plug the AC power adaptor in the inlet on the rear panel. -
Page 18: Operating Procedures
5-2. Operating Procedures (1) Set target collection volume with the [ ] buttons. PRESET DOWN (2) Place blood collection bag on tray. (3) Route blood collection bag tubing through tube clamp. [Note 3] The tubing length from the clamping point to the blood bag should not be shorter than 30 centimeters (1 ft) to ensure proper rocking movement. - Page 19 [Note 7] If blood flow rate is slow, lower than 30 ml per minute, and remains low for 1 minute, audible beeps will sound and the [ ] indicator ALARM will be activated. Check donor phlebotomy site to ensure blood flow is adequate.
-
Page 20: Audible Alarm Signals
5-3. Audible Alarm Signals Different audible alarms are generated by a buzzer to indicate that the attention of the phlebotomist is required. A. End of normal collection: ----- activated when collection ends normally. Follow Section 5-2-(7). ----- Three long beeps (1 second long each) each 30 second interval * Press [ ] button. - Page 21 D. Tray removal: ----- activated when the tray is removed. ----- Beeps sound twice a second until power is turned off. * Turn the power switch off. E. 10 minutes passed: ----- activated when 10 minutes passed after the start of collection. ----- 20 rapid beeps (twice a second) only once for 10 seconds.
-
Page 22: Recharging The Battery
5-4. Recharging the Battery The battery pack can be recharged in two ways. It can be recharged in the mixer unit, or with the battery charger unit included. Recharging the battery pack while still in equipment (1) Plug the AC power adaptor into the jack on the rear panel of the main unit. (2) Plug the AC cord plug into a wall outlet. - Page 23 [Note 1] Recharging a battery for more than 10 hours is not harmful to the battery or any circuit. [Note 2] The expected lifetime of a rechargeable battery is about 6 months to 2 years. If operation time is apparently reduced, or if nothing is displayed on the LCD panel when the power switch is turned on, the battery pack may be worn out or have permanent damage.
-
Page 24: Moving The Clamp Module
5-5. Moving the Clamp Module The tube clamp module is detachable and users can change its mounting place either to the left or to the right side of the mixer. (1) Turn power switch off. (2) Remove the three screws (# 1), and pull out the clamp module (# 2). (3) Remove the two screws on the side panel (# 3) and the one screw (# 4). -
Page 25: Maintenance
6. Maintenance 6-1. Troubleshooting User maintenance is limited to battery charging, cleaning, calibration and tray leveling. The following table covers common problems and suggested solutions: Symptom Likely Cause Solution Power switch is on, but Exhausted battery Recharge battery as per Sec. 5-4. no display comes on. -
Page 26: Calibration
6-2. Calibration Designed tolerance of weight measurement is +/- 1 gram. For example, if a standard weight of 500 grams is put on the tray, the display should show a figure between ‘ ’ and ‘ ’. Otherwise, the equipment may be subject to calibration by users. Checking accuracy of weight measurement (1) Prepare a known weight of about 500 grams. -
Page 27: Leveling The Tray
6-3. Leveling the Tray Tray leveling is ensured by a magnetic position sensor and precision mechanism. After long use for years, the tray might become unlevel. Leveling of the tray can be simply adjusted by users. (1) Prepare a flat (-) tip screwdriver, 3-5 mm (1/8-3/16”) in diameter. (2) Turn power off and remove tray from tray mount (# 5 in the figure in Section 3-2). -
Page 28: Service Call
6-2. Service Call If the equipment does not operate properly, or if you need assistance, contact your distributor or the manufacturer: CM73522UMC.0112...
Need help?
Do you have a question about the CM735 and is the answer not in the manual?
Questions and answers