Download Print this page

Advertisement

Quick Links

WiFi Module Instruction Manual
Welcome
Thank you for purchasing a Pro Series Pumps product.
We, at Glentronics, strive for excellence in all of our
products and work to make everything user friendly.
Should you need our help, please visit our website at
www.StopFlooding.com or contact us at 1-800-991-0466.
Getting set up and connected is simple
1. Determine what Pro Series device you have and how
you are attaching to it
2. Attach your WiFi Module to your Pro Series system
3. Accessories available
4. Wi-Fi water alarm
5. Mount your WiFi Module
6. Connect to your Wi-Fi network
7. Register online
Other important information
8. Test the setup
9. The Glentronics Connect website
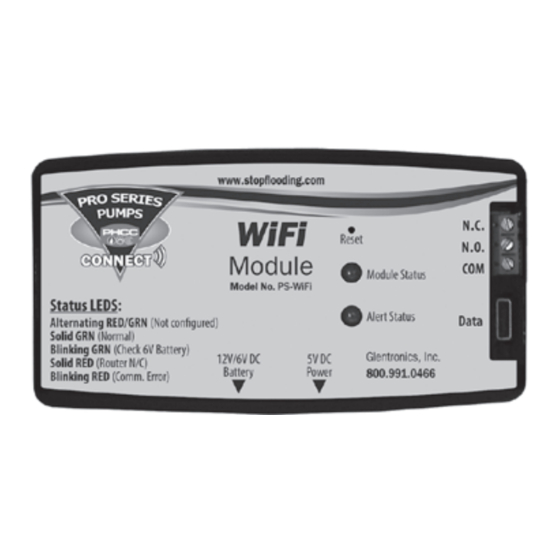
10. Explanation of the lights
11. Resetting the module & Troubleshooting
Before you begin
View the installation video at
www.StopFlooding.com/videos
What you need:
Small flathead screw driver
Wi-Fi network name
Wi-Fi network passphrase
Wi-Fi capable device (computer, tablet, or smartphone)
Recommended: Battery backup for your Wi-Fi router/
modem (battery built-into router or UPS)
This is a Wi-Fi based device that can remotely alert the user
of potential water problems in their home. It will use the
internal Wi-Fi chip to connect to the user's Wi-Fi network
through their router. When connected to a backup sump pump
system, it will send an email or a text message to the user's
phone, or other device, when there is a potential problem
with the connected sump pump system. In the past, the user
would have to be home to be notified of any problem with
water or the sump pump system. With this device, the user
will be able to receive alerts when away from home.
This WiFi Module includes:
• WiFi Module
• 6V Battery pack (4 x AA not included)
• Remote terminal cable
• Mini USB cable
• 5V 1A USB charger
(1) Determine what Pro Series device you are
attaching to and how to attach
(see diagram sheet for visual help)
1. If you are attaching to a
Pro Series Connect backup
system with a USB port:
Go to section 2A
List of compatible models:
1850 Connect
2400 Connect
2. If you are attaching to a Pro Series
backup system with a Remote terminal:
(Backup systems that do
not have a USB port)
Go to section 2B
• 12V Battery cable
• Micro USB cable
• Mounting hardware

Advertisement

loading

Summary of Contents for Glentronics PRO Series PUMPS

  • Page 1 With this device, the user will be able to receive alerts when away from home. Welcome Thank you for purchasing a Pro Series Pumps product. We, at Glentronics, strive for excellence in all of our products and work to make everything user friendly.
  • Page 2 List of compatible models: 2. Connect the standard USB end into 1730 (since 2014) the USB port on the backup sump 2400 (since 2006) pump controller PS-C22 (since 2014) Note: When using the data PS-C33 (since 2006) connection, no other cable is 3.
  • Page 3 1. Using the 3 foot remote 9. Attach the smaller terminal cable, attach ringlug labeled one end of the cable negative (-), to the labeled ‘NO’ to the negative post of the Normally Open port battery. labeled ‘NO’ on the 10.
  • Page 4 (a) The Red and Green lights should start alternating Note: This connection style should not be used if your C2 controller is a Pro Series Connect and has a USB port. You (b) This means the module is ready for setup will only connect via the USB port.
  • Page 5 (4) When Using as a Wi-Fi alarm only This accessory can be ordered by calling our office at: 1-800-991-0466 The Pro Series Pumps WiFi module is designed so that it Once you have the part: can be used as a standalone Wi-Fi water alarm (additional accessories are required).
  • Page 6 (a) If you will be using this in a sump pit, sewage pit, our office at: 1-800-991-0466 or other area that can handle a 3/8” depth, proceed to Once you have the part: Section 4-1. (a) Mount the High Water Contacts (HWC) with the sensor (b) If you will be using this in an area where you need to pads down and secure in place using the holes in the know when there is minimal buildup of water, proceed...
  • Page 7: Connect To Your Wi-Fi Network

    5. In the URL field, enter This will explain how to complete the registration process 192.168.1.1 Hit enter/go and how to access the Glentronics Connect website. This website will be used to edit your entered information This will take you to the...
  • Page 8: Testing The Setup

    3. Click on the ‘Complete Registration’ link in the lower the setup process. It will left and it will take you to the Glentronics Connect website also allow enabling of the following options: 4. This page will contain all your entered information.
  • Page 9 (10) Explanation of the lights more than one WiFi module is registered, they can be This section will explain what the lights on the selected by clicking on the WiFi module mean. dropdown list above the Alarm status. This page 1.
  • Page 10: Troubleshooting Guide

    Changes or modifications not expressly approved by with the limits for a Class B digital device, pursuant to part Glentronics could void the user’s authority to operate the equipment. 15 of the FCC Rules. These limits are designed to provide...
  • Page 11 LIMITED WARRANTY By opening this package and using this GLENTRONICS, INC. product, you are agreeing to be bound by the terms of the GLENTRONICS, INC. limited warranty (“warranty”) as set out below. Do not use your product until you have read the terms of the warranty. If you do not agree to the terms of the warranty, do not use the product and return it within the return period stated on your purchase receipt from the retail store or authorized distributor where you purchased it for a refund.
  • Page 12 The product must be returned to GLENTRONICS, INC. for inspection in order to be considered for warranty service. If the product is not returned to GLENTRONICS, INC. or the product is inspected by any person, plumber, contractor or business other than GLENTRONICS, INC., this warranty shall no longer be valid.

This manual is also suitable for:

Ps-wifi