Table of Contents
Advertisement
Quick Links
Advertisement
Table of Contents

Summary of Contents for VST MN3010E
- Page 1 Fire Alarm Control Panel MN3010E USER’S MANUAL...
- Page 2 Version:5059161214 Preface VST-3010W fire alarm control unit (linkage type) is a new generation of intelligent and integrated fire alarm and linkage control unit designed by Victory System Technology . The company strictly follows the requirements and spirit of GB 4717-2005 Fire Alarm Control Unit and...
-
Page 3: Table Of Contents
Contents Chapter 1 System Overview.........................1 System introduction......................1 System features........................1 System connection diagram.....................1 Introduction to system constituent equipment............2 Technical parameters of system products..............3 1.5.1 Power supply......................3 1.5.2 System operating environment................. 3 1.5.3 Peripheral equipment................... 3 Chapter 2 Engineering Installation and Dimension of the System...........4 Outline and dimension diagram of products...............4 System installation......................4... - Page 4 4.4.6 Query current isolation..................37 4.4.7 Cancel all isolation....................38 4.4.8 Check current delaying..................38 Historical query........................38 4.5.1 Historical fire alarms...................38 4.5.2 Historical faults....................39 4.5.3 Historical request/feedback................39 4.5.4 Historical operations..................40 4.5.5 Historical deletions..................... 40 Special operations......................41 4.6.1 USB equipment data backup................41 4.6.2 USB data load.......................
-
Page 5: Chapter 1 System Overview
Chapter 1 System Overview 1.1 System introduction VST-3010W fire alarm control panel (hereinafter referred to fire control unit) is a new generation of fire alarm control panel launched by Victory System Technology Ltd. In order to meet the engineering design demand, the control unit is provided with both linkage and control functions. -
Page 6: System Connection Diagram
1.3 System connection diagram Figure 1-1 System connection diagram Note: Refer to the connection diagrams of detectors/modules for the connection of detector, interface module, monitoring module and control module. 1.4 Introduction to system constituent equipment As shown in Figure 1-1,in order to familiarize you with this system, the constituent equipment is introduced briefly in the following sections. -
Page 7: Technical Parameters Of System Products
fire hydrant The system can get access to multiple intelligent modules produced by the company, with the main types as follows: Input module JK-952, Input module JS-951, output module KZ-953 and I/O module KZJ-956. Meanwhile, it can also get access to intelligent acousto-optic alarm apparatus SG-991, and intelligent manual alarm button J-SAP-M-960 and intelligent fire hydrant J-SAP-M-961. -
Page 8: Chapter 2 Engineering Installation And Dimension Of The System
Chapter 2 Engineering Installation and Dimension of the System 2.1 Outline and dimension diagram of products Outline and dimension of VST-3010W Figure 2‑1 Case dimension 2.2 System installation 2.2.1 Open-box check Before installation, check the field equipment at first. After opening the packing box, check... -
Page 9: Chapter 3 System Debugging And Use
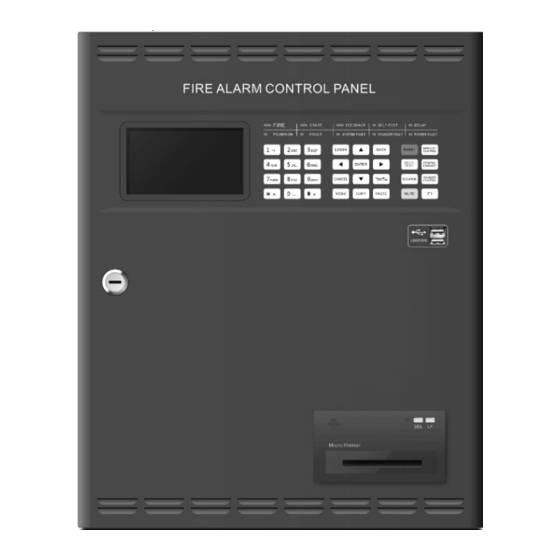
3.2 System operating instructions 3.2.1 Functions of the panel The layout of VST-3010W panel is as follows: Figure 3-1 Layout diagram of the panel The design of panel contains the basic functions of alarm enquiries and control. The indication... - Page 10 alarm. The indicator light will be lit if the system has sent out a START linkage request of a certain module. The indicator light will be lit if the system has received a FEEDBACK linkage feedback of a certain module. The indicator light will be lit when the system detects any fault FAULT Yellow...
- Page 11 correct password and LOGIN indicator light is lit. Under open state, press LOGIN or * panel keyboard or C of USB keyboard to close the keyboard and log out. When the panel keyboard is open, the system will automatically log out the logging status and close the panel keyboard If it is inactive for about 10 minutes.
- Page 12 test, try many acoustic modes for buzzer (fire alarm, fault and feedback) and illuminate the pixel matrix on the screen by sequence. The system will log out automatically after self-test completion. Under self-test state, press SELF-TEST key again to exit the self-test state. Attention The system will not receive alarm signals temporarily under self-test state.
-
Page 13: Start-Up And Power-On
on the display screen, as shown in the following figure: The title bar Display model and name of the host as well as company logo The status bar It has the following main functions: Display the special function buttons available currently ... -
Page 14: Login Operation Of The Users
Figure 3‑7 Normal prompt interface of the system operation The prompt interface means the system has entered into the monitoring status. 3.2.3 Login operation of the users Login in refers to the process of entering password by the users and identifying by the system. - Page 15 Figure 3‑9 Password logging window In order to keep confidential, “*” will be displayed in the input box when entering any key value. After login-in, panel keyboard will be opened at the same time and indicator light on the panel will be lightened. LOGIN ...
-
Page 16: Special Function Keys Of The System
move). Under not-logged-in state, the user may only execute “MUTE” operation and other operations are not allowed. 3.2.4 Special function keys of the system The system adopts the standard USB keyboard compatible with PC and defines the following special function keys. The function keys corresponding to keyboard are set on the panel keyboard and the specific contents are as follows: Function keys Shortcuts... -
Page 17: Input Of Characters
Under fire alarm and feedback state, the system administrator is not allowed to enter into the setting interface. This is because the system decides emergencies have been detected and must be disposed preferentially. At this moment, F1 key is in vain. However, the system debugger and the super user may enter into the setting interface under fire alarm and feedback state as the system decides it is under debugging or maintenance state currently. -
Page 18: Chapter 4 System Configuration Details
Chapter 4 System Configuration Details This chapter will describe operation of the submenus related to the system configuration, including system setup, bus setup and linkage setup. The following figure is the list of menu setup. Figure 4‑1 List of menu setup 4.1 System setup Click on S menu and pop up the submenu, as shown in Figure below:... -
Page 19: Time Setup
4.1.1 Time setup The time setup interface is as follows: enter into proper date and time, click the OK button, and the system will save the time set by the user. Figure 4‑3 Time setup interface In the networking system of multiple hosts, as the host time is required to be the same, all hosts in the system will take time of the concentrator as criterion. -
Page 20: Networking Setup
4.1.3 Networking setup The system supports the networking of 20 control hosts of VST-3010W series. Due to requirements of over-host linkage, the fire alarm message shall be transmitted to the concentrator or other regional units in the network simultaneously, so the networking must be carried out. - Page 21 The transmission rate set for all hosts in the network must be the same, the networked hosts must be acknowledged and the host number shall differ from each other. The networking setup interface is as follows: Figure 4‑6 Networking setup interface After modification of networking setup information, the machine can operate normally only after power-on again.
- Page 22 Figure 4‑7 Schema of transmission distance Type of networking transmission line The commonly-used connecting lines consist ① shielded twisted pair, ② ordinary twisted-pair, ③ shielded line, ④ plain conductor and otherwise. By our test, the effective transmission distance of ① and ②...
-
Page 23: Password Setup
4.1.4 Password setup The password setup interface is as follows: Figure 4‑9 Password setup interface Modifying method: enter into the new password twice in “New password” and “Confirm”. Then press OK button to save the setup and exit; press button to retain the original CANCEL setup and exit. -
Page 24: Power Setup
Figure 4‑10 Indicating panel setup interface 1 Find the address of 485 bus indicating panel to be registered. Click on "Registration" column to show "√". Double click "Type", "Building" and "Floor" columns and select type, building and floor in the drop-down box. Enter description information at "location description" column. -
Page 25: Printer Setup
debugging is required. 4.1.7 Printer setup The printer setup interface is as follows: Figure 4‑12 Printer setup Method of modifying: the transmission rate of printer is fixed to 9600. Click on "Registration" column of the corresponding power to show "√". Press "OK" button to save the setup and exit, otherwise press "Cancel"... -
Page 26: Bus Setup
4.2 Bus setup The submenu of bus setup is as follows: Figure 4‑15 Bus setup menu 4.2.1 Detector/module setup The setup interface of detector/module is a key and relatively complex one of the system. All detectors/modules controlled by the system can be set up in this interface. The setup interfaces of detector/module are as shown in the following figure: Figure 4‑16 Detector/module setup The following section describes the line-by-line sheet setup of detector/module. - Page 27 The options of detector/module production type include: Ion detector Photoelectric detector Thermal detector Infrared detector Combination detector Gas detector JK input module Output module JS input module I/O module Manual control button Manual alarm button Acousto-optic alarm KZJ-LD Fire hydrant button apparatus Acoustic alarm apparatus Light alarm apparatus...
- Page 28 Figure 4‑20 Setup of building number, floor number and room number As shown in the figure, the building number is selected through the drop-down box and the input of floor number and room number is similar. The locations of detector/module can be described in detail by the character string of location description;...
- Page 29 when the user presses "Cancel" after modifying contents in the form, the system will display the following warnings: Figure 4-23 System warnings If you really do not want to change the original setup, click on "N" or press "N" on the standard keyboard, and if it is required to save the updated data, click on "Y"...
-
Page 30: Work Mode Setup
window interface of batch setting column, as shown below: Figure 4-25 Batch setting column of detector/module The setting interface is divided into three parts. The first part is to set equipment properties in the column (if the column header is equipment type, choose to set equipment type. If the column header is building number, choose to set building number). -
Page 31: Add Equipment Type
Figure 4-28 Work mode setup Select interface board number, circuit number and work modes to be changed in the corresponding drop-down box; enter into address number of the equipment to be changed at "Address"; and then click on OK button, work modes of relevant detector/module will be changed and information of successful modification will be displayed. -
Page 32: Linkage Setup
Figure 4-31 Type setup interface The system provides 5 expanded alarm types and feedback types, the default names are “fire alarm type XX” and “feedback type XX”, and the user is free to change names. The alarm type means the return information of equipment added by the user, which is regarded as the return of alarm signal by the system. - Page 33 Figure 4‑33 System linkage setup interface The setup interface is divided into 3 areas: condition setting area, result output area and target selection area Each page (i.e. display of the entire screen) corresponds to a linkage condition. The setup flow of a linkage condition is as follows: Step 1: condition setting Four buttons (P and D...
- Page 34 Step 2: select the module required to be started when conditions are satisfied Click on a certain module in the list box and click on << button, to add this module into the result list area. Except for "manual control panel linkage setup", a linkage condition can be used to start multiple modules, therefore step 2 and step 3 can be repeated to add multiple output results.
- Page 35 Figure 4-36 Selection of input type The 5 types commonly used by the system are presented by check boxes and 4 drop-down selection boxes are given for selection of any equipment type. If the types to be selected exceed 9, a linkage condition can be set additionally, pointing to the same output results. The selection of linkage alarms is as shown in the figure below: Figure 4-37 Linkage alarm selection The default value of linkage alarm is 01, which means the condition is satisfied when any...
-
Page 36: Building Linkage Setup
the module is requested for the second time. The setup of other linkage types in the system is identical to that of system linkage. The difference is the input box for other information is added in the linkage condition setup. The following section gives a brief description based on the illustration. -
Page 37: Room Intergration Setup
Figure 4-40 Floor integration - point output The figure shown above is the floor integration of point output type and certain floor in the system can be selected by drop-down box, which means The alarm of detector or module of any specified type at the floor will cause the modules listed in the result list to act.. -
Page 38: Setup Of Four-Wire Fire Hydrant
modules generate alarms. The host number can be set in the condition column, which means detector or modules participating in the compound operation may come from any host in the networking system! Less than 5 detectors or modules can be set in the condition column and the remaining input columns must be kept empty if the number is less than 5. -
Page 39: Repeat Address Check
4.4.1 Repeat address check The repeat address check aims to check the repeated address number of devices in the loop. Figure 4‑45 Repeat address check interface Select “query” to carry out the repeat address check. Now, “query” and “return” buttons are disabled. -
Page 40: Single-Start/Stop
Figure 4-47 Single-point test result The curve in the figure represents current state of detector/module. The scale is marked on vertical coordinate at the left side of the screen, from which the information return value can be read. The user may click on "Exit" button at the right bottom corner of the screen at any time, to exit out of the single-point test state. -
Page 41: Auto Register
Figure 4-48 Address selection of single-start/stop The user may select one of the module addresses by drop-down box and click on TART to carry out corresponding operations; click on button directly to exit out of the dialog box without performing any operation. Click on drop-down button of address number and the system will list addresses of all output or input modules for selection by the user. -
Page 42: Isolate Current Alarm
The above figure shows that 5 detectors are registered in the original setting, but only 2 detectors are on-line currently; 10 modules are registered, but only 7 modules are on-line. The figure also prompts warning messages, such as "Press OK to enter setup interface" and "register and production type address will be changed", to prompt the user to make choice. -
Page 43: Check Current Delaying
Figure 4-53 Cancel isolating information 4.4.8 Check current delaying In case of linkage, if the linked equipment is provided with delay time and is during the delay time, the linkage modules delaying at current can be inquired with this function. The delaying list will be empty when inquiring after all delays end. -
Page 44: Historical Faults
Time Company Equipment Type (Year/Month/Day/ Fire Description Code Fault Type Hour/Minute) 13/06/08 15:38 01008 Science Building OptD Lose The following figure is the query interface of historical fire alarms: Figure 4-56 Historical fire alarm interface To use print function of historical fire alarms, enter start number and end number of the historical fire alarm to be printed at the print column in the lower left corner. -
Page 45: Historical Operations
indicates the time of equipment action feedback. {16:28} signifies the time of stopping start/feedback The query interface of historical request/feedback is similar to that of historical fire alarm, which lists request time and feedback time, as follows: Figure 4-58 Historical feedback/request interface 4.5.4 Historical operations Historical operations include the operations carried out on the system by the user, such as login in, reset and muting. -
Page 46: Special Operations
Figure 4-60 Historical deletion submenu The historical deletions can be used to remove historical faults, historical feedback, historical fire alarms and historical operations, and this historical information can be deleted by selecting relevant option. Barring special circumstances, the user is not suggested to delete historical records. - Page 47 Figure 4-62 Prompt of U disk data backup If U disk is inserted incorrectly, the system prompt will be as follows: Figure 4-63 Prompt when U disk is not inserted If U disk is inserted correctly and the remaining storage capacity satisfies the requirement, the system will proceed to copy setup data and historical data into U disk and indicate the document processed currently, as follows: Figure 4- 64 Prompt of U disk data backup...
-
Page 48: Usb Data Load
4.6.2 USB data load Download the data in U disk into the system host. The host will search for all system files automatically and copy them into data Flash of the host. The operation needs to be reconsidered, as setup data of the host will be overwritten (note: historical files are copied during data backup, but ignored during data load). -
Page 49: Statistics
follows: Figure 4-69 Document reset To prevent important setup information from losing due to mal-operations, this function can only be used after logging in through “super user” password and ordinary users are not allowed to use it. 4.6.5 Statistics The statistical function is used for counting registered number of zones, buildings and floors in the system and registered number of detectors and modules of each type set on the interface board. -
Page 50: About
performance and thus the user is suggested to use this function. The backlight tubes of all displays (LCD) have a certain service life, typically 10,000-30,000 hours. If the system is under alarm state (regardless of fault state or fire alarm state), the timed power off the display will be disabled, that is, the display will be normally on. -
Page 51: Chapter 5 Alarm Function
Chapter 5 Alarm Function Alarm is the main function of the fire alarm linkage control equipment. The system can recognize, control and drive our company’s bus devices and multi-wire devices, including intelligent detectors and modules. The alarm functions mainly include fire alarm, device request/feedback and handling and display of various faults. - Page 52 indicator light and the buzzer. The alarm interface locks the first alarm message of each alarm type (always exhibits in the first line, not participates in the scroll display). Alarm messages following the first one are in the circular scroll display with an interval of 5 seconds. The message stops scrolling for 15 seconds when the user chooses to view and the message will resume scrolling after 15 seconds.
- Page 53 8. Activated alarm box Activated alarm box is used to show which type of alarm messages in the alarm interface is under activated status and only such allows manual query operation. Operations can be performed on the alarm interface: a. Alarm information query: ...
- Page 54 3. The power state is that the main power is normal and the backup power is charging; 4. The first fire alarm, the first request and the first fault are displayed in different colors; 5. Fire alarm shows information concerning building, floor and room; 6....
-
Page 55: Chapter 6 Analysis And Elimination Of Possible Causes Of The Fault
Fault phenomenon: The printer prints messy code at the time of alarm. The host of VST-3010W series can set multiple printer types and their communication parameters. Possible causes: The printer type set is not consistent with that of equipped printer. It is the thermal printer when set as "SPRT-02 printer"... - Page 56 The networking of VST-3010W series host adopts a relevant advanced CAN BUS protocol at the current, which requires serial connection of networked hosts only and prohibits star connection.
-
Page 57: Chapter 7 Appendix
Chapter 7 Appendix Appendix1: List of Equipment Types Types of alarm equipment: IonD (Ion smoke detector) OptD (Photoelectric smoke detector) HeatD (Heat detector) BeamD (Infrared detector) CombD (Composite detector) ConvIon (Interface ion detector) ConvPhoto (Interface photoelectric detector) ConvTherm (Interface heat detector) ConvBeam (Interface infrared detector) 10 ConvCombn... - Page 58 16 Generator (Alternator) 17 SprinPump (Spray pump) 18 PresrPump (Stabilizing pump) 19 FirePump (Fire pump) 20 FoamPump (Foam pump) 21 Drencher (Water curtain pump) 22 CutPubPwr (Municipal electricity cut-off) 23 Lift-Down (Elevator forced landing) 24 CurtnHalf (Curtain semi-drop) 25 CurtnDown (Curtain full-stop) 26 Air-condt (Air conditioner)
Need help?
Do you have a question about the MN3010E and is the answer not in the manual?
Questions and answers