
Summary of Contents for Roar Quad 15
-
Page 1: Table Of Contents
May 2021 User manual Contents: 1. Safety instructions, Warranty, 7. Control & Programming with MIDI Accessories & Installation 8. Setup Examples 2. Introduction 9. Programmable/MIDI – controlled 3. AC input & AC outlets (Mains) pickup switching 4. Connections – Audio & MIDI 10. - Page 2 For 19” rack installation, see section 1.3. 7. Avoid using the Quad 15 in damp or wet conditions. Do not expose to water or liquids. 8. Always replace fuses with correct types shown in Table 2:...
- Page 3 1. The depth of other rack units must not cover more than half of the Quad 15 ventilation holes. 2. If possible, mount the 4 included rubber feet on the bottom of the Quad 15 before installing in the rack case to ensure 4mm distance from other rack unit placed underneath.
-
Page 4: Introduction
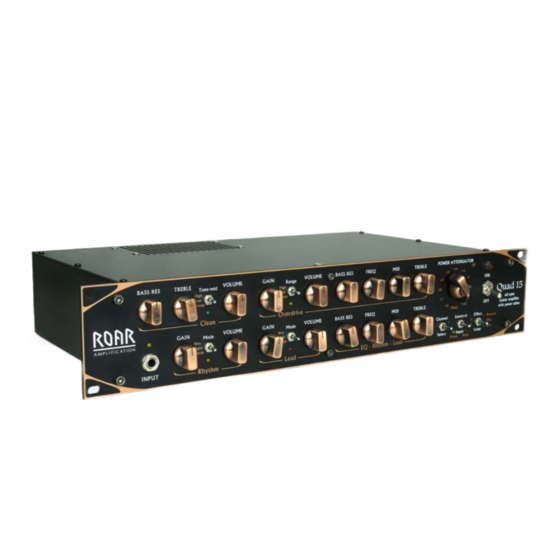
2. Introduction The Quad15 is an all tube 4 channel guitar amplifier with programmable effect loops, outputting 15 watts to a speaker cabinet (not included). The output power to the speaker can be attenuated by the built-in power attenuator to retain the desired amount of power tube overdrive: ”The Sound of Loud at All Levels”... -
Page 5: Connections - Audio & Midi
4. C – A & MIDI ONNECTIONS UDIO This chapter describes all audio & MIDI connections to the Quad15. Use screened jack cables of good quality for audio connections except for the speaker output, where a dedicated speaker cable is recommended. 4.1 I NPUT FRONT... - Page 6 4.5 P GAIN EFFECT LOOP The Quad 15 is equipped with a classic effect loop between the preamp and the power amp. With simple controls, you can program whether the effect loop should be parallel, serial or de-activated: Return on...
- Page 7 Connect speaker cabinets to the speaker jacks on the rear panel of the Quad15 using dedicated speaker cables. The total impedance must be minimum 8 ohm and the lower speaker jack must be used first. It is safe to use the Quad 15 as a preamp only when no speaker cables are connected to the speaker outputs! Speaker(s) connected...
-
Page 8: Preamp - Channel Description
HANNEL DESCRIPTION The preamp of the Quad 15 consists of four channels, each with 3 modes for a variety of clean, compression, overdrive and distortion characteristics. This section describes the individual controls of the channels and how they sound. Visit www.roaramps.com... - Page 9 5.2 O VERDRIVE C HANNEL With a more classic overdrive character, this channel is designed to cover a wide range of overdrive/distortion sounds. From compressed cleans to classic overdriven blues or medium rock distortion and even metal sounds for rhythm work. Three switchable gain range settings make it easy to adjust the desired amount of gain with the gain knob.
- Page 10 5.3 R HYTHM & EAD C HANNELS The Rhythm and Lead channels are Hi-gain channels that also master the lower gain territory. Built around the 5751 tube, they share the same EQ section, described on page 12. Both channels have their own “Mode” switch with three different preamp characters for a variety of OD/DIST sounds Four tube stages in the preamp result in plenty of gain for Leads, rock and metal guitars, even for lower output pickups.
- Page 11 EAD C HANNEL With slightly more gain and mid/treble boost compared to the Rhythm channel, the Lead channel is dedicated to solos without the need for any external boost pedal. Preamp overdrive/distortion GAIN: At lower gain settings, the Lead channel still provides good control and clarity for chord work. As you turn up the gain, single notes will be more bold with plenty of sustain.
- Page 12 5.4 EQ – O & R VERDRIVE HYTHM BASS RES 14 dB bass resonance control Adds body and fat dynamic bass Contributes to power amp overdrive when you turn it up Affects both dry signal from Preamp and signal from effect return The preamp of the Quad15 is designed to produce strong mids and highs to retain clarity and chord definition.
- Page 13 Adjust the level of mid frequencies from the preamp The mid control attenuates the mids at a certain frequency set by the “FREQ” control, which lets you change the fundamental sound of your amp Note that if you turn the mid control up fully, the “Freq” control will have no effect since there will be no attenuation of the mids.
-
Page 14: Power Attenuator
6. P OWER TTENUATOR The built-in Power Attenuator lets you control the desired listening level while retaining a natural “speaker cabinet” response. A total of 12 steps let you go all the way down to bedroom level with as much power amp overdrive as you prefer. - Page 15 Connect a MIDI-foot controller (like the one shown below, not included) to the “MIDI – IN” connector on the rear panel of the Quad 15 with a standard MIDI-cable. Your MIDI-foot controller can be phantom powered by the Quad 15, see page 7.
-
Page 16: Setup Examples
XAMPLES The Quad 15 is designed for any setup imaginable, from the most basic to the most advanced stereo setup. Plug in your guitar, your speaker cabinet and a MIDI-footcontroller and you're ready to rock! Or get some inspiration from the following examples that also include customized guitar cabinets that can be found on the website www.roaramps.com. - Page 17 8.2 H – H 12” OWER ETUP EAD WITH CABINETS The Quad15 delivers 15W of tube power to the top cabinet. An additional Class D power amp is replicating the sound of the Quad15 – delivering hundreds of watts to additional speaker cabinets. •...
- Page 18 8.3 H – R 12” OWER ETUP ACKCOMBO WITH CABINET A rackcombo holding the Quad15, additional power amp, rack effects and effect pedals can be placed on top of a 3 by 12” cabinet for maximum flexibility and convenience. 8.4 T AS A PREAMP ONLY Use the Quad15 as a “preamp only”...
- Page 19 8.5 S – TEREO ETUP WITH EFFECTS AND MIDI FOOTCONTROLLER The ultimate setup for the demanding lead guitarist. Three speakers retain clarity for stereo sounds and provide the sound engineer with the dry/direct signal for better control behind the mixing desk. •...
- Page 20 8.6 S – R TUDIO SETUP AMPING • Record the raw guitar pickup signal by connecting the upper “GUITAR OUT” jack of the Quad15 to your recording device (DAW, soundcards, etc.) (Don’t use the lower “GUITAR OUT” jack socket. It will typically cause hum, since it is equipped with a 10 ohm loop break resistor) •...
-
Page 21: Programmable/Midi - Controlled Pickup Switching
The simplest way to modify your guitar for programmable pickup switching with the Quad 15 is shown above. A stereo jack cable is required along with two volume pots or one double pot. To be able to use your guitar with standard mono input cables for other amplifiers, there are several options to incorporate a pickup switch in your guitar as shown in the following examples. - Page 22 Connect your guitar to the Quad 15 with a stereo jack cable. • Pull the “Neck volume control”. • Select between “Front” and “Rear” pickup with the Input selector on the Quad 15. (Pickup switch on your guitar is now de-activated) • Separate volume controls for Bridge and Neck pickups.
- Page 23 One master volume control and one master tone control. 1 x Pickup switch (keep original) Stereo cable: 1 x Capacitor (22nF typical) • Connect your guitar to the Quad 15 with a stereo jack cable. • Pull the “Tone control”. • Set the pickup switch to “Neck” position.
- Page 24 No tone control, pickup switch deactivated) • Select “Front” input on the Quad 15 to use the guitar with the 5-way pickup switch, one master volume control (upper) and a master tone control (mid); the way you're used to. www.roaramps.com...
- Page 25 10. T & B UBE REPLACEMENT IAS ADJUSTMENT Warning! RISK OF ELECTRIC SHOCK! Service and replacement of tubes shall be performed by qualified service personnel only! 10.1 P OWER TUBE REPLACEMENT The rear panel of the Quad15 is equipped with a small cover that can be removed to replace the two 6V6 power tubes. A stereo jack socket is placed between the tube sockets for easy access to measure bias current for the power tubes, which is done by adjusting the trimmer placed above the bias jack socket.
-
Page 26: Specifications
Max power, clipped sine wave, 8 ohm to 16 ohm load ~ 20 W Frequency response (-3 dB), internal speaker emulator load, sine 40 Hz to 20 kHz wave to return input. Website: www.roaramps.com © ROAR amplification, Copenhagen, Denmark, 2021... - Page 28 © ROAR amplification, Copenhagen, Denmark, 2021...
Need help?
Do you have a question about the Quad 15 and is the answer not in the manual?
Questions and answers