
Related Manuals for Spirit Healthcare TEE2+


Summary of Contents for Spirit Healthcare TEE2+
- Page 1 Owner’s Booklet Blood Glucose Monitoring System Large LCD No Coding Intuitive Meal icons...
- Page 2 Welcome to the TEE2 Plus Blood Glucose Monitoring System Thank you for choosing the TEE2 Plus Blood Glucose Monitoring System. The system provides you with rapid and convenient blood glucose in vitro (i.e., outside the body) diagnostic monitoring. You can obtain accurate results in just 5 seconds with a small (0.5 µL) blood sample.
- Page 3 WARNING: Turn off the Bluetooth feature in areas where the use of wireless devices is restricted, such as hospitals, some healthcare professional offices, and aeroplanes. Trademarks The Bluetooth word mark and logos are registered trademarks ® owned by Bluetooth SIG, Inc. and any use of such marks by i-SENS, Inc.
-
Page 5: Table Of Contents
Table of Contents Information Important Information: Read This First! ------------------------------------------------------- Specifications ---------------------------------------------------------------------------------------- TEE2 Plus Blood Glucose Monitoring System ------------------------------------------------ Inserting or Replacing the Batteries ----------------------------------------------------------- 10 Caring for Your System ---------------------------------------------------------------------------- 11 TEE2 Blood Glucose Test Strip ------------------------------------------------------------------- 12 TEE2 Plus Blood Glucose Meter ----------------------------------------------------------------- 14 TEE2 Plus Blood Glucose Meter Display ------------------------------------------------------- 15 Preparation Setting Up Your System --------------------------------------------------------------------------- 16... -
Page 6: Important Information: Read This First
Important Information: Read This First! For optimum safety and benefits, please read the entire manual contents before using the system. Intended use: TEE2 Plus Blood Glucose Monitoring System is used for the quantitative measurement of the glucose level in capillary whole blood as an aid in monitoring diabetes management effectively at home or in clinical settings. - Page 7 • Inaccurate results may occur in patients undergoing oxygen therapy. If you need assistance, please contact the Spirit Healthcare 24/7 Freephone Support Line at 0800 881 5423 or go to www.spirit-healthcare.co.uk. www.spirit-healthcare.co.uk 7...
-
Page 8: Specifications
Specifications Product specifications Measurement range 1.1–33.3 mmol/L Sample size Minimum 0.5 μL Test time 5 seconds Sample type Fresh capillary whole blood Calibration Plasma-equivalent Assay method Electrochemical Battery life 1,000 tests Power Two 3.0 V lithium batteries (disposable, type CR2032) Memory 1,000 test results Size... -
Page 9: Tee2 Plus Blood Glucose Monitoring System
TEE2 Plus Blood Glucose Monitoring System TEE2 Plus Blood Glucose Monitoring System includes the following items: * TEE2 Plus Blood Glucose Meter * Owner's Booklet * Quick Reference Guide * Batteries Optional items: * TEE2 Blood Glucose Test Strips * Lancets * Lancing Device * Logbook * Carrying Case... -
Page 10: Inserting Or Replacing The Batteries
Inserting or Replacing the Batteries The TEE2 Plus meter uses two 3.0 V lithium batteries. Before using the meter, check the battery compartment and insert batteries if empty. When the symbol appears on the display while the meter is in use, the batteries should be replaced as soon as possible. The test results may not be saved if the batteries run out. -
Page 11: Caring For Your System
Caring for Your System Use a soft cloth or tissue to wipe the meter exterior. If necessary, dip the soft cloth or tissue in a small amount of alcohol. Do not use organic solvents such as benzene or acetone, or household and industrial cleaners that may cause irreparable damage to the meter. -
Page 12: Tee2 Blood Glucose Test Strip
TEE2 Blood Glucose Test Strip The TEE2 Plus Blood Glucose Monitoring System measures blood glucose quickly and accurately. It automatically absorbs the small blood sample applied to the narrow edge of the strip. Contact bars Gently push the test strip, with its contact bars facing up, into the test strip port of meter Confirmation window... - Page 13 Warning! • The TEE2 Test Strips should be used only with fresh capillary whole blood samples. • Do not reuse test strips. • Do not use test strips past the expiration date. • Test strips in new, unopened vials and test strips in vials that have been opened can be used up until the expiration date printed on the test strip box and vial label if the test strips are used and stored according to its storage and handling methods.
-
Page 14: Tee2 Plus Blood Glucose Meter
Test Strip Port Insert test strip here Note: • The cable for data management software can be ordered separately. Please contact Spirit Healthcare on 0800 881 5423. • The unit of measurement is fixed and it cannot be changed by the user. -
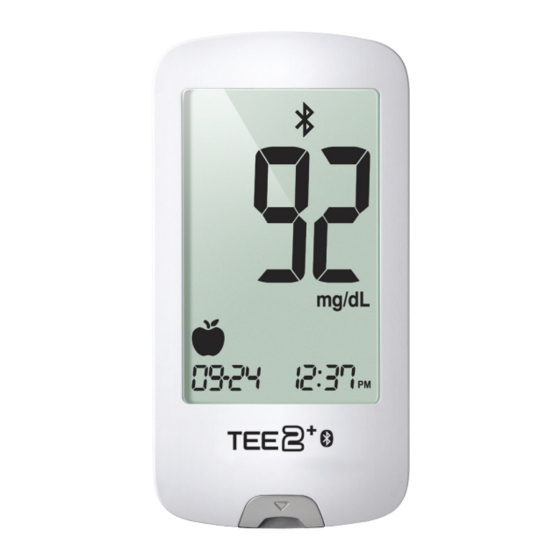
Page 15: Tee2 Plus Blood Glucose Meter Display
TEE2 Plus Blood Glucose Meter Display Test results : test results displaying panel Memory recall mode : appears when test results stored in the memory are displayed PP2 alarm : appears when the post- meal alarm has been set Bluetooth symbol Mute symbol : appears only when the sound is set to OFF... -
Page 16: Setting Up Your System
Setting Up Your System Press and hold the button for 3 seconds to enter SET mode. ● After all settings are finished, press and hold the button for 3 ● seconds to turn off the meter. Press the ▲ or ▼ button to change values. Press and hold the ▲... -
Page 17: Setting Up Bluetooth
Setting Up Bluetooth Step 2 Bluetooth Pairing If you do not want to connect your meter to your smartphone, press the button when ● the screen shows on the right. The meter will go to Step 4 Year Setting mode. Press the ▲... - Page 18 Step 3 Entering the PIN number The symbol and 'PIn' will appear if you press the ● button when the meter screen shows 'PAIr'. Launch SmartLog mobile app to start pairing the meter with your smartphone. Find the 'Accessories' menu and select the appropriate meter model on SmartLog mobile app.
- Page 19 Enter the PIN number into the SmartLog mobile app and touch 'OK'. Make sure the PIN you enter on your smartphone matches the PIN on your meter screen. When your meter and smartphone are paired and connected, the meter will display 'SUCCESS' and the saved test results will be transferred to your smartphone.
-
Page 20: Adjusting The Date And Time
Adjusting the Date and Time Step 4 Setting the Year Press the ▲ or ▼ button to adjust until the correct year appears. When the present year appears, press the button to confirm your ● selection and to go to the next step. Step 5 Setting the Month A number indicating the month will blink on... - Page 21 Step 7 Setting the Time Format The meter can be set in the AM/PM 12-hour or the 24-hour clock format. Press the ▲ or ▼ button to select a format. The • PM symbol is not displayed in the 24-hour format.
-
Page 22: Setting The Sound On/Off
Setting the Sound On/OFF Step 10 On pressing the ▲ or ▼ button, the screen will display 'On' or 'OFF'. Press the button to confirm the selection. ● The meter will beep in the following instances if set to On: •... -
Page 23: Turning On The Strip Expiration Date Indicator
Turning on the Strip Expiration Date Indicator Step 11 This setting allows you to turn the strip expiration date indicator on or off. This setting turns the function on or off only. See page 25 to set the strip expiration date. When 'EP' appears on the screen, press the ▲... -
Page 24: Turning On The Hypoglycemia (Hypo) Indicator
Turning on the Hypoglycemia (HYPo) Indicator Step 12 This setting allows you to turn the hypoglycemia indicator (possible low blood sugar) On or OFF and to select the desired level for the indicator. You will be alerted any time your test result is lower than the selected level. -
Page 25: Setting The Strip Expiration Date Indicator
Setting the Strip Expiration Date Indicator Step 1 Entering the Expiration Date Setting Press and hold the ▲ and ▼ buttons at the same time for 3 seconds to enter the expiration date settings. After all segments flash across the screen, 'EP' will show up. Note: The strip expiration date is printed on the test strip vial. -
Page 26: Checking The System
Checking the System You may check your meter and test strips using the TEE2 Control Solution (control A and/or B). The TEE2 Control Solution contains a known amount of glucose and is used to check that the meter and the test strips are working properly. The test strip vials have TEE2 Control Solution ranges printed on their labels. -
Page 27: Control Solution Testing
You may do a control solution test: • When you want to practice the test procedure using the control solution instead of blood, • When using the meter for the first time, • Whenever you open a new vial of test strips, •... - Page 28 Step 3 Shake the bottle before each test. Remove the cap and squeeze the bottle to discard the first drop. Then wipe the tip with a clean tissue or cloth. Dispense a drop of control solution onto a clean non-absorbent surface. It helps to squeeze a drop onto the top of the cap as shown.
- Page 29 The range printed on the test strip vial is for the TEE2 Control Solution only. It has nothing to do with your blood glucose level. Note: The TEE2 Control Solution can be purchased separately. Please contact Spirit Healthcare on 0800 881 5423. www.spirit-healthcare.co.uk 29...
-
Page 30: Comparing The Control Solution Test Results
Comparing the Control Solution Test Results The test result of each control solution should be within the range printed on the label of the test strip vial. Repeat the control solution test if the test result falls outside of the range. Out of range results may occur in following situations: Situations Do This... -
Page 31: Using The Lancing Device
Using the Lancing Device You will need a lancing device in order to collect a blood sample. You may use the lancing device that is included in the TEE2 Plus Blood Glucose Monitoring System or any other medically approved lancing device. Lancet Holder Ejection System Sliding Barrel... -
Page 32: Preparing The Lancing Device
Preparing the Lancing Device Step 1 Wash hands and sample site with soap and warm water. Rinse and dry thoroughly. Step 2 Unscrew and remove the lancing device tip. Step 3 Firmly insert a new lancet into the lancet holder. Hold the lancet firmly. Gently twist to pull off protective disk. - Page 33 Step 5 The lancing device has seven puncture depth settings, numbered 1 through 7 (1 for a shallow puncture, 7 for a deeper puncture). Choose a depth by rotating the top portion of the adjustable tip until the desired number aligns with the arrow. Note: 1 = least penetration of lancet into the skin.
-
Page 34: Preparing The Meter And Test Strip
Preparing the Meter and Test Strip Step 7 Insert a test strip with the contact bars facing upwards into the meter’s test strip port. Push the strip in gently until the meter beeps. Be careful not to bend the test strip. The symbol will appear on the screen. - Page 35 Step 9 After the symbol appears on the screen, apply the blood sample to the narrow end of the test strip till the meter beeps. If the confirmation window is not filled in time because of abnormal viscosity (thickness and stickiness) or insufficient volume, the Er4 message may appear.
- Page 36 Step 10 Apply the blood sample to the narrow end of the test strip until you hear a ‘beep’. At this time, the display segments will rotate clockwise while the blood is going in. The test result will appear after the meter counts down from 5 to 1.
- Page 37 Step 11 You can attach a flag to a result to indicate particular situations while the strip is still in the meter. When the result is displayed right after a test, press the ▲ or ▼ button to select a pre-meal flag ( ), a post-meal flag ( ), a fasting flag ( ), or a control solution flag ( ).
-
Page 38: Discarding Used Lancets
Discarding Used Lancets Step 1 Unscrew the lancing device tip. Step 2 Stick the lancet into the saved protective disk. Push the lancet ejector forward with the thumb to dispose of the used lancet in a proper biohazard container. Caution: The lancet is for single use only. -
Page 39: Alternate Site Testing
Alternate Site Testing What is AST (Alternate Site Testing)? Usually, we take the blood sample from the tip of the finger. However, since there are many nerve endings in the fingertip, it can be quite painful.When doing a glucose test, using different parts of the body such as the forearms and palms can reduce the pain during testing. - Page 40 Things to Know When Using AST Please read the following before testing at alternate sites (forearms and palms). The capillary whole blood of the fingertips reflects changes in glucose levels more rapidly than in alternate sites. The test results from the fingertip testing and AST may differ due to factors such as lifestyle and ingested food which affect glucose levels.
- Page 41 AST Precautions • Before using AST, please consult your healthcare professional. • Do not ignore the symptoms of hyperglycemia or hypoglycemia. • When the results of the test do not reflect your opinion, retest using the fingertip test. If the fingertip result still does not reflect the way you feel, please consult your healthcare professional.
-
Page 42: Hi And Lo Messages
If 'Lo' is displayed again upon retesting, please contact your healthcare professional immediately. Note: Please contact the Spirit Healthcare 24/7 Freephone Support Line at 0800 881 5423 or go to www.spirit-healthcare.co.uk, if such messages are displayed even if you do not have hyperglycaemia or hypoglycaemia. -
Page 43: Target Blood Glucose Ranges
SmartLog software and cable. The meter screen displays 'Pc' when it is connected to the computer using the data cable. For more information, contact the Spirit Healthcare 24/7 Freephone Support Line at 0800 881 5423 or go to www.spirit-healthcare.co.uk. -
Page 44: Meter Memory
Meter Memory The TEE2 Plus meter can save up to 1,000 glucose test results with time and date. If the memory is full, the oldest test result will be deleted and the latest test result will be stored. The meter calculates and displays the averages of total test results, Pre-meal ( ) test results, Post-meal test ( ), and Fasting test results (... - Page 45 Step 3 Viewing Pre-meal Averages Repeatedly press the button ▲ ▲ button to view 1, 7, 14, Pre-meal 30 and 90-day average average values and the number (1, 7, 14, 30, 90 of tests performed pre- days) meals with the symbol for the last test period.
- Page 46 Step 6 Use the ▼ button to scroll back through the averages seen previously. Press the button to turn off the meter. ● Note: The control solution test results saved with the symbol are not included in the averages. 46 www.i-sens.com...
-
Page 47: Viewing Test Results Stored In Memory
Viewing Test Results Stored in Memory Step 1 Press any button to turn the meter on. The current date and time will be displayed on the bottom of the screen followed by the 1 day average value and the number of the test results saved within the current day. -
Page 48: Setting The Alarm Function
Setting the Alarm Function Four types of alarms can be set in the TEE2 Plus Meter: one post-meal alarm (PP2 alarm) and three time set alarms (alarm 1–3). The PP2 alarm goes off 2 hours after setting the alarm. The alarms ring for 15 seconds and can be silenced by pressing any button or by inserting a test strip. - Page 49 Step 2 Turning the PP2 alarm OFF To turn off the PP2 alarm, press and hold the ▲ button for 3 seconds. ‘PP2’ , bell ( ) symbol and ‘OFF’ will appear on the screen. Then the screen will change automatically to the memory recall mode without bell ( symbol displayed.
-
Page 50: Setting The Time Alarms (Alarm 1-3)
Setting the Time Alarms (alarm 1–3) Step 1 Without inserting a test strip, press the ▲ and buttons simultaneously for ● 3 seconds to enter the time alarm settng. 'alarm 1' will be displayed while ‘OFF’ blinks on the screen. Step 2 On pressing the ▼... - Page 51 Step 4 On pressing the ▲ button, the number indicating the minute will start blinking. Press the ▼ button to set the minute. Step 5 Press the button to finish and to go to ● 'alarm 2' settng. Repeat steps 2 to 4 to set the remaining time alarms (alarm 2–3).
-
Page 52: Understanding Error Messages
Understanding Error Messages A used test strip was inserted. > Repeat the test with a new test strip. The blood or control solution sample was applied before the symbol appeared. > Repeat the test with a new test strip and wait until the symbol appears before applying the blood or control... - Page 53 Spirit Healthcare 24/7 Freephone Support Line at 0800 881 5423 or go to www.spirit-healthcare.co.uk. Note: If the error messages persist, contact the Spirit Healthcare 24/7 Freephone Support Line at 0800 881 5423 or go to www.spirit-healthcare.co.uk. www.spirit-healthcare.co.uk 53...
-
Page 54: General Troubleshooting
General Troubleshooting Troubleshooting Problem • Check whether the test strip is inserted with the contact bars facing up. Check if the strip has been inserted completely into the The display is blank test strip port. even after inserting • Check if the appropriate test strip a test strip. -
Page 55: Performance Characteristics
Performance Characteristics System Accuracy and Measurement Precision The performance of TEE2 Plus Blood Glucose Monitoring System has been evaluated in laboratory and in clinical tests. Accuracy: The accuracy of the TEE2 Plus Blood Glucose Monitoring System (Model GM01BAC) was assessed by comparing blood glucose results obtained by patients with those obtained using a YSI Model 2300 Glucose Analyzer, a laboratory instrument. - Page 56 System accuracy results for glucose concentrations between 2.2 mmol/L and 26.0 mmol/L Within ±0.83 mmol/L and Within ±15 % 599/600 (99.8 %) Precision: The precision studies were performed in a laboratory using TEE2 Plus Blood Glucose Monitoring Systems. Within Run Precision 2.3 mmol/L SD = 0.1 mmol/L 4.7 mmol/L...
-
Page 57: Influence Quantities
Influence Quantities Packed cell volume (Hematocrit) Packed cell volume evaluation was conducted in various hematocrit levels. The range of hematocrit levels within the acceptance criteria is 15–65 %. Interferences The effect of various interfering substances was evaluated in whole blood samples. The presence of the following substances within the given concentrations does not affect blood glucose measurements. -
Page 58: User Performance Evaluation
Interferent Concentration Hydrocortisone 1 mg/dL Ibuprofen 40 mg/dL Icodextrin 2 mg/dL L-Dopa 5 mg/dL (L-3,4-dihydroxyphenylalanine) Maltose 1000 mg/dL Mannitol 600 mg/dL Methyl-DOPA 1.5 mg/dL Pralidoxime Iodide (PAM) 25 mg/dL Salicylate 60 mg/dL Tolbutamide 100 mg/dL Tolazamide 100 mg/dL Triglycerides 3000 mg/dL Uric acid 20 mg/dL Xylose... -
Page 59: Warranty Information
Warranty Information Manufacturer’s Warranty i-SENS, Inc. warrants that the TEE2 Plus Meter shall be free of defects in material and workmanship in normal use for a period of five (5) years. The meter must have been subjected to normal use. The warranty does not cover improper handling, tampering, use, or service of the meter. - Page 60 MEMO 60 www.i-sens.com...
- Page 61 MEMO www.spirit-healthcare.co.uk 61...
- Page 62 MEMO 62 www.i-sens.com...
- Page 63 MEMO www.spirit-healthcare.co.uk 63...
- Page 64 MEMO 64 www.i-sens.com...
- Page 65 MEMO www.spirit-healthcare.co.uk 65...
- Page 66 MEMO 66 www.i-sens.com...
- Page 67 • No part of this document may be reproduced in any form or by any means without the prior written consent of i-SENS. • The information in this manual is correct at the time of printing. However, i-SENS reserves the right to make any necessary changes at any time without notice as our policy is one of continuous improvement.
- Page 68 Visit the webpage below to see supported devices/ download app (scan the QR code for easy access). www.i-sens.com/smartlog Spirit Healthcare Ltd. Spirit House, Saffron Way, Off Saffron Lane, Leicester, LE2 6UP Customer Support Tel : 0800 881 5423 www.spirit-healthcare.co.uk i-SENS, Inc.
Need help?
Do you have a question about the TEE2+ and is the answer not in the manual?
Questions and answers