Table of Contents
Advertisement
Quick Links
Advertisement
Table of Contents

Summary of Contents for Swift PGM EVK
- Page 1 PGM EVK User Manual Revision 4.0 UM-110007-04 12-14-2021...
-
Page 2: Table Of Contents
PGM EVK User Manual / UM-110007-04 ________________________________________________________________________________________________________________________________________________________________ Table of Contents Table of Contents Introduction Firmware Version & Updates Technical Support Used Acronyms PGM EVK Contents EVP Overview Connections Operating Conditions Power GNSS Antenna Initial PGM EVP Setup Connecting Antennas & Power... - Page 3 PGM EVK User Manual / UM-110007-04 ________________________________________________________________________________________________________________________________________________________________ Vehicle Installation Mounting The PGM EVP Starling Vehicle Settings Vehicle Signals Logging Data Using Swift Console NMEA Output Appendices Appendix A - Firmware Update Option 1: Automated Procedure Option 2: Manual Procedure Appendix B - Starling License Activation...
-
Page 4: Introduction
This document provides complete setup, configuration, and operating details for Swift Navigation’s Precision GNSS Module (PGM) Evaluation Kit (EVK). A PGM EVK Quick Start Guide is also available for a quick and basic initial setup of your PGM EVK. You can Support > Products > Precision GNSS Module (PGM) > Quick... -
Page 5: Firmware Version & Updates
Technical Support This manual describes the operation of the PGM EVP running software package version 1.6.0. For additional information about using the PGM EVK, FAQs, or to request assistance, please visit support.swiftnav.com/ Used Acronyms Like any technical product, many acronyms are used. For clarity and convenience, the following are the Swift-specific acronyms used within this User Manual. -
Page 6: Pgm Evk Contents
PGM EVK User Manual / UM-110007-04 ________________________________________________________________________________________________________________________________________________________________ PGM EVK Contents The PGM EVK includes everything needed to setup and start evaluating the performance of Swift’s location technology. Included with your PGM EVK are the following items. Figure 2: PGM EVK Contents 1. -
Page 7: Evp Overview
________________________________________________________________________________________________________________________________________________________________ EVP Overview The PGM EVK features Swift’s PGM Evaluation Platform (EVP) consisting of a Swift mPCIe format PGM receiver (with integrated IMU and CAN / wheel tick odometry support) installed in an OnLogic IoT computer that hosts Swift’s Starling positioning engine. The PGM EVP provides real-time precision GNSS and IMU measurements and provides a turn-key platform that can be used to evaluate the performance of Swift’s PGM... -
Page 8: Operating Conditions
PGM EVK User Manual / UM-110007-04 ________________________________________________________________________________________________________________________________________________________________ Figure 4: PGM EVP connectors (continued) 1. 12 V power supply. 2.5/5.5 mm barrel jack connector, positive in the center 2. USB 2.0 port connector 3. RS232 serial port connector (use adapter cable for DB 9 connector) 4. -
Page 9: Gnss Antenna
PGM EVK User Manual / UM-110007-04 ________________________________________________________________________________________________________________________________________________________________ GNSS Antenna PGM EVP requires an active GPS/Galileo/BeiDou L1/L5 antenna. In the kit, an Amotech L1/L5 antenna is included for evaluation. The EVP provides 3.3 V antenna bias voltage through the SMA antenna connector (max. -
Page 10: Connecting A Computer To The Pgm Evp
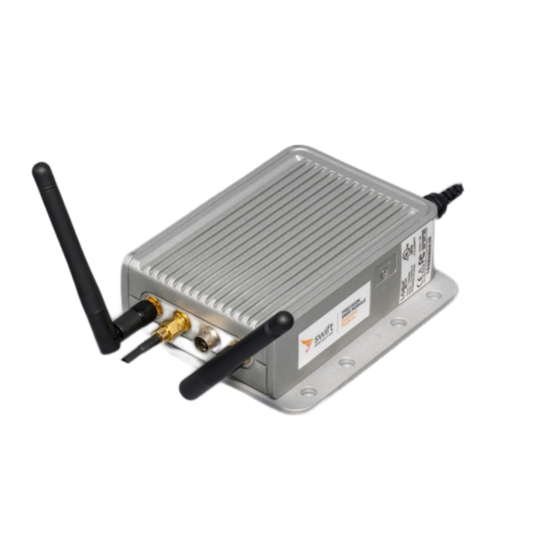
PGM EVK User Manual / UM-110007-04 ________________________________________________________________________________________________________________________________________________________________ Figure 5: PGM EVP with GNSS antenna, Wi-Fi antennas, & power 1. Amotech GNSS L1/L5 magnet-mount antenna 2. Wi-Fi Antennas 3. PGM Evaluation Platform (EVP) 4. Power Supply (12V) Connecting A Computer To The PGM EVP In order to monitor the operation of the PGM EVP, it must be connected to a computer. - Page 11 PGM EVK User Manual / UM-110007-04 ________________________________________________________________________________________________________________________________________________________________ To connect directly to the PGM EVP via Wi-Fi from your computer: 1. Apply power to the PGM EVP if not done so already. Within approximately 3 minutes from power up, the PGM EVP will create a Wi-Fi network access point named SwiftNav-PEP-xxxx, where the last 4 digits of the network name are the last 4 digits of the serial number of the platform.
-
Page 12: Ethernet Connection
1. Connect the EVP’s ethernet port to the modem/router using the ethernet cable provided. 2. Power-up the PGM EVP and wait 3 minutes for boot-up. 3. You will now need to find the IP address of PGM EVP for use with Swift Console. There are two common ways of doing this: a. -
Page 13: Monitoring Pgm Evp Using Swift Console
You should now be connected to the PGM EVP and have the IP address needed to be used with Swift Console. NOTE: The PGM EVP Ethernet network can also be set to static IP if required for networks without a DHCP server. -
Page 14: Connecting Pgm Evp To The Swift Console
PGM EVK User Manual / UM-110007-04 ________________________________________________________________________________________________________________________________________________________________ Connecting PGM EVP To The Swift Console To connect Swift Console to your PGM EVP either directly using the Wi-Fi or through Ethernet: 1. Launch Swift Console. The Swift Console interface selection dialog will appear. - Page 15 PGM EVK User Manual / UM-110007-04 ________________________________________________________________________________________________________________________________________________________________ Figure 11: Swift Console tracking window For full details and operation of the Swift Console, refer to the Swift Console User’s Guide. The Swift Console User’s Guide can be found at Swift Console User's Guide.
-
Page 16: Accessing The Pgm Evp To Configure & Change Settings
PGM EVK User Manual / UM-110007-04 ________________________________________________________________________________________________________________________________________________________________ Accessing The PGM EVP To Configure & Change Settings The PGM EVP consists of an OnLogic IoT computer which runs Linux. The terminal of the Linux OS must be accessed in order to configure the operational aspects of the PGM EVP including configuring Starling and setting up internet access. - Page 17 PGM EVK User Manual / UM-110007-04 ________________________________________________________________________________________________________________________________________________________________ To SSH into the PGM EVP using Windows: 1. Download and install the SSH client PuTTY. 2. Launch PuTTY and open a connection to the PGM EVP by entering the IP address as shown in the figure below.
-
Page 18: Ssh Into The Pgm Evp Using Macos / Linux
PGM EVK User Manual / UM-110007-04 ________________________________________________________________________________________________________________________________________________________________ Figure 13: PuTTY terminal window after connecting to the PGM EVP You are now connected to the PGM EVP and can configure and change settings of the PGM EVP through SSH. SSH Into the PGM EVP Using MacOS / Linux The terminal application that comes with MacOS has a built-in SSH client and can be used to SSH into the PGM EVP. -
Page 19: Accessing The Pgm Evp Directly With Keyboard & Monitor
________________________________________________________________________________________________________________________________________________________________ Figure 14: Terminal window after connecting to the PGM EVP You are now connected to the PGM EVK and can configure and change settings of the PGM EVP through SSH. Accessing The PGM EVP Directly With Keyboard & Monitor A simple way of getting access to the Linux terminal on the PGM EVP is to connect a monitor and a keyboard directly to the unit itself. -
Page 20: Directory Of Files
PGM EVK User Manual / UM-110007-04 ________________________________________________________________________________________________________________________________________________________________ To access the Linux terminal using a monitor and keyboard: 1. Connect a monitor to the HDMI port on the PGM EVP using the provided HDMI cable. 2. Connect a USB keyboard to any one of the USB ports on the PGM EVP. -
Page 21: Internet Access Using Ethernet
PGM EVK User Manual / UM-110007-04 ________________________________________________________________________________________________________________________________________________________________ Internet Access Using Ethernet The PGM EVP’s ethernet interface is configured as DHCP, thus connecting the ethernet port on the EVP to a modem/router (DHCP server) with internet access will automatically connect the PGM EVP to the internet. -
Page 22: Internet Access Using Wi-Fi
To connect the PGM EVP to the internet using Wi-Fi, you must edit Wi-Fi configuration scripts that are resident on the PGM EVP. This is done either through SSH or a connected keyboard and monitor. Please see the chapter Accessing The PGM EVK To Configure & Change Settings for details on connecting to the PGM EVK. - Page 23 PGM EVK User Manual / UM-110007-04 ________________________________________________________________________________________________________________________________________________________________ To connect the PGM EVP to the internet using Wi-Fi: 1. Use the wifi-list.sh script to view the networks currently visible by the PGM EVP. This is done by entering the command ./wifi-list.sh and pressing ENTER.
- Page 24 PGM EVK User Manual / UM-110007-04 ________________________________________________________________________________________________________________________________________________________________ Figure 19: Editing the Wi-Fi channel of the PGM EVP Use the arrow keys on your keyboard to scroll down and edit the channel number in the line section band bg channel 1 password swiftnav. After you have entered the correct channel number press Ctrl+x to exit and then Y to save the changes.
-
Page 25: Applying Skylark Corrections
Skylark Portal User's Guide for instructions on how to set-up your account and obtain credentials. With the purchase of the PGM EVK, an email is sent containing a promo-code for a free 6 month Skylark subscription with 1 device. Note: The PGM EVK ships with a demo Skylark account already configured. This account is temporary and should be replaced with credentials obtained from the Skylark Portal. - Page 26 PGM EVK User Manual / UM-110007-04 ________________________________________________________________________________________________________________________________________________________________ To configure Starling for Skylark corrections: starling-edit.sh 1. Use the script to open the Starling configuration file for editing. This is done by entering the command ./starling-edit.sh and pressing ENTER. This will open the Starling configuration file and allow you to edit the Skylark credentials: host address, ntrip-username, and ntrip password.
- Page 27 PGM EVK User Manual / UM-110007-04 ________________________________________________________________________________________________________________________________________________________________ 4. Open Swift Console and ensure observations from Skylark are arriving and used to compute a RTK position. Observations from Skylark will be listed in the Remote section under the Observations tab. Figure 21: Swift Console with observations from Skylark...
-
Page 28: Vehicle Installation
PGM EVK User Manual / UM-110007-04 ________________________________________________________________________________________________________________________________________________________________ Vehicle Installation The PGM EVP uses an integrated Inertial Measurement Unit (IMU) to provide continual high-precision positioning in areas with reduced GNSS satellite visibility. It can also take advantage of vehicle sensor inputs. - Page 29 PGM EVK User Manual / UM-110007-04 ________________________________________________________________________________________________________________________________________________________________ Record lever arm X, Y and Z vectors after installation. Measure along X, Y and Z axes from the orange dots printed on the PGM EVP enclosure to the center of the antenna.
-
Page 30: Vehicle Signals
Figure 23: VSS input for the PGM EVP OBDII Vehicle Speed Signal (VSS) Generators application notes on the Swift Support portal shows a list of available VSS generators compatible and tested with the PGM EVP. Evaluation kit includes a M8 connector to pigtails cable for optional vehicle signals. -
Page 31: Logging Data Using Swift Console
Logging Data Using Swift Console It is possible to log data from the PGM EVK for the purpose of additional analysis and evaluation. The Swift Console allows data logging of the raw SBP stream or SBP.JSON data stream. To log data using Swift Console: 1. -
Page 32: Appendices
After the download the script will also ask to perform the installation. Option 2: Manual Procedure 1. Download the latest PGM EVK system update tarball from Swift Navigation using one of the following methods: ○ Download directly to the PGM EVK platform with command... - Page 33 PGM EVK User Manual / UM-110007-04 ________________________________________________________________________________________________________________________________________________________________ ○ Download the update (e.g. pgm-evp-onlogic-files-v1.6.0.tar.gz) from Swift Navigation Support portal and copy it (SCP) to the new directory, e.g. /home/swiftnav/update 2. Untar the file with command tar -xvf pgm-evp-onlogic-files-v1.6.0.tar.gz 3. Run ./install-update.sh script.
-
Page 34: Appendix B - Starling License Activation
The license activation process must be performed only once during the first execution of Starling. In order to activate a licence, the user must obtain a so-called guard file and an activation code from Swift Navigation. The device hosting Starling must have access to the Internet to perform the activation procedure. -
Page 35: Appendix C - Orientation Settings
PGM EVK User Manual / UM-110007-04 ________________________________________________________________________________________________________________________________________________________________ Appendix C - Orientation Settings Use the worksheet below to determine corresponding euler angles for the Starling orientation settings ( rotation-sensor-vehicle-degrees ). Angles are in degrees. X: Forward X: Right X: Backward X: Left... -
Page 36: Appendix D - Configuration Files And Directory
PGM EVK User Manual / UM-110007-04 ________________________________________________________________________________________________________________________________________________________________ Appendix D - Configuration Files and Directory Configuration files are saved in the home directory as shown below: Figure 24: Home directory files Note: Instead of using the command line SSH interface you can also use a program like WinSCP (on Windows) to edit configuration files using the GUI interface. -
Page 37: Control Scripts
- stream to stream routing program (binary) Home Directory: check-for-updates.py - Checks and downloads PGM EVK software update version.yaml - EVK files version information Control Scripts The following shell scripts are provided for convenience for common operations over SSH: eth-edit.sh... -
Page 38: Appendix E - Other Available Software Tools
Appendix E – Other Available Software Tools Collected log files can be converted and visualized using Woodpecker Log Utility or sbp2report tool. Instead of Swift Console, a Drongo Maps program can be used to display position in real time. Woodpecker Log Utility... -
Page 39: Appendix F - Hardware Specifications
PGM EVK User Manual / UM-110007-04 ________________________________________________________________________________________________________________________________________________________________ Appendix F – Hardware Specifications Dimensions are in mm. Page 39... -
Page 40: Appendix G - Related Information
> Products > Starling PGM Evaluation Kit Software support.swiftnav.com > General > Downloads > PGM Evaluation Kit Software Swift Console support.swiftnav.com > General > Downloads > Swift Console Swift Tools support.swiftnav.com > General > Downloads > Tools Onlogic Device www.onlogic.com/cl200g-11/...
Need help?
Do you have a question about the PGM EVK and is the answer not in the manual?
Questions and answers