Table of Contents
Advertisement
Quick Links
Advertisement
Table of Contents

Summary of Contents for Omnicomm PORT
- Page 1 Omnicomm PORT Automatic Data Acquisition Module User Manual 20.11.2021...
-
Page 2: Table Of Contents
Omnicomm PORT Module Data Transfer via Wi-Fi to the Communication Server Data Transfer via Mobile Networks Data Receipt via Wi-Fi from the Omnicomm Profi Wi-Fi Terminals Connection to the Communication Server Access to Omnicomm PORT Settings Access to the Settings of Data Transfer to the LCS... -
Page 3: General Information
Omnicomm Profi Wi-Fi terminals and data transfer to the Communication Server when connected to the Internet. Main functions: data collection from Omnicomm Profi Wi-Fi terminals version 2.0 and up using the Wi- Fi network data storage in non-volatile memory... - Page 4 General Information...
-
Page 5: Technical Specifications
From + 9 to + 36 V Power consumption, max 120 W Data Collection Time of archive downloading from the 2 min ¹ Omnicomm Profi Wi-Fi reading, not more than Archive size Storing data from 200 vehicles (at least 1 month) - Page 6 Wi-Fi 2.4 GHz, 5 GHz ¹ Depends on the distance between the terminal and Omnicomm PORT, channel load, line of sight, and antenna type. To ensure a reliable connection with terminals at a distance of more than 50 meters, it is recommended to connect external Wi-Fi antennas...
-
Page 7: Installation
PIN, following the phone's operating instructions. SIM card insertion procedure: Remove the 6 screws with a 3mm hex screwdriver from the base of the Omnicomm PORT and remove the cover: Remove the screw securing the protective plate... -
Page 8: Antennas
To ensure connection to terminals at a distance of more than 50 m, it is recommended to install onto Omnicomm PORT external Wi-Fi antennas AX-2408R (provided that Profi Wi- Fi terminals are equipped with an external Wi-Fi antenna “TRIADA - MA 2435 SOTA”. -
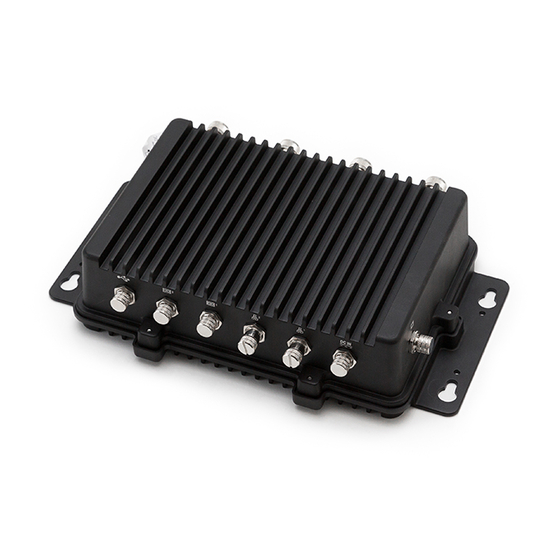
Page 9: Omnicomm Port Module
The Omnicomm PORT Automatic Data Acquisition Module can be installed either inside or outside a vehicle. If installing the module on the inside, mount the external Wi-Fi antennas outside the vehicle. Omnicomm PORT must be installed on a flat surface. If using screws, drill holes as shown in the drawing:... -
Page 10: Setting
2. Start your laptop and turn on Wi-Fi 3. Connect to the Wi-Fi network. Default network name – “Mobile-CS”, default password – “Mob1Com2Ser3” 4. In the browser, enter the Omnicomm PORT setting interface address. Default value – 192.168.5.100:8088. A window will open: Default values: “Login”... -
Page 11: Data Transfer Via Wi-Fi To The Communication Server
Configure the settings of the available Wi-Fi access point that will be used to transmit data to the communication server. In the section “Access point for Omnicomm PORT”: Open the 2.4 GHz or 5 GHz tab, depending on the frequency of the Wi-Fi access point “Network selection”... -
Page 12: Data Transfer Via Mobile Networks
In order to transfer data, collected by PORT in 1 day by from 30 terminals to the CS within no more than 1 hour, the Internet channel must meet the following requirements:... - Page 13 Setting Configure the settings of the Omnicomm PORT Wi-Fi access point, which will be used to receive data from Omnicomm Profi Wi-Fi terminals. If the IP address is changed, the address of the Omnicomm PORT setup interface will change to the set address.
-
Page 14: Connection To The Communication Server
“CS 1 IP address or domain name” – enter IP address or domain name of the communication server. Default value – cs.omnicomm.ru “Port” – specify the port to be used by the terminal to connect to the communication server. Default value – 5445 Access to Omnicomm PORT Settings “Login”... -
Page 15: Setting Storage Time
To configure the settings in the Omnicomm Profi Wi-Fi 3.0 terminal when you connect to Omnicomm PORT for the first time, add the terminal ID, vehicle name, and password to the table. Password - the terminal's password for access to the remote configuration server. -
Page 16: Selecting The Loading Mode
Setting Selecting the Loading Mode Omnicomm PORT supports two modes of data loading depending on the available Internet connection speed. Check the “Use with slow connection” box if your Internet connection to the CS does not provide a response time (ping) of less than 150 ms, a download speed greater than 100 Kbps and a packet loss of less than 20%. - Page 17 Setting Check the “Transfer to the CS on timer” box. Ensure that the values in the fields “CS1 IP address or domain name” and “Port” correspond to those indicated in the section Connecting to the communication server...
-
Page 18: Firmware Update
3. Format the USB flash drive with the FAT 32 file system IMPORTANT! Full flash drive formatting is required. Insert the USB flash drive into the USB port of the PC In the File Explorer window on your PC, select the USB flash drive, right-click, and select... - Page 19 Setting Set the following formatting parameters: “File system” – select “FAT32 (default)” “Allocation unit size” – select “Standard cluster size” кластера» “Formatting methods” – uncheck “Quick (clean the table of contents)” Click the “Start” button and wait for the formatting to finish. 4.
- Page 20 In Windows, click the USB icon in the system tray and select “Safely Remove Hardware”. In Linux, use the sync command. 7. Turn off Omnicomm PORT by pressing the power button: 8. Connect the USB flash drive to Omnicomm PORT using the USB cable provided:...
- Page 21 9. Turn on Omnicomm PORT by pressing the power button. The firmware update will start automatically and takes about 10 minutes Do not disconnect Omnicomm Port and the USB cable (USB flash drive) until the update is completed 10. When the Omnicomm Port update process is completed, you will hear five short...
- Page 22 Setting Remove the USB flash drive to avoid running the update again. 11. Turn on Omnicomm PORT by pressing the power button. Ensure that the firmware version number is 1.3.1 Firmware version number: 12. Set up Omnicomm PORT and import archive data if necessary Archive data export In the browser, enter the address of the local communication server.
-
Page 23: Omnicomm Profi Wi-Fi Terminal
Omnicomm Profi Wi-Fi Terminal To achieve the highest speed and distance of data transmission, it is recommended to equip Omnicomm Profi Wi-Fi terminals with an external Wi-Fi antenna "TRIADA - MA 2435 SOTA". Connect the Omnicomm Profi Wi-Fi terminal to a PC. - Page 24 To transfer data to the CS: “IP address” – 192.168.5.100. “Port” – 9977. “Protocol” – Omnicomm. If the default values have been changed, set the values as indicated in the section Data receipt via Wi-Fi from the Omnicomm Profi Wi-Fi terminals...
- Page 25 www.omnicomm-world.com...
Need help?
Do you have a question about the PORT and is the answer not in the manual?
Questions and answers